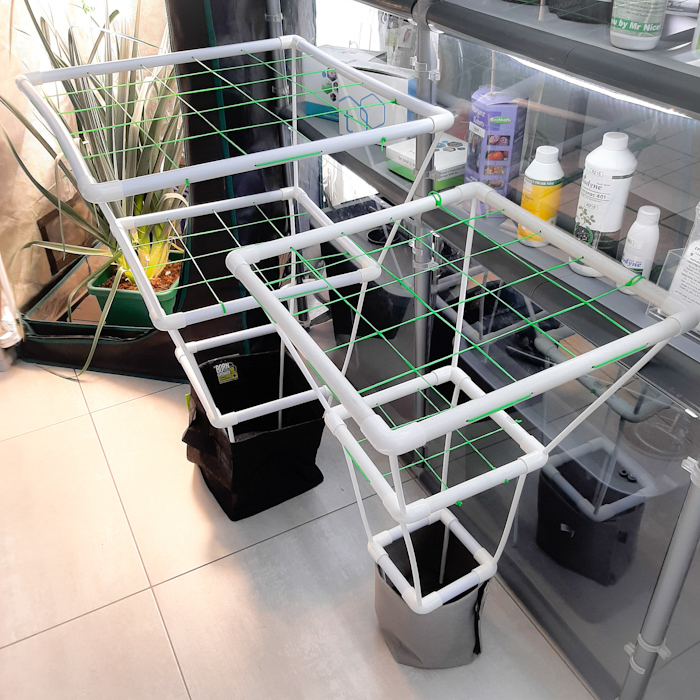
Pot SCROG Scrog Frames – One pot, one scrog frame! These per-pot plant support trellis frames enable you to train and support your plants while still being able to move them in and out of your grow tent or grow area whenever you want to.
Pot SCROG Scrog Frames are available from Hydroponic.co.za in 2 sizes:
Large, for 15lt pots or larger:
Top square frame is approx. 55 x 55 cm
Distance between top and bottom square is approx. 60 cm
The large frame is made so that 4 frames can be put into a 1.2 x 1.2 m grow tent.
Medium, for 5lt pots or larger:
Top square frame is approx. 43 x 43 cm
Distance between top and bottom square is approx. 54 cm
The large frame is made so that 4 frames can be put into a 1 x 1 m grow tent.
Growers who like to train and scrog (“Screen of Green”) their plants often get frustrated when their plants become unmovable, being tied to netting that is attached to a growing table or to grow tent frames, as this often makes trimming, defoliating, foliar spraying, flushing, pest identification and pest control hard if not impossible to do with ease.
With Pot SCROG Scrog Frames, each plant can be beautifully trained and levelled and still be easily moved outside for a good flush or onto a table for an easy trim or foliar treatment.
These frames ship in flat-packs, saving shipping fees and are quickly and easily assembled on site, as each frame’s scrogging grid is already woven into the frame
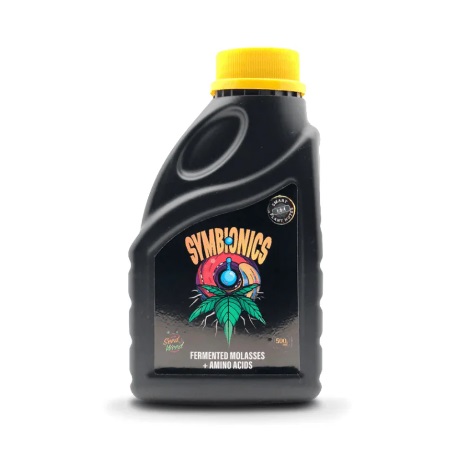
Bud Juice Symbionics: Fermented molasses and amino acids
Symbionics is an instant food source for your substrate’s microbial populations – designed specifically to promote the cycle of nutrient uptake in all crops, Symbionics not only contains beneficial sugars, but Potassium and & essential amino acids as well.
Used during vegetative and flowering stages.
Bud Juice Symbionics directions:
Shake well before use. Use within 24 hours of mixing
Seedlings: 0.5 ml/lt once per week
Vegetative Stage: 1 – 2 ml/lt once per week
Flowering Stage: 2 – 3 ml/lt once per week
More on Aminos…
Amino acids play a pivotal role in the growth and development of plants. Due to their fundamental importance, plants have evolved efficient mechanisms for digesting amino acids. In fact, plants possess various enzymes and transport systems specialized for the uptake and utilization of amino acids from the surrounding soil solution. This efficient digestion ensures that plants can readily access the essential building blocks required for synthesizing proteins, enzymes, and other vital molecules necessary for their growth. For plant growers, utilizing the digestibility of amino acids by plant is beneficial, as it easily improves the overall health and vigor of their plants.
Amino acids facilitate rapid growth and development, allowing plants to reach their full potential in terms of size and yield. Additionally, amino acids contribute to enhanced stress tolerance, enabling plants to withstand environmental pressures such as heat, drought, or disease more effectively. Moreover, easily digested amino acids can improve overall nutrient uptake, ensuring that plants have access to essential nutrients necessary for optimal growth. Overall, incorporating amino acids into the nutrient regimen can lead to healthier, more robust plants with improved yields, ultimately satisfying the goals of growers aiming for top-quality harvests.
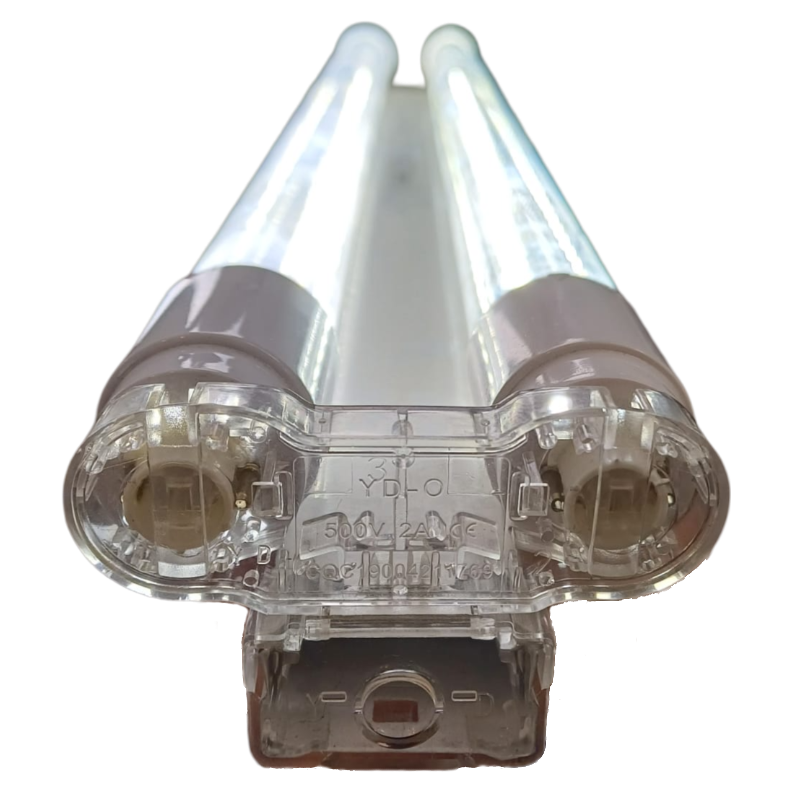
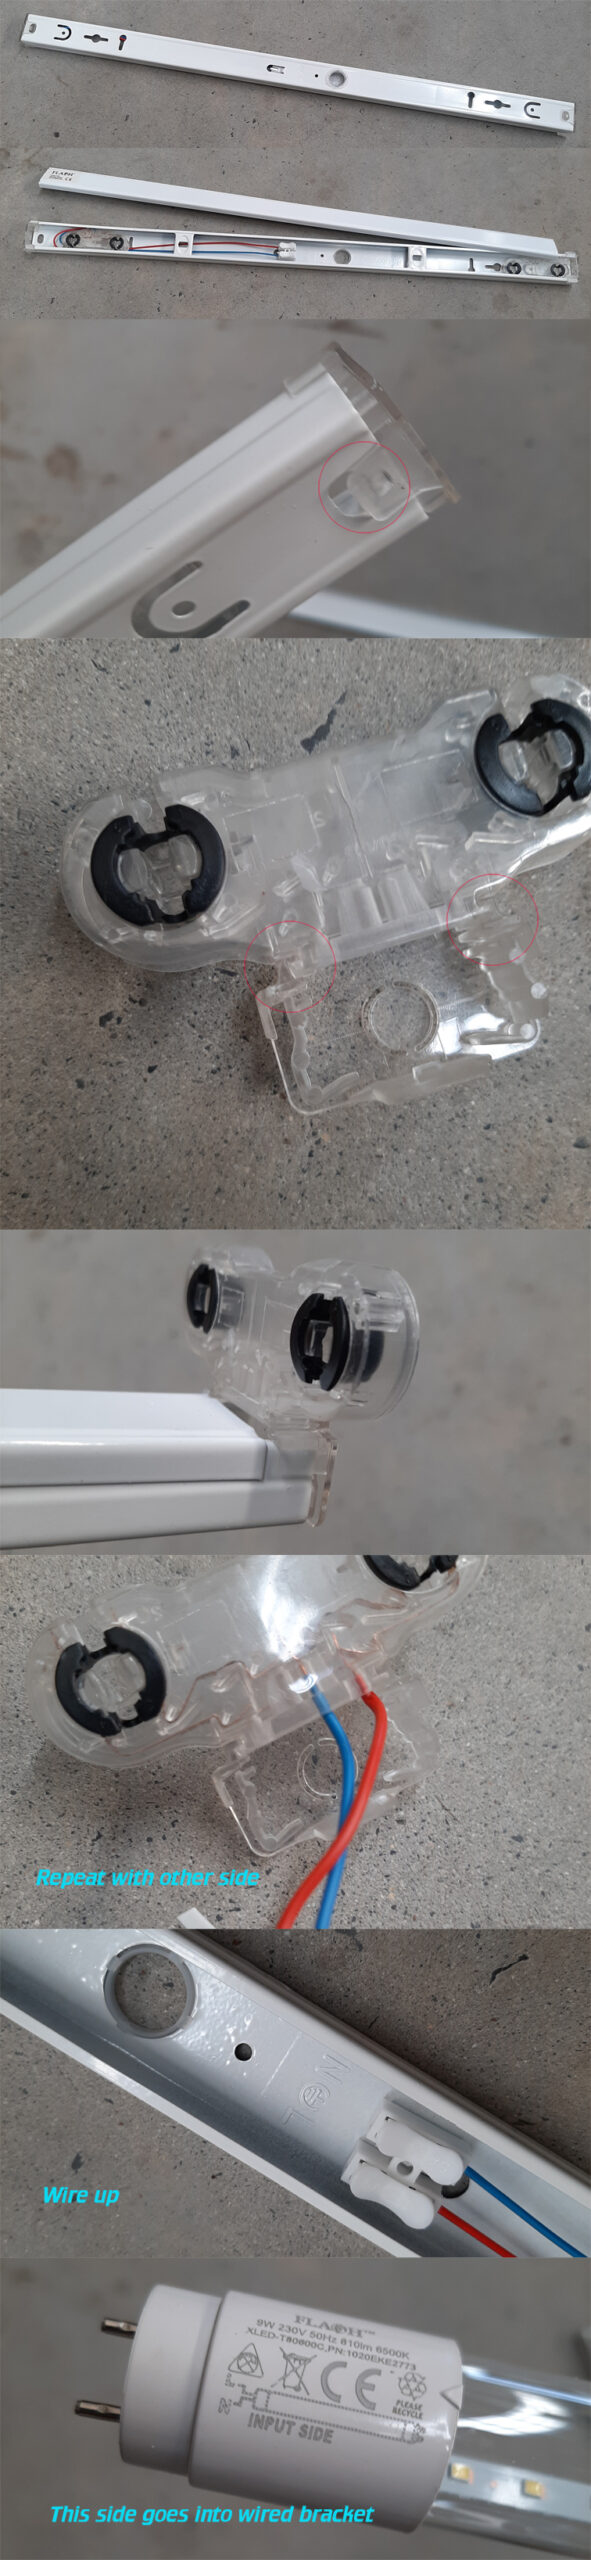
Low cost, slim-line and ultra light, these can easily be installed in cloning racks or propagation tents. They can also be hung vertically to be used as supplemental lighting for dark tent corners and in between plantings.
Each Double T8 LED Fitting is 1215mm long and fits 2 x T8 LED tubes. PLEASE NOTE: These fittings are not the same as older fluorescent fittings (which have ballasts and starters) and should not be used for fluorescent tubes!
Each Clear T8 LED Tube is 1200mm long, has a 18 Watt power draw, 6500K colour temperature, and Lumen output of 1600 Lumens. PLEASE NOTE: These tubes are not the same as older fluorescent tubes and should not be used in fluorescent fittings!
The LED tubes produce hardly any heat and can be hung as close to the cuttings or seedlings as possible to maximize the light intensity.
T8 LED Tubes and Fittings 120cm Assembly:
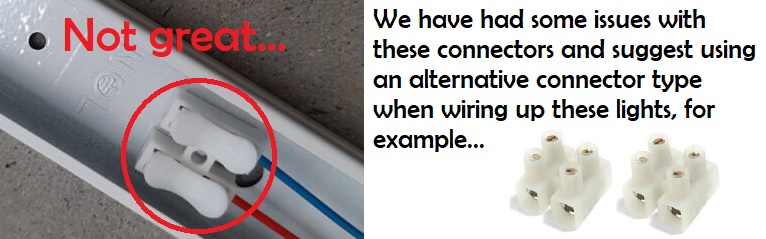
Always wire up and use correctly.
Never put strain on the connected electrical wire. Do not hang from electrical wire.
PLEASE NOTE: The holes of the hanging eyelets ( that are folded up, out of the casing, if needed, one on each side ) are too small to clip into standard rope ratchet clips. Use something like a round key-holder ring to go into the hanging eyelets and then clip the key ring into the rope ratchet clips if needed.
Take care when handling these units as they are light-duty items and can easily damage if dropped by accident.
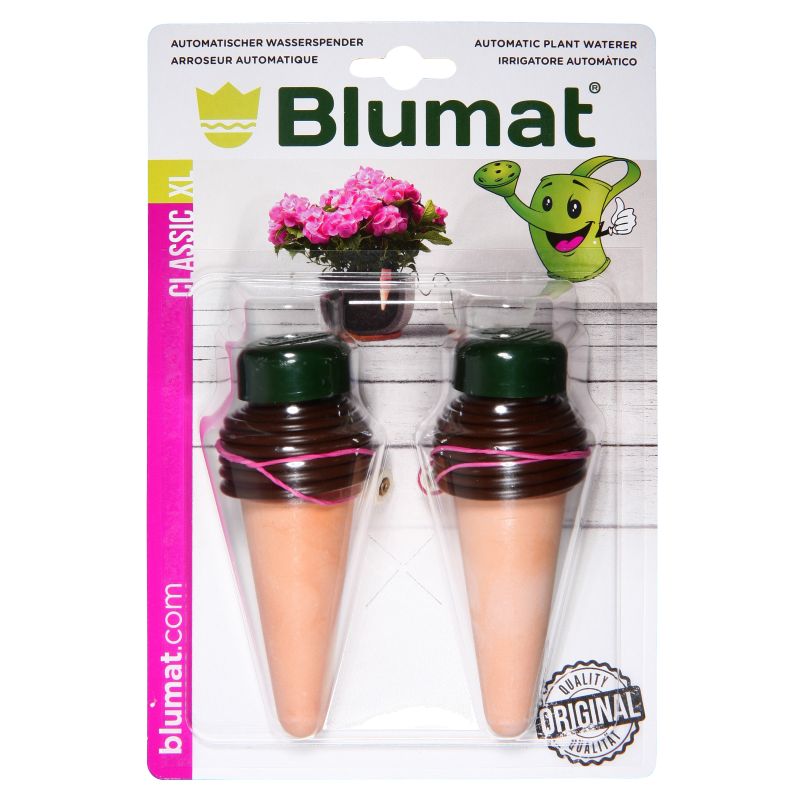
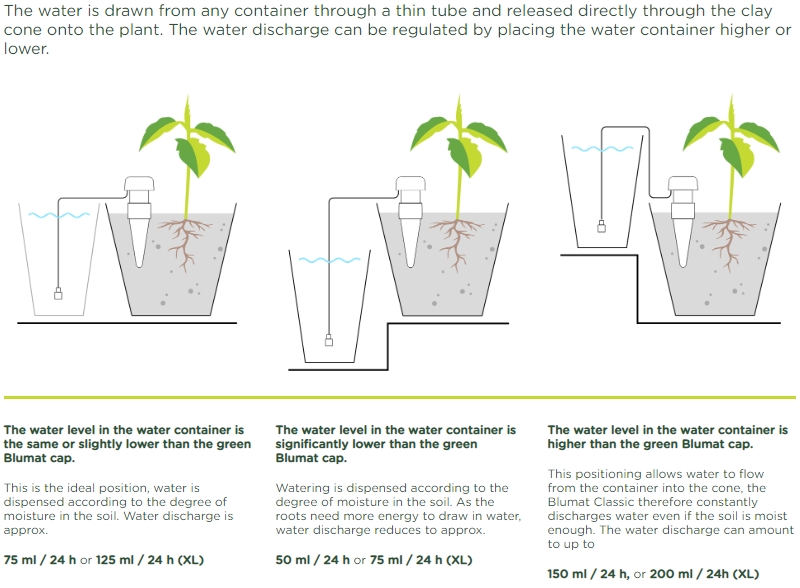
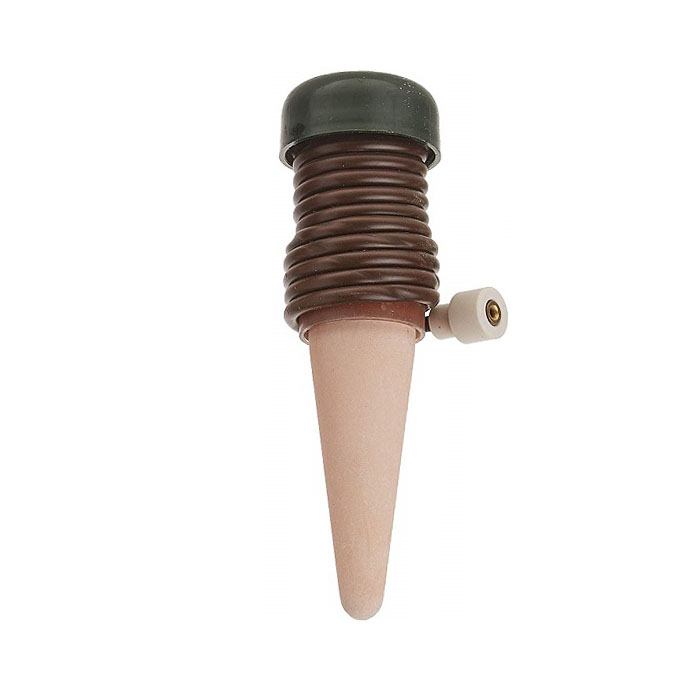
The Blumat Classic XL Sensor 2 Pack keeps indoor plants watered automatically when they need it! A simpler version of the Blumat Tropf System, where the water is drawn from any container through a thin tube and released directly through the clay cone “carrot” into the plant’s root zone.
Blumat Classic range is the tried and tested solution for the reliable watering of all kinds of indoor plants. Simple and totally safe to use, at the weekend, on holiday or all year round. Also suitable for the watering of balcony plants when you’re on holiday in the XL version.
You can regulate the amount of water that each plant will receive be adjusting the height of the water container relative to the plant pot:
(Notice how the Classic XL Sensors allow more watering in a day the Classic Standard Sensors)
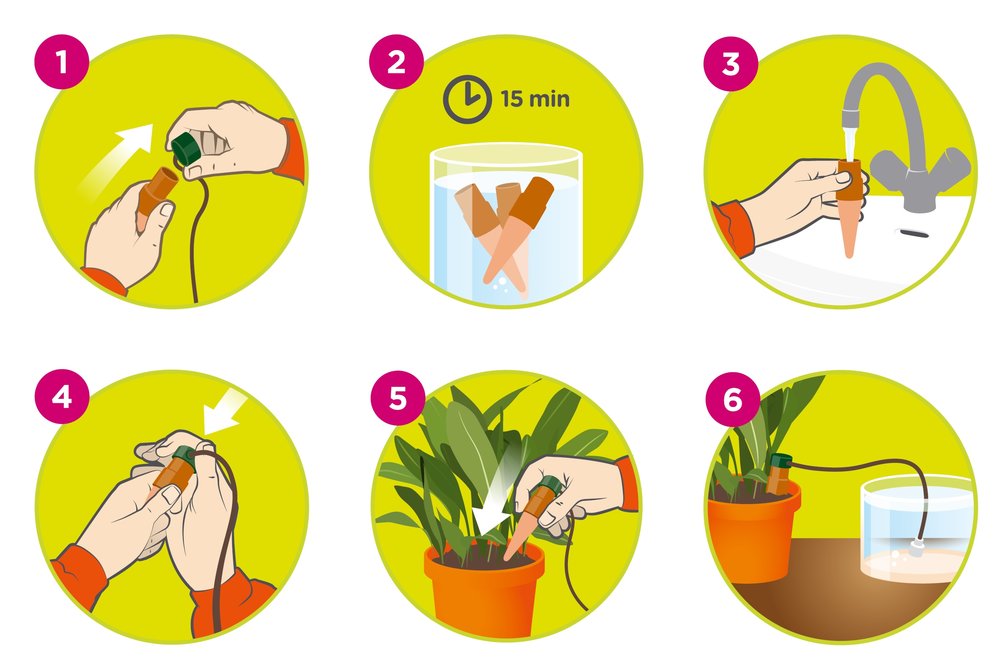
Follow the quick-start guide below to install you Blumat Classic Sensors (“carrots”).
Extra care can be taken by priming the 3mm feeding tube beforehand to ensure that it is full of water as well
Step 4 can also be done with the carrot submerged underwater – making sure that there are absolutely no air bubble inside the system.
Whether a person can use a mineral nutrient solution for feeding in conjunction with the Blumat system is debatable – as the small diameter pipping may easily clog up over time with normal salt build-ups and nutrient calcification. A flushing and rinsing agent like FlashClean may have to be used periodically to dissolve any nutrient build-up inside the piping and/or clay cone “carrots”. An alternative would be to top-feed with your favorite nutrient range as needed and to rely on the Blumat system for regular watering in between feedings.
Your Blumat Classic XL Sensor 2 Pack will take the hassles out of keeping your potted indoor plants hydrated and healthy !
The Blumat Classic Standard Sensor keeps indoor plants watered automatically when they need it! A simpler version of the Blumat Tropf System, where the water is drawn from any container through a thin tube and released directly through the clay cone “carrot” into the plant’s root zone.
Blumat Classic is the tried and tested solution for the reliable watering of all kinds of indoor plants. Simple and totally safe to use, at the weekend, on holiday or all year round. Also suitable for the watering of balcony plants when you’re on holiday in the XL version.
You can regulate the amount of water that each plant will receive be adjusting the height of the water container relative to the plant pot:
Follow the quick-start guide below to install you Blumat Classic Sensors (“carrots”).
Extra care can be taken by priming the 3mm feeding tube beforehand to ensure that it is full of water as well
Step 4 can also be done with the carrot submerged underwater – making sure that there are absolutely no air bubble inside the system.
Whether a person can use a mineral nutrient solution for feeding in conjunction with the Blumat system is debatable – as the small diameter pipping may easily clog up over time with normal salt build-ups and nutrient calcification. A flushing and rinsing agent like FlashClean may have to be used periodically to dissolve any nutrient build-up inside the piping and/or clay cone “carrots”. An alternative would be to top-feed with your favorite nutrient range as needed and to rely on the Blumat system for regular watering in between feedings.
Your Blumat Classic Standard Sensor will take the hassles out of keeping your potted indoor plant hydrated and healthy !
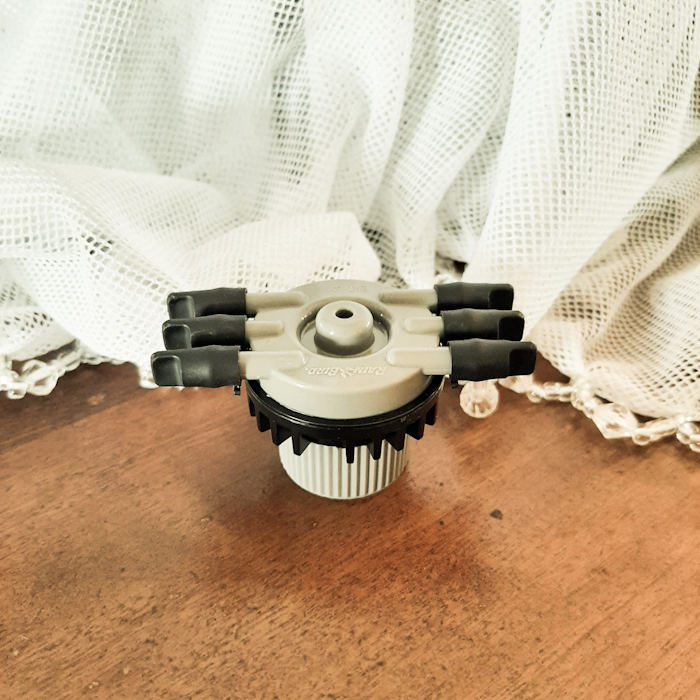
Six Port Sprinkler Bubbler Manifold – an ideal component if you are building a small or medium sized automated watering system!
This economical sprinkler manifold screws into standard so called 1/2″ (approx. 17mm) male threaded sprinkler adaptor fittings and allows for the connection of up to 6 “5mm” irrigation lines. These 5mm watering lines (commonly in use in residential and agricultural irrigation and often referred to as micro-sprinkler piping) can each water an individual potted plant. Fewer lines can be utilized as well – simply leave the end caps that the unit comes with attached to each outlet that is not being used.
The water output per line per minute will of course be determined by the amount of water pressure that the Six Port Sprinkler Bubbler Manifold is connected to – pond pump normally do not provide lots of pressure, and if they are used, the pump may have to remain on for a longer period of time before the desired amount of water has been applied to each pot. A simple test can be run after the watering system has been installed, to see how many liters of water is provided by each outlet per minute – simply place an outlet inside of a measuring jug and use your smartphone’s stopwatch function to run the pump for one minute. Then see how much water has been added to the jug.
Multiple manifolds can be used to set up a single watering system, but remember that increased pump sizes / increased water pressures will be need as the number of manifolds are increased. The output of each manifold and 5mm irrigation line may also vary – depending on the way that the system is set up… if the water pressure in the main supply line is not equalized, the manifold furthest from the water source inlet will have a smaller flowrate than the closer ones. 5mm lines that are substantially longer than the others will also have a lesser flow-rate.
Analogue or digital timers can be used to automatically turn watering on and off during a 24 hr or weekly period.
USE PLUMBER’S TAPE ON THE MALE FITTING TO ENSURE A WATERTIGHT CONNECTION!!
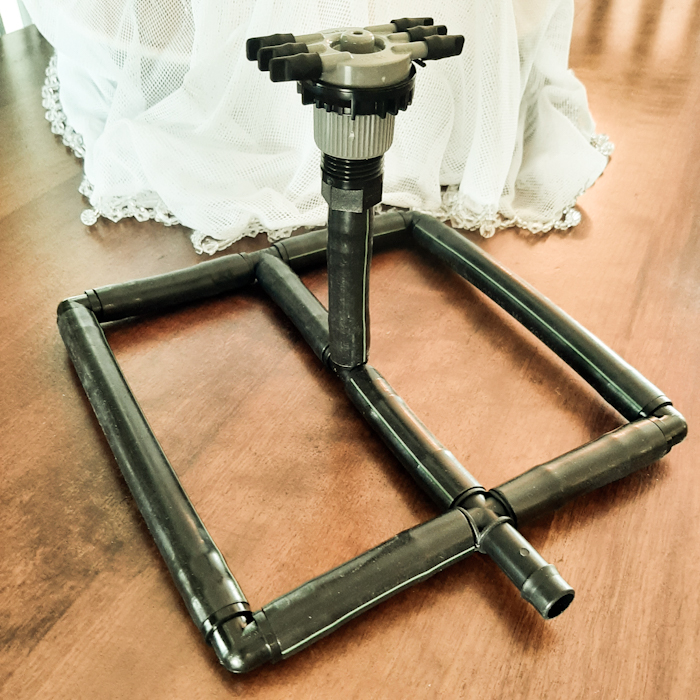
TIP: A simple pressure-equalizing base can easily be constructed with a bit of piping and irrigation fittings, as in the picture below…
The Blumat Classic Standard Sensor 3 Pack keeps indoor plants watered automatically when they need it! A simpler version of the Blumat Tropf System, where the water is drawn from any container through a thin tube and released directly through the clay cone “carrot” into the plant’s root zone.
Blumat Classic is the tried and tested solution for the reliable watering of all kinds of indoor plants. Simple and totally safe to use, at the weekend, on holiday or all year round. Also suitable for the watering of balcony plants when you’re on holiday in the XL version.
You can regulate the amount of water that each plant will receive be adjusting the height of the water container relative to the plant pot:
Follow the quick-start guide below to install you Blumat Classic Sensors (“carrots”).
Extra care can be taken by priming the 3mm feeding tube beforehand to ensure that it is full of water as well
Step 4 can also be done with the carrot submerged underwater – making sure that there are absolutely no air bubble inside the system.
Whether a person can use a mineral nutrient solution for feeding in conjunction with the Blumat system is debatable – as the small diameter pipping may easily clog up over time with normal salt build-ups and nutrient calcification. A flushing and rinsing agent like FlashClean may have to be used periodically to dissolve any nutrient build-up inside the piping and/or clay cone “carrots”. An alternative would be to top-feed with your favorite nutrient range as needed and to rely on the Blumat system for regular watering in between feedings.
Your Blumat Classic Standard Sensor 3 Pack will take the hassles out of keeping your potted indoor plants hydrated and healthy !
Dip’N Grow Liquid Rooting Agent – a concentrated liquid rooting hormone solution easily diluted with water to the necessary strength. This tested and proven formula contains two root-inducing auxins (IBA and NAA). Alcohol is used as the solvent for the active ingredients, so Dip ‘n Grow is self-sanitizing and cross-contamination problems are eliminated.
Direction for use:
Poisonous and highly flammable, store below 20 degrees Celsius, out of direct sunlight, away from kids, pets, food and animal feed. Avoid contact with eyes or skin.
Mix only for immediate use. For best results once diluted, Dip’N Grow should be used within 10 hours.
Hardwood / difficult to root cuttings: dilute 1 part Dip’N Grow to 5 parts water.
Semi-Hardwood / general cuttings: dilute 1 part Dip’N Grow to 10 parts water.
Softwood / succulent cuttings: dilute 1 part Dip’N Grow to 20 parts water.
Dip the basal end (bottom) of the cutting approximately one inch into the diluted Dip’N Grow for 3 to 5 seconds. Following dipping, place cuttings into planting medium. (Vermiculite, perlite, rooting plugs, Jiffy pellets, etc.)
Find full Instructions for using Dip’N Grow Liquid Rooting Agent HERE
After dipping…
To optimize the rooting process for cuttings that have been dipped in rooting hormone, maintaining ideal environmental conditions is paramount.
Firstly, controlling humidity levels is crucial; ensure a consistent humidity of around 70-80% to prevent desiccation while promoting root development. Additionally, maintaining an optimal temperature range between 21-24°C encourages metabolic activity without stressing the cuttings.
Secondly, providing adequate aeration is vital for preventing fungal growth and ensuring oxygen supply to the developing roots. This can be achieved through proper ventilation and avoiding overcrowding of cuttings.
Lastly, employing a well-draining, sterile rooting medium such as perlite or vermiculite promotes root growth and reduces the risk of rotting. Regular monitoring of moisture levels and adjustment of watering frequency accordingly is essential to prevent waterlogging and maintain optimal conditions for rooting success.
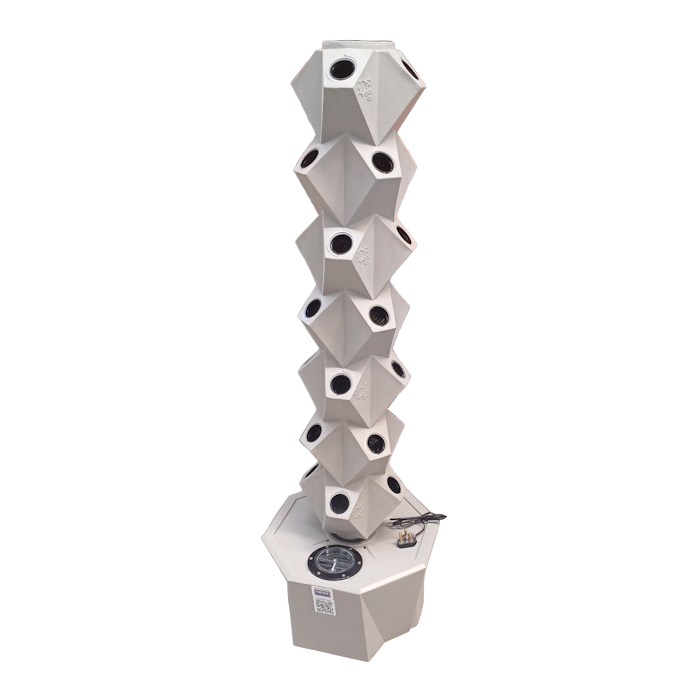
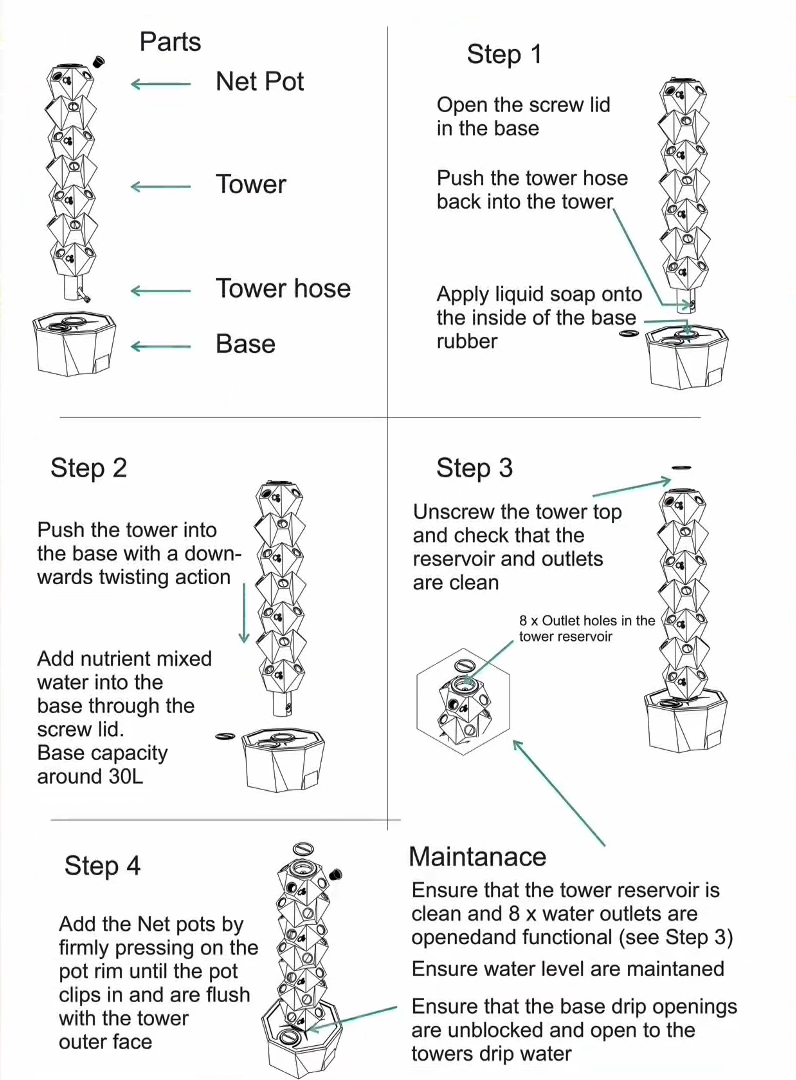
Vertical tower systems like the Vertigrow 28 Hydroponic Tower, has revolutionized traditional agriculture by maximizing space efficiency and optimizing resource utilization. These innovative setups enable plants to thrive in a vertical arrangement, utilizing a fraction of the space required by conventional horizontal farming. By stacking multiple tiers of plants, these towers make it possible to cultivate a diverse range of crops in a relatively small footprint. This is particularly beneficial in urban environments where space is limited, opening up new avenues for local, sustainable food production. The vertical orientation also promotes efficient nutrient and water distribution, as well as adequate exposure to light, essential for healthy plant growth.
One of the key advantages of vertical hydroponic tower systems is utilizing nutrient-rich water solutions and a soil-less growing environment – these systems deliver essential nutrients directly to the plant roots, leading to accelerated growth rates and higher yields. Additionally, they minimize the risk of soil-borne pests and diseases, reducing the need for pesticides and herbicides. This sustainable approach to farming not only conserves water and reduces the reliance on arable land, but also offers a promising solution to feeding a growing global population while minimizing the ecological footprint of agriculture. Vertical tower systems represent a forward-thinking approach that holds great potential for the future of food production.
EC Calibrating Solution 2.764 to be used with the Digital EC Pen
When using a meter to measure either the ppm of total dissolved solids or conductivity of a liquid, it is necessary to periodically calibrate the meter using a calibration standard solution. Although the basis for testing ppm of total dissolved solids is the conductivity of the solution, it is not correct to assume that this measurement is absolute.
It is always necessary to calibrate all total dissolved solids meters with a parts per million total dissolved solids standard calibration solution that contains the same type of salts or mixtures of salts as the solution to be tested. Failure to do this will result in serious errors in the measurement of total dissolved solids.
Refer to Digital Pen instructions for type of calibrating solution required.
HOW CAN I GET THE BEST READING
SHAKE:
Always make sure to shake excess water off the probe before dipping it into a water sample, even if it’s the same water.
STIR / TAP:
After dipping probe in the water, always lightly tap it against the side and stir the meter to remove any lingering air bubbles.
POSITIONING:
When taking the reading, always make sure to hold the meter straight up without it touching the sides or bottom of the glass/beaker/cup. The probes should be suspended as close to the center of the water sample as possible. In-line meter probes need to be positioned in the tee so that the water will flow between the two metal prongs, not against them.
TIME:
The longer the probe is in the water, the more accurate the reading will be.
RINSE:
If switching between very low and very high PPM water, always rinse the probes with water to avoid any build-up. Rinse probe under running water after each rest to avoid salt buildup on Probe.
EC Calibrating Solution 1.413 should be used to calibrate your Digital EC Pen to ensure accurate readings for optimal growth.
When using a meter to measure either the ppm of total dissolved solids or conductivity of a liquid, it is necessary to periodically calibrate the meter using a calibration standard solution. Although the basis for testing ppm of total dissolved solids is the conductivity of the solution, it is not correct to assume that this measurement is absolute.
It is always necessary to calibrate all total dissolved solids meters with a parts per million total dissolved solids standard calibration solution that contains the same type of salts or mixtures of salts as the solution to be tested. Failure to do this will result in serious errors in the measurement of total dissolved solids.
Refer to Digital Pen instructions for type of calibrating solution required.
HOW CAN I GET THE BEST READING
SHAKE:
Always make sure to shake excess water off the probe before dipping it into a water sample, even if it’s the same water.
STIR / TAP:
After dipping probe in the water, always lightly tap it against the side and stir the meter to remove any lingering air bubbles.
POSITIONING:
When taking the reading, always make sure to hold the meter straight up without it touching the sides or bottom of the glass/beaker/cup. The probes should be suspended as close to the center of the water sample as possible. In-line meter probes need to be positioned in the tee so that the water will flow between the two metal prongs, not against them.
TIME:
The longer the probe is in the water, the more accurate the reading will be.
RINSE:
If switching between very low and very high PPM water, always rinse the probes with water to avoid any build-up. Rinse probe under running water after each rest to avoid salt buildup on Probe.
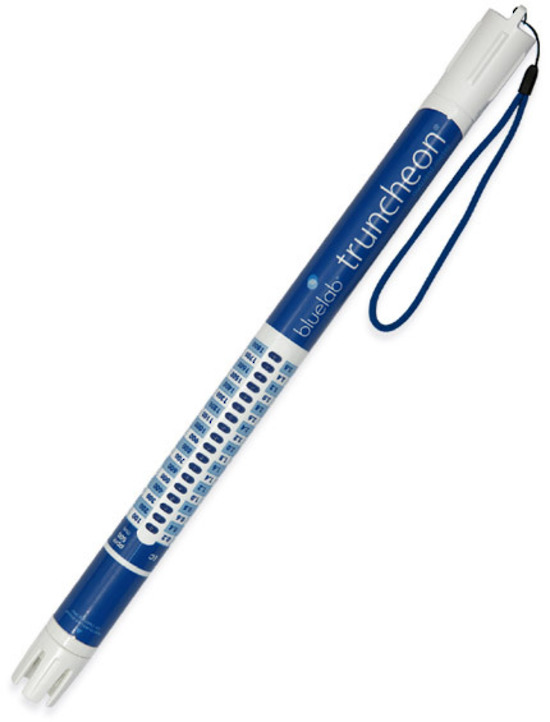
The Bluelab Truncheon Nutrient Meter is one of the World’s favourite conductivity meter. Simply brilliant, brilliantly simple! Easy to use and Fast! Using the Bluelab Truncheon® Nutrient Meter is the fastest and easiest way to measure the conductivity!
When growing with a hydroponic solution it is essential to KNOW what the strength of the solution is before feeding your plants AND while they are growing. If the conductivity reading is too low, your plants may not be getting enough nutrients. If the conductivity reading is too high, plants can dehydrate. Understanding the conductivity of the nutrient solution takes the guesswork out of feeding plants.
To take a reading of your solution – simply place the probe head into the solution and the reading is indicated by the flashing lights. Calibration of the Truncheon® Nutrient Meter is not required.
The only maintenance it requires is cleaning the probe and changing the batteries. ‘The instrument is only as accurate as the probe is clean’ – easy probe cleaning and a quick test is all you need to do to keep the Truncheon Meter operating perfectly for years!
Main Features
EC (0.2 – 3.6), CF (2 – 36) and ppm scales (TDS and 700 scale)
Fully waterproof
No calibration required
Auto sense on and off
No external switches or adjustable buttons
Battery life minimum 1 year (or shelf life of battery)
Meter length: 40.7cm
5 year guarantee for Bluelab Truncheon® Nutrient Meter (Proof of purchase is required)
EC Calibrating Solution 2.8 to be used with the Essentials EC Pen
When using a meter to measure either the ppm of total dissolved solids or conductivity of a liquid, it is necessary to periodically calibrate the meter using a calibration standard solution. Although the basis for testing EC of total dissolved solids is the conductivity of the solution, it is not correct to assume that this measurement is absolute.
It is always necessary to calibrate all total dissolved solids meters with a parts per million total dissolved solids standard calibration solution that contains the same type of salts or mixtures of salts as the solution to be tested. Failure to do this will result in serious errors in the measurement of total dissolved solids.
Refer to Digital Pen instructions for type of calibrating solution required.
HOW CAN I GET THE BEST READING
SHAKE:
Always make sure to shake excess water off the probe before dipping it into a water sample, even if it’s the same water.
STIR / TAP:
After dipping probe in the water, always lightly tap it against the side and stir the meter to remove any lingering air bubbles.
POSITIONING:
When taking the reading, always make sure to hold the meter straight up without it touching the sides or bottom of the glass/beaker/cup. The probes should be suspended as close to the center of the water sample as possible. In-line meter probes need to be positioned in the tee so that the water will flow between the two metal prongs, not against them.
TIME:
The longer the probe is in the water, the more accurate the reading will be.
RINSE:
If switching between very low and very high EC water, always rinse the probes with water to avoid any build-up. Rinse probe under running water after each rest to avoid salt buildup on Probe.
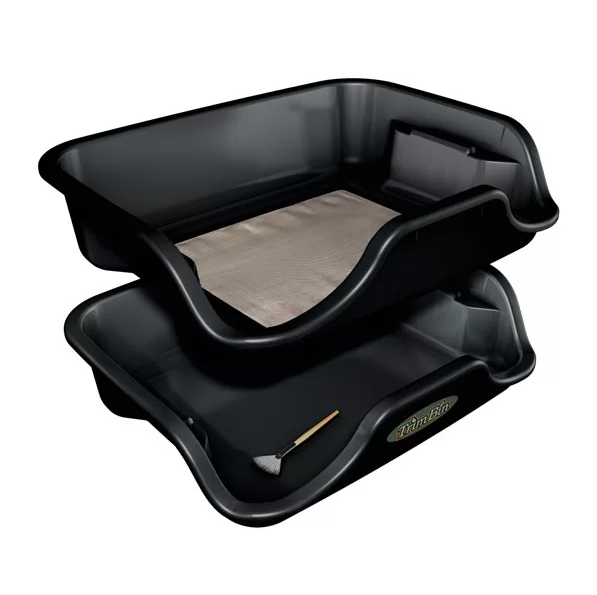
1 top bin with 150 micron stainless steel screen
1 bottom bin with mirror finish collection tray
High molded walls keep your work contained
1 static brush by Harvest More to sweep up pollen
Made from 100% recyclable polypropylene
Easy to clean. Easy to carry
The HarvestMore Trim Bin trim tray by Harvest-More features an ergonomic design that makes trim work more enjoyable. The two part system allows for versatility and efficient use of space. Like all products in the Harvest More line, the HM trim tray is made with quality materials and ingenuity. It’s long lasting, durable and portable. Turn any couch or table into a comfortable work station!
How to dry-ice kief shake…
To perform a dry-ice cannabis shake using a trim tray mesh screen and a kief-catching bin, start by assembling your equipment: a trim tray with a mesh screen, a kief-catching bin, dry ice, cannabis trim or buds, and protective gloves. Place the trim tray over the kief-catching bin on a clean, flat surface. Wearing gloves to protect your hands from the extreme cold, break the dry ice into small chunks and mix it with the cannabis trim in the trim tray. Gently shake the tray back and forth for a few minutes, allowing the dry ice to freeze the trichomes, making them brittle and easy to separate. As you shake, the kief will fall through the mesh screen and collect in the bin below. Once you’ve collected enough kief or the cannabis appears dusty, stop shaking. The collected kief can then be used to enhance joints, bowls, or pressed into hash.
We use cookies to ensure that we give you the best experience on our website. If you continue to use this site we will assume that you are happy with it. Privacy policyOk