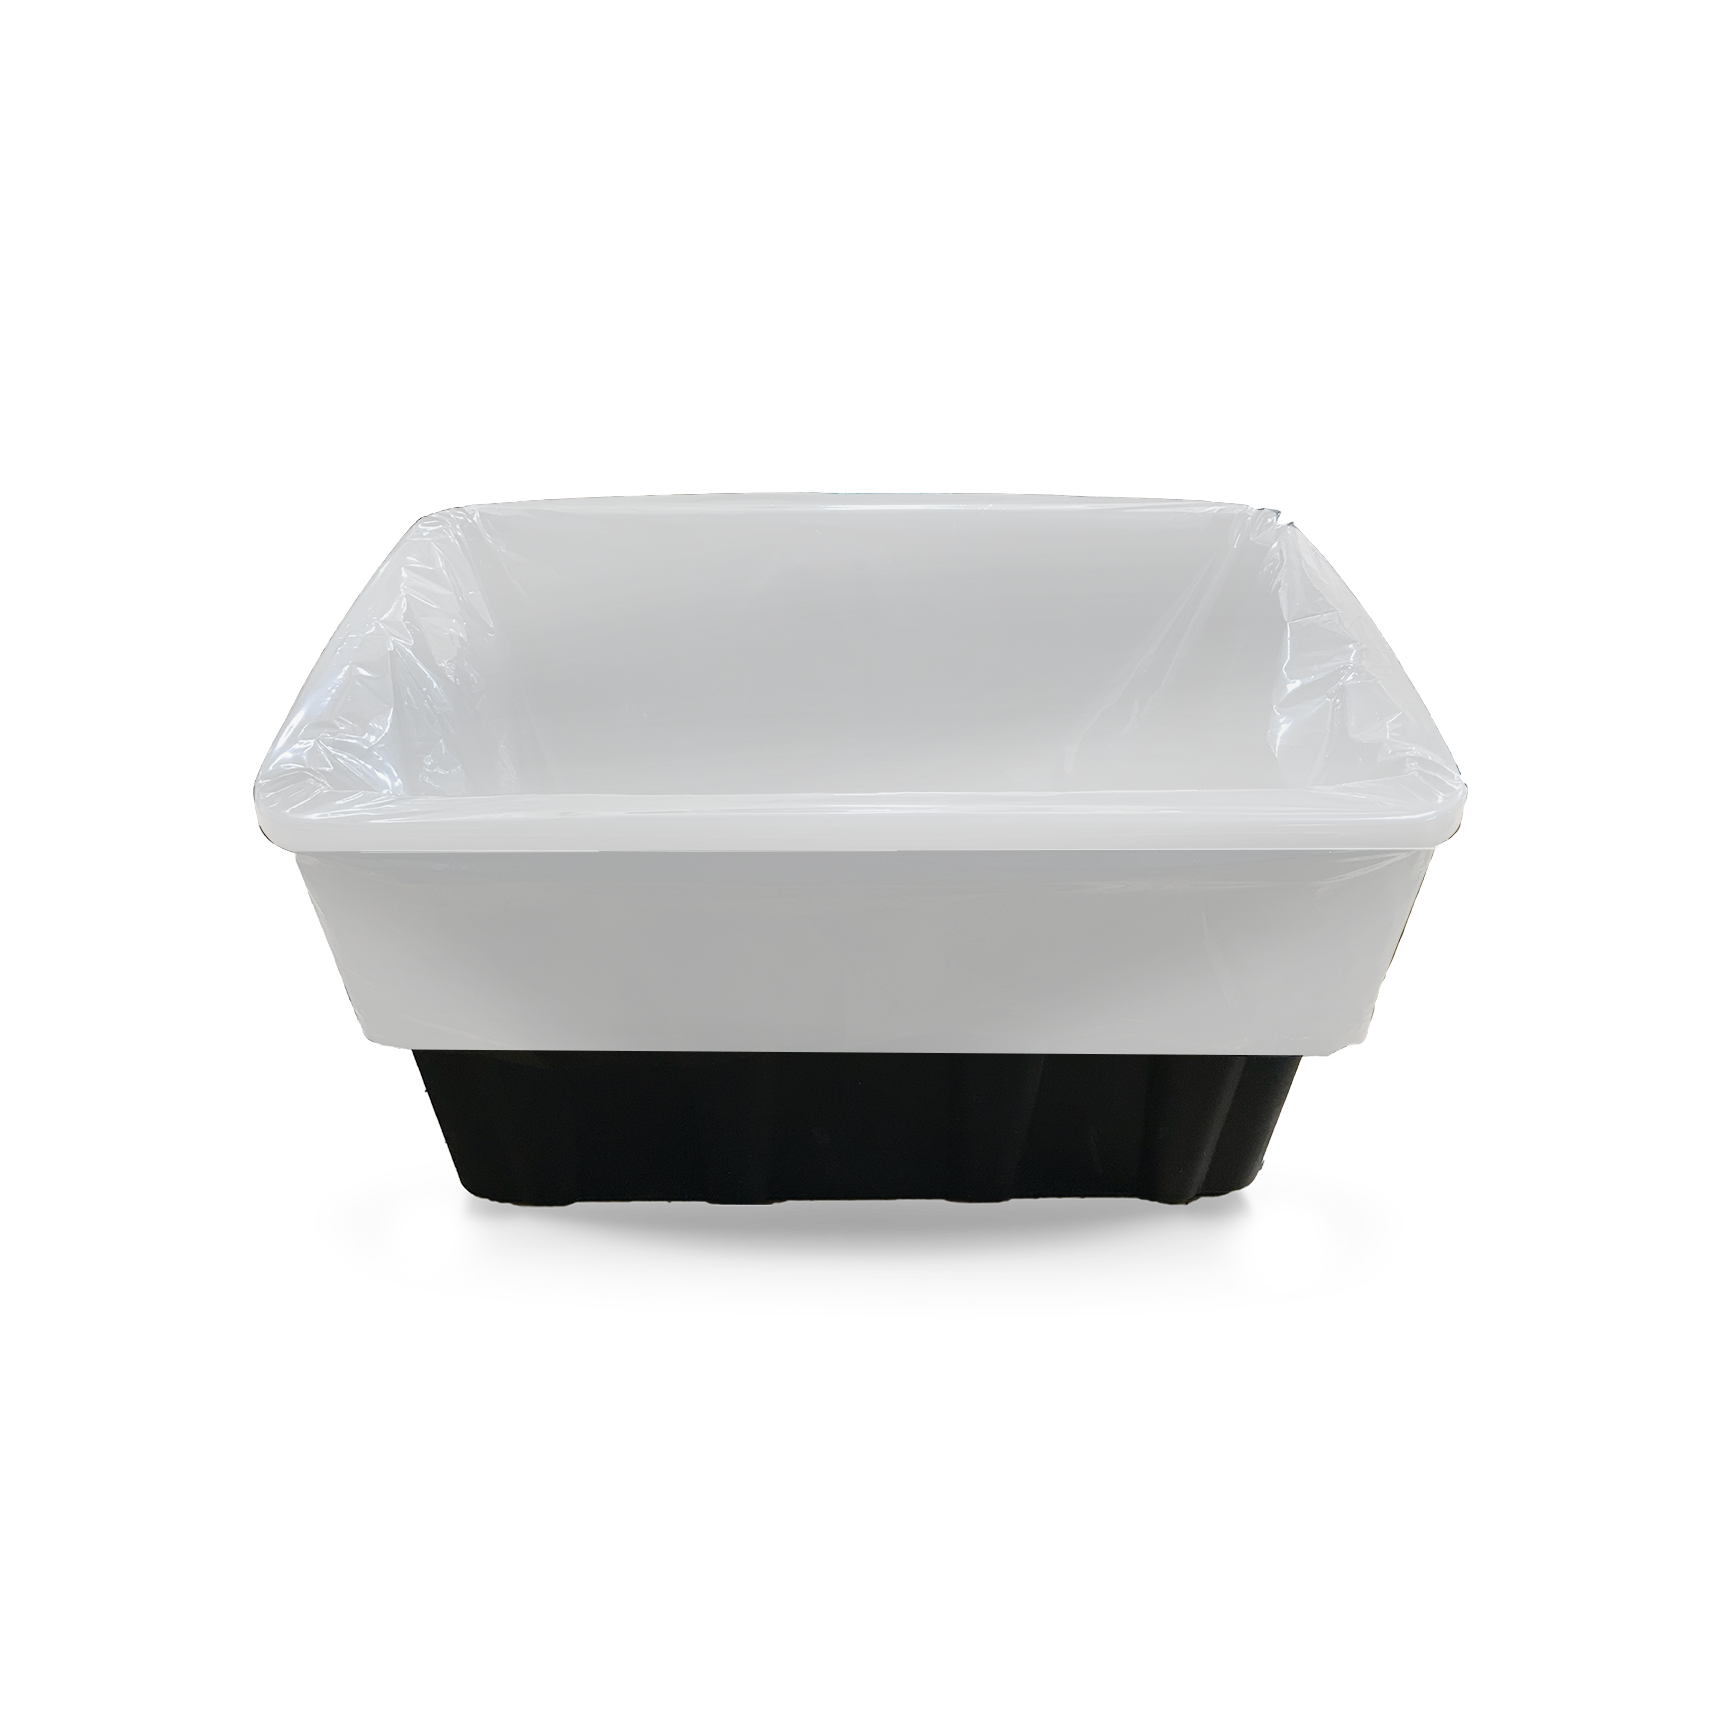
WHITE TerpLoc Bin and Tote Liners by Grove Bags are perfect to use during harvesting and also for post harvest storage.
Tote liners can be used after properly drying and sweating your cannabis for bulk storage and curing. These bags are completely opaque to keep out harmful UV light and have added anti-static properties to prevent trichome loss. Simply using a liner can prevent cross contamination from batch to batch limiting your product loss from unforeseen pest and mold issues. Using TerpLoc Tote Liners will protect your product and your bottom line.
Tote liners: Use this with rectangular Totes while collecting freshly harvested plant material and transport it around the cultivation center.
100lt Tote Liner: Dimensions when flat: 112cm 116cm wide, with one side being the opening, 76cm high. Use this with rectangular Totes while collecting freshly harvested plant material and transport it around the cultivation center.
Bin liners: These liners form a tall cylinder when filled and are geared towards bulk storage in round bins
75lt Round Bin Liner: Dimensions when flat: 76cm wide, with one side being the opening, 113cm high.
200lt Round Bin Liner: Dimensions when flat: 101cm wide, with one side being the opening, 115cm high.
* WHITE TerpLoc Bin and Tote Liners sold individually, totes and bins not included.
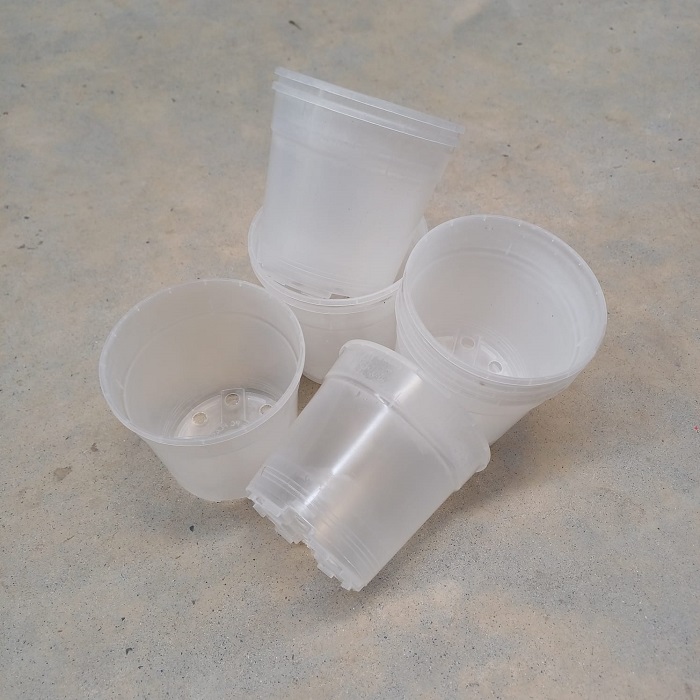
Clear Plastic Orchid Pots, round, 11.5 cm top diameter. Please note, plastic material is not 100% clear and transparent, but is a bit opaque, as can be seen in the product image.
Top Diameter: 11.5 cm, Bottom Diameter: 8.5 cm, Height: 11 cm, Volume: 700 ml
Clear plastic pots are particularly vital for orchids due to the unique nature of their roots. Orchids possess specialized aerial roots that differ significantly from those of conventional plants. These roots are adapted to absorb moisture and nutrients from the air, making them especially sensitive to their immediate environment.
The transparency of clear plastic pots is paramount in understanding the intricacies of orchid root systems. It provides an unobstructed view of these unique roots, allowing growers to closely monitor their growth and health. This visual clarity is invaluable in ensuring that orchids do not become root-bound, a condition that can severely impede their growth.
Moreover, clear plastic pots facilitate superior light penetration to the roots, a critical factor for orchids. Unlike other plants, orchids derive a significant portion of their nutrition from photosynthesis in their roots. Clear pots allow natural light to stimulate this vital process, encouraging the production of energy-rich compounds.
Additionally, they enable growers to precisely assess moisture levels, reducing the risk of overwatering, which is particularly detrimental to orchids. It also allows for early intervention in case roots become tangled or constrained, preventing potential harm to the plant.
In conclusion, the choice of Clear Plastic Orchid Pots is of paramount importance for orchid enthusiasts. It not only offers a clear window into the health and growth of their specialized roots but also supports their unique nutritional needs, ultimately contributing to the thriving success of these exquisite plants.
Utilizing expanded clay balls as a growing substrate for orchids further optimizes their unique root requirements. These lightweight, porous balls provide excellent aeration and drainage, mimicking the orchid’s natural epiphytic habitat. Their structure promotes air circulation around the roots, preventing them from becoming waterlogged. Additionally, expanded clay balls offer stability and support for orchids, ensuring their delicate roots have a secure foundation for healthy growth. This substrate choice complements the benefits of clear plastic pots, creating an ideal environment for thriving orchids with vibrant, robust root systems.
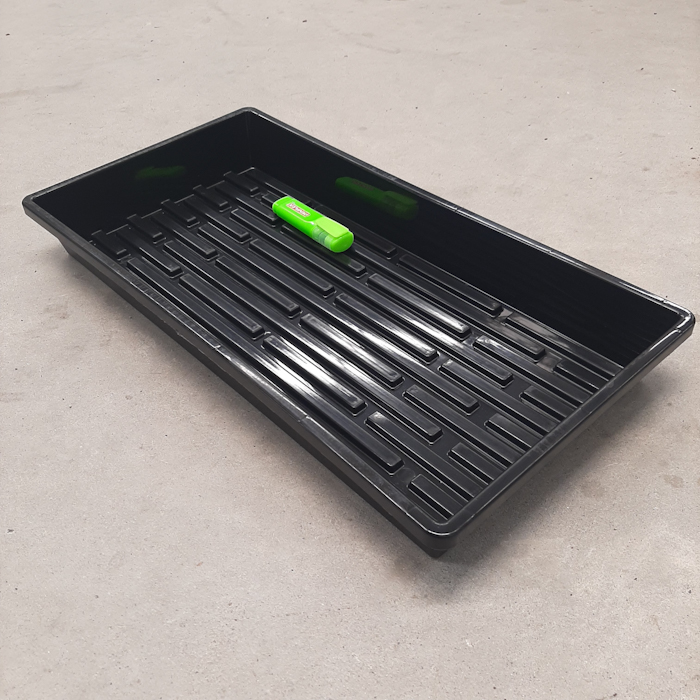
The 50mm Microgreen Tray Without Holes has no drainage holes and is 275mm wide and 535mm long.
With its 50mm height, it can be filled to the brim using only about 7.5 liters of growing medium.
Coco coir based substrates/growing mediums are a very popular choice for growing microgreensat home, as it is a soft and airy medium with great moisture retention. Because the microgreen growing cycle is so short, with the seedling relying mostly on nutrients stored inside the seed itself, adding any supplements or additional nutrients to your substrate is not a necessity at all, although a lot of people do add a little bit of worm castings to their mixes, claiming better results.
Once you have added your substrate into the tray, water or mist spray lightly if the substrate is on the dry side and tamp the substrate down very lightly by hand, to get it to settle and flatten out nicely. Then gently sprinkle your seeds across the surface. Once this is done, a VERY thin layer of additional substrate may be sprinkled over the top of the seeds (using a baking sieve, for example)
Place the trays into a suitable environment for germination and mist or spray the top of the substrate regularly to prevent it from drying out. (A propagation dome will help keep substrate moist until your seeds have germinated, saving you a lot of effort. Remove the ). Do not overspray, as this will cause overly wet “swampy” subsurface conditions! Just keep the substrate slightly moist at all times.
Once your seeds have sprouted and grown to a harvestable size, you are able to clip off the delicious micro-leaves for your dishes and salads with a pair of pruning scissors.
The 50mm Microgreen Tray Without Holes can also be used as a drip tray for potted plants, which will catch runoff during watering or flushing.
Schedules and Timers (Even schedules with 100’s of short ON and OFF cycles per day – as is necessary when doing aeroponics)
“Scenes” can also be set up, using data from other Sonoff devices, like the TH Elite, or data coming in from Zigbee devices – when certain conditions are met, set up which Basic R2 Smart Switch to turn on or off.
IMPORTANT TO REMEMBER:
No system is perfect – always monitor your automation to ensure that your plants aren’t in danger!
Not all electrical equipment is suitable for remote operation – some may “light up” (Power up) when its smart switch engages (turns ON), but it may still need a person to press a button on the device, or its remote, before it will actually start to OPERATE.
Timers and schedules are stored on the switches themselves, but a WiFi connection will be necessary for “SCENES” to work.
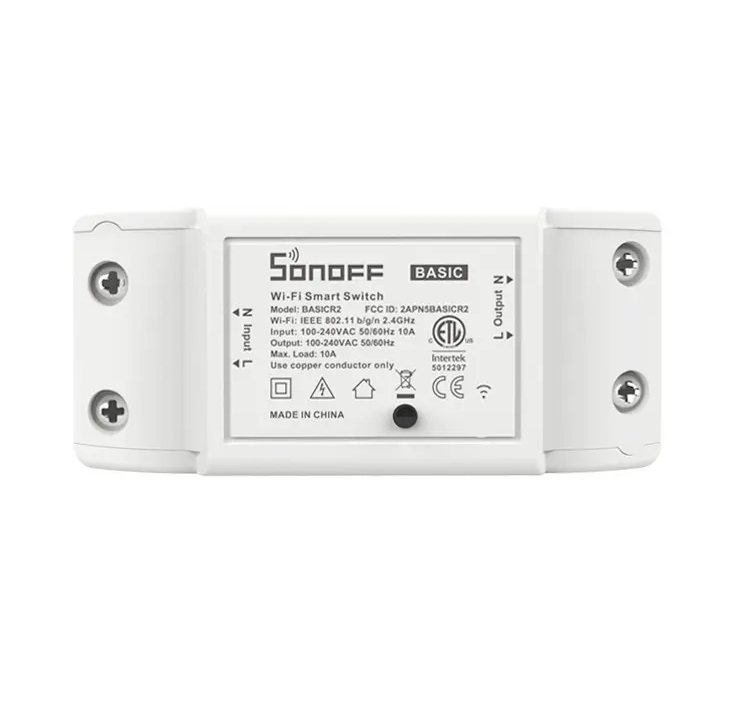
Sonoff made upgrades and optimizations to the Sonoff Basic R2 Smart Switches, mainly on their safety to provide a higher value and usage experience to users.
Moisture and dust resistant, no potential safety hazard in harsh weather. BASICR2 is tested to work at an excessive humidity environment for up to 48 hours.
It has high feasibility in various environments and prevents sparking from high humidity environments. There is adequate protection against accidental contact with live parts in all unfavorable positions of normal use. The structure strictly controls the requirements of insulation, micro disconnection, and installation test to ensure the reliability and safety of BASICR2. Even a heat shrinkable sleeve is used for the fuse to provide better electrical insulation.
Besides CE, FCC and RoHS certified, BASICR2 is also compliant with safety standards, having been tested and ETL certified too.
Sonoff Basic R2 Smart Switch 3-Pack, Features:
ETL Certified
Remote ON/OFF–Turn electrical devices on/off from anywhere
App Support –Free iOS and Android mobile App eWeLink
Sync Status–Real-time device status provided to App
Timing–Set scheduled/countdown/loop timers to turn on/off at specified time
Share Control– Control your smart home together with your family
Scene–Turn on/off a gang of devices with one tap
Smart Scene–Triggered on/off by temp, hum or other environmental conditions from sensor
Compatibility –Works perfectly with Amazon Alexa, Google Assistant, IFTTT
Schedules and Timers (Even schedules with 100’s of short ON and OFF cycles per day – as is necessary when doing aeroponics)
“Scenes” can also be set up, using data from other Sonoff devices, like the TH Elite, or data coming in from Zigbee devices – when certain conditions are met, set up which Basic R2 Smart Switch to turn on or off.
IMPORTANT TO REMEMBER:
No system is perfect – always monitor your automation to ensure that your plants aren’t in danger!
Not all electrical equipment is suitable for remote operation – some may “light up” (Power up) when its smart switch engages (turns ON), but it may still need a person to press a button on the device, or its remote, before it will actually start to OPERATE.
Timers and schedules are stored on the switches themselves, but a WiFi connection will be necessary for “SCENES” to work.
Sonoff made upgrades and optimizations to the Sonoff Basic R2 Smart Switches, mainly on their safety to provide a higher value and usage experience to users.
Moisture and dust resistant, no potential safety hazard in harsh weather. BASICR2 is tested to work at an excessive humidity environment for up to 48 hours.
It has high feasibility in various environments and prevents sparking from high humidity environments. There is adequate protection against accidental contact with live parts in all unfavorable positions of normal use. The structure strictly controls the requirements of insulation, micro disconnection, and installation test to ensure the reliability and safety of BASICR2. Even a heat shrinkable sleeve is used for the fuse to provide better electrical insulation.
Besides CE, FCC and RoHS certified, BASICR2 is also compliant with safety standards, having been tested and ETL certified too.
Features:
ETL Certified
Remote ON/OFF–Turn electrical devices on/off from anywhere
App Support –Free iOS and Android mobile App eWeLink
Sync Status–Real-time device status provided to App
Timing–Set scheduled/countdown/loop timers to turn on/off at specified time
Share Control– Control your smart home together with your family
Scene–Turn on/off a gang of devices with one tap
Smart Scene–Triggered on/off by temp, hum or other environmental conditions from sensor
Compatibility –Works perfectly with Amazon Alexa, Google Assistant, IFTTT
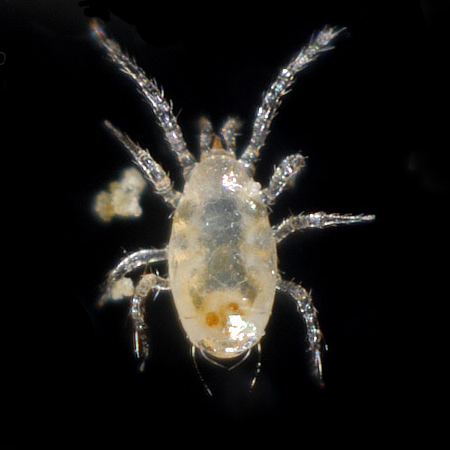
Neoseiulus Californicus is a predatory mite supplied by BioBee South Africa, who are actively providing IPM solutions which reduce the use of pesticides for both conventional and bio-organic agriculture in the country.
Sold by Hydroponic.co.za in 5g sachets, which are hooked onto plant stems close to leaves. The mites will emerge from the holes in the top of the sachets over a number of days, eager to find food and help with the elimination of the following pests:
Two spotted spider mite (Tetranychus Urticae)
Fruit spider mite (Panonychus Ulmi)
Citrus red mite (Panonynchus Citri)
Begonia mite (Tarsonemus Pallidus)
Broad mite (Polyphagotarsonemus Latus)
Full dispersion and noticeable effects may take between 2 and 3 weeks, depending on each unique situation. Make sure that the holes of each sachet are indeed open, to ensure that the mites will be able to crawl out of it easily. (Holes can be enlarged slightly, using a pen or pencil). For faster dispersion, the sachets can be torn open and the contents sprinkled onto the plant’s leaves.
Neoseiulus Californicus should be shipped and stored at temperatures ranging from around 6 – 16 °C and the sachets should be viable for up to 3 weeks after the production date printed on each sachet.
Disclaimer:
Due to the sensitive nature of this living product, Hydroponic.co.za can not be held liable for the state in which the product is received after being shipped.
We will be (“overnight”) shipping this product (using polystyrene containers which will include cooling packs) separately from any other items purchased and additional charges will apply FOR AREAS OUTSIDE OF CAPE TOWN. “Overnight” service can take up to 3 days to be delivered, especially for REGIONAL TOWNS.
ORDERS RECEIVED TOO LATE IN THE WEEK WILL ONLY BE SHIPPED OFF ON MONDAY OF THE FOLLOWING WEEK.
These charges will be visible during check-out, before payment for the order is made….
1 – 30 Sachets = Additional charge x 1
31 – 60 Sachets = Additional charge x 2
61 – 90 Sachets = Additional charge x 3
etc.
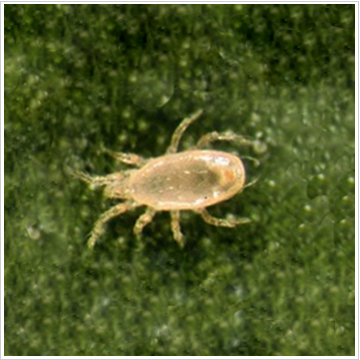
Mite Description:
Neoseiulus californicus are translucent and range in color from pale orange to peach. The nymphs resemble the adults except that they are smaller and cannot reproduce. Their eggs are oblong, transparent and white to dirty-white in color. Adult predatory mites, nymphs and larvae actively search for their prey and suck them empty. All stages of Neoseiulus californicus prefer to eat younger stages of host mites and adult females can consume fifteen to twenty spider mite eggs per day. Neoseiulus californicus can also feed and survive on Thrips and can survive for up to 3 – 4 weeks without food and therefore very good for prophylactic treatments and maintaining low populations of Red Mite and Red spider mite. Neoseiulus californicus tolerates high temperatures and low humidity levels.
Please note… not recommended for use on Tomatoes, as the trichomes of a Tomato plant give of a substance that is irritating to these mites.
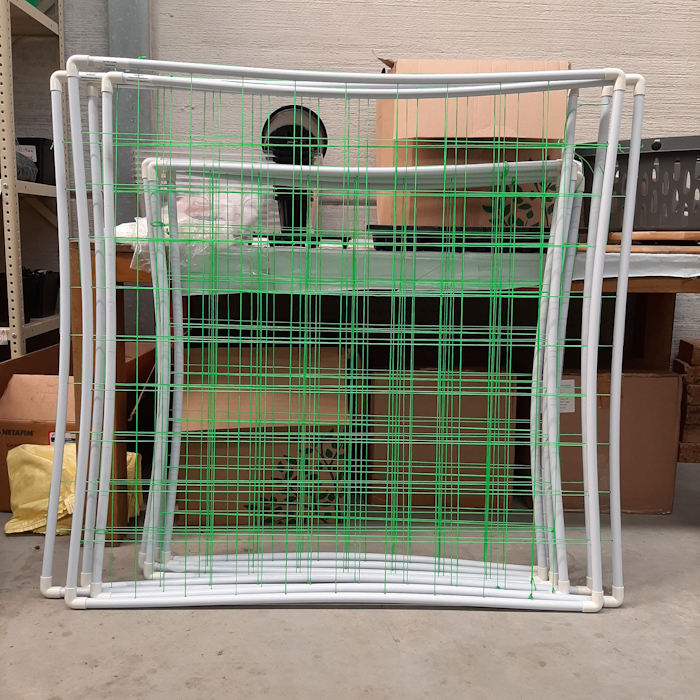
Tent SCROG Scrog Frames – These pre-made scrog frames are easy to tie onto grow tent poles With these scrog frames in place you can trim and train your plants’ shoots into a flat, uniform canopy, full of potential bud sites.
PLEASE NOTE: Tent SCROGs are now shipped “rolled up” to minimize courier fees and damages in transit. They are easily assembled once received. ( video here )
Training plants into a flat canopy (“Screen of Green”) enables the formation of many bud sites along the same horizontal plane. The leaves and bud sites along this plane will then be able to make the most of the light that is emitted by the grow light in the tent, and will generate more yield per plant when it comes to harvest time.
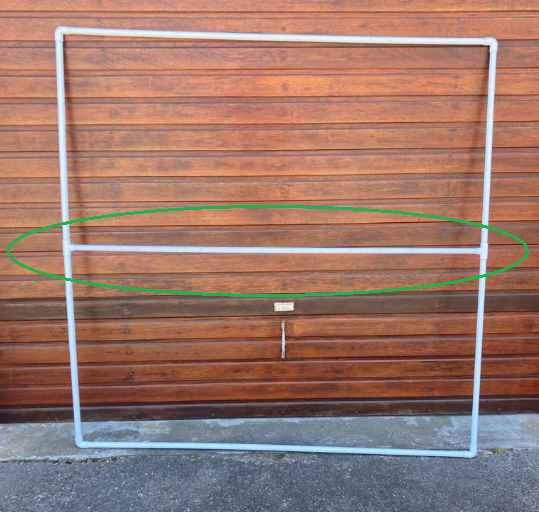
We currently offer Tent SCROG Scrog Frames that fit into the following popular grow tent sizes. PLEASE NOTE that the frames themselves are slightly smaller than the tent dimensions, to make sure that the frame can easily fit inside the tent, even if the tent frame has thicker diameter poles:
1 m x 1 m ( actual frame dimensions are approx. 95 cm x 95 cm )
1.2 m x 1.2 m ( actual frame dimensions are approx. 115 cm x 115 cm )
1.5 m x 1.5 m ( actual frame dimensions are approx. 145 cm x 145 cm ) Also has 1 x additional brace through middle for stability, see below…
You will need to have something on hand to secure the frame to the tent poles, for example, cable-ties or LightHouse Soft Garden Tie.
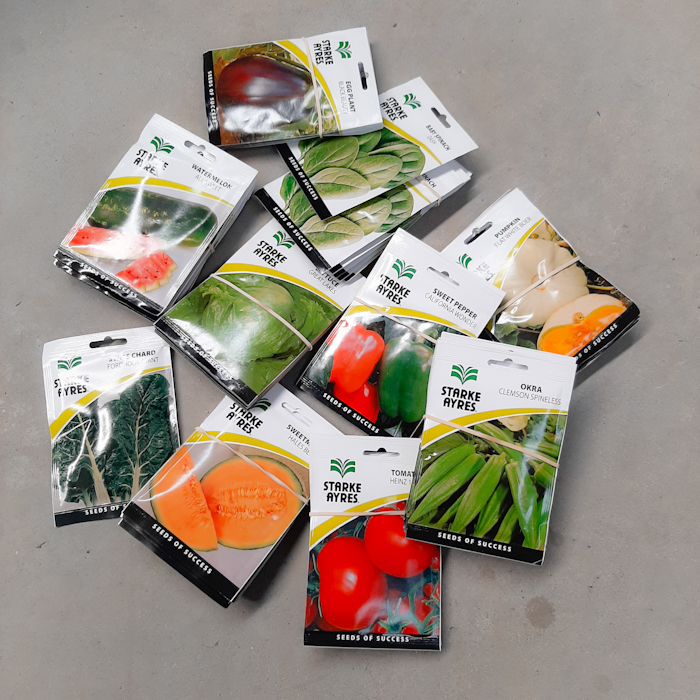
Starke Ayres Vegetable Seed Packs are now available in a number of vegetable seed varieties.
The seeds are treated against fungi and parasites, and should only be used for PLANTING, NOT FOR CONSUMPTION. Store in a safe, cool, dry place.
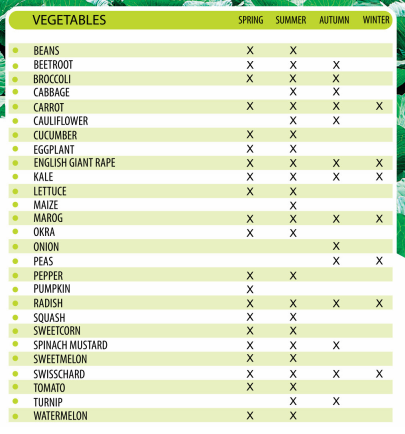
Consult the Starke Ayres Planting Guide to find out which types of vegetable seeds can be planted right now !
Read up about the ideal conditions that your Starke Ayres Vegetable Seed Packs require for best results. Ideally, the newly sprouted seeds should be left undisturbed ( except for watering ) until the new seedlings are ready to transplant – the bigger the seedling is when first transplanted, the less stressful the transition will be on the plant. Jiffy 7 Pellets are great for germination, and seedlings can be potted into 1.5lt or 5lt Thermoform Plant Pots, using a seedling mix, like Freedom Farms SeedStarter. Once repotted, water seedlings well, to allow the substrate to compact and settle onto the seedling’s root ball. Light feeding can the begin, using nutrients of your choice, given in concentrations that fall in line with the feeding requirements of the type of plant at its current size.
Germinating vegetable seeds is a critical phase in the life cycle of plants, marked by the emergence of a new seedling from its dormant state. This process involves carefully providing the optimal conditions for the seed to break dormancy and initiate growth. Seeds typically require a combination of moisture, warmth, and oxygen to activate enzymes that trigger germination. It’s like nature’s own version of a startup launch – a seed’s way of saying, “I’m ready to grow!”
As the seed absorbs water, it swells, and metabolic activity resumes, leading to the emergence of the radicle, the embryonic root. This marks the beginning of root development and is followed by the appearance of cotyledons, the embryonic leaves. The cotyledons provide the initial burst of energy for the seedling until true leaves take over. It’s a meticulously choreographed botanical ballet taking place beneath the soil surface, where each step is essential for the successful establishment of the plant. So, whether it’s a tomato or a radish, the germination process is the green light for a vegetable seed to embark on its journey to becoming a mature, harvest-ready plant.
Amblyseius Swirskii is a predatory mite supplied by BioBee South Africa, who are actively providing IPM solutions which reduce the use of pesticides for both conventional and bio-organic agriculture in the country.
Sold by Hydroponic.co.za in 5g sachets, which are hooked onto plant stems close to leaves. The mites will emerge from the holes in the top of the sachets over a number of days, eager to find food and help with the elimination of the following pests:
Young larvae of Western flower thrips (Frankliniella occidentalis) – targets immature stages
Two-spotted spider mite and red spider mite (Tetranychus urticae, T. cinnabarinus)
Broad mite (Polyphagotarsonemus latus)
The release rate depends upon the nature of the crop, the ecosystem (e.g. open field or greenhouse) and the rate of pest infestation. Temperatures of 21-27°C and high humidity (above 60%) will enhance predator activity and ensure its success. Make sure that the holes of each sachet are indeed open, to ensure that the mites will be able to crawl out of it easily. (Holes can be enlarged slightly, using a pen or pencil). For faster dispersion, the sachets can be torn open and the contents sprinkled onto the plant’s leaves.
Amblyseius Swirskii should be shipped and stored at temperatures ranging from around 6 – 16 °C and the sachets should be viable for up to 3 weeks after the production date printed on each sachet.
Disclaimer:
Due to the sensitive nature of this living product, Hydroponic.co.za can not be held liable for the state in which the product is received after being shipped.
We will be (“overnight”) shipping this product (using polystyrene containers which will include cooling packs) separately from any other items purchased and additional charges will apply FOR AREAS OUTSIDE OF CAPE TOWN. “Overnight” service can take up to 3 days to be delivered, especially for REGIONAL TOWNS.
ORDERS RECEIVED TOO LATE IN THE WEEK WILL ONLY BE SHIPPED OFF ON MONDAY OF THE FOLLOWING WEEK.
1 – 30 Sachets = Additional charge x 1
31 – 60 Sachets = Additional charge x 2
61 – 90 Sachets = Additional charge x 3
etc.
Mite Description:
The adult female is an off-white droplet-shaped mite. It has a characteristic rapid movement when disturbed or exposed to bright light. The eggs are oval and transparent to white.
Please note… not recommended for use on Tomatoes, as the trichomes of a Tomato plant give of a substance that is irritating to these mites.
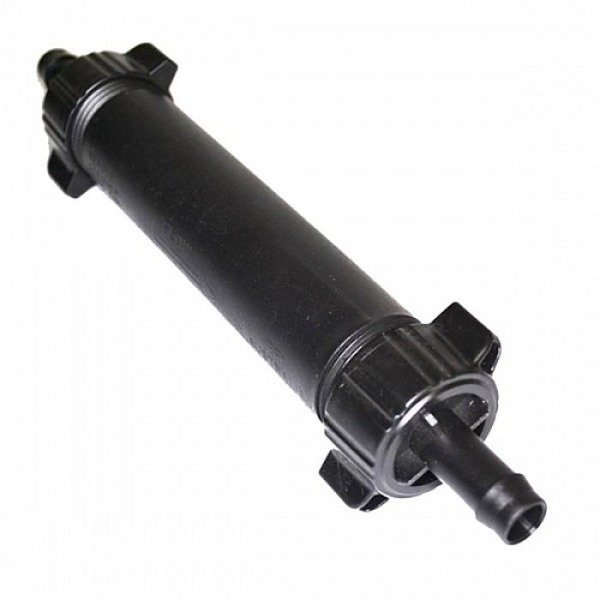
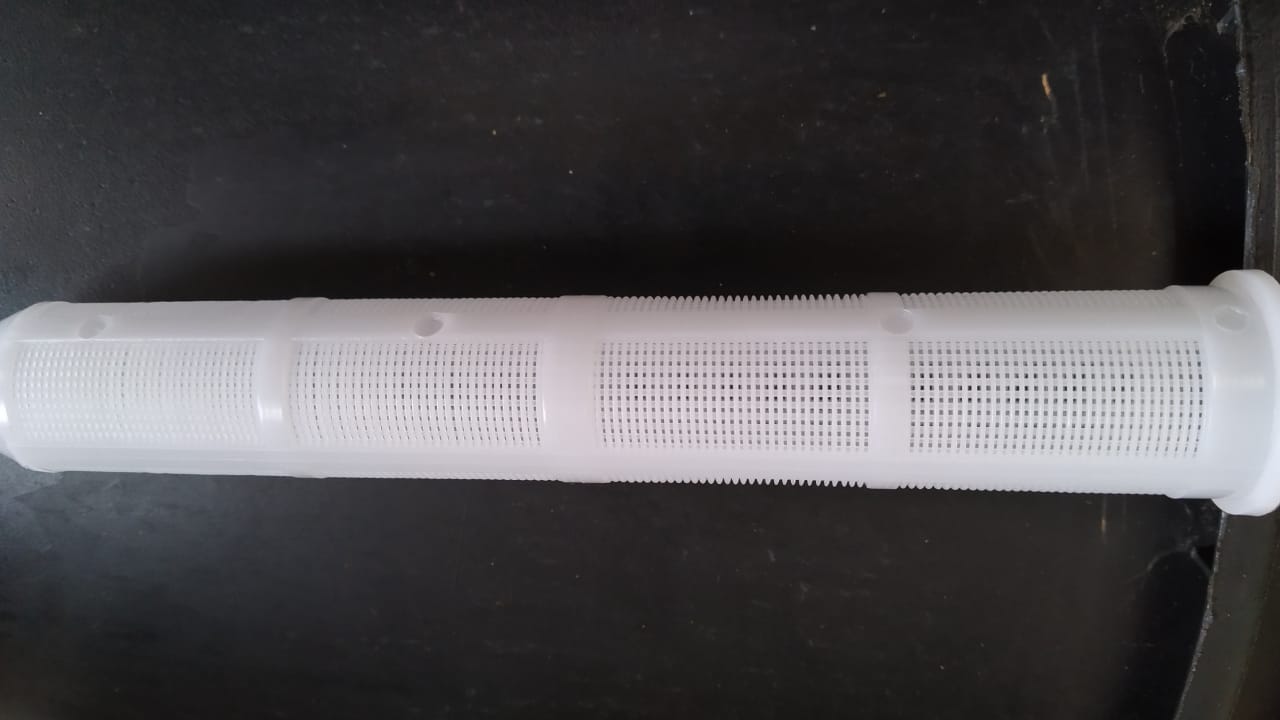
The Black Autopot Inline Water Filter 12mm will filter out small bits of debris that are present in a water tank or nutrient reservoir. This will help prevent piping and Aquavalveblockages from happening. This is very handy when using water sources that may contain particulates, for example rainwater. in your feeding or watering systems. Rainwater harvested from rooftops often has grit, leaves, twigs and other bio-matter in it and these will eventually get stuck inside small diameter piping or Aquavalves, leading to improper functioning of the system.
Contrary to clear plastic inline water filters this black plastic filter will block out all sunlight from penetrating into the water / nutrient solution. Any clear piping or fitting used in the supply lines of water and especially nutrient solutions will cause algae growth to form inside these clear areas, which may spread to other parts of the system.
The filter has barbed connections on each side, with the shaft outer diameter being about 12.5cm. TIP: If you are connecting piping to the filter, stick the end of the piping into a bit of boiled water to soften up the pipe. This will allow for much easier fitment.
The Autopot inline filter has mesh size small enough to catch particles that may cause problems in an Autopot system, but will still let through very small particles, bordering on silt/ sludge. We advise consulting an irrigation supply store with regards to getting rid of extremely small or fine types of particulates.
Filter mesh size of the Autopot Inline Water Filter can be seen in the picture below:
Chikamasa PST-8 General Purpose Pruners have a thicker width of cut than finer shears and trimmers, making it a wonderful tool to have when trimming off larger stems and stalks in your indoor garden. These are also great for general pruning in an ornamental garden or homestead. Die-cast aluminium makes the prunerhandles tough and strong.
This pruners’ high quality carbon steel blades makes sharp, clean cuts and the reinforcing rib is close to the rivet to provide enhanced cutting strength and the rubber coated steel plate grip and soft coil spring makes them easy to handle. Carbon-steel blades do rust if they aren’t kept dry and lightly oiled.
Blade length: 45mm, total length: 19cm.
Doing regular pruning of indoor and outdoor plants provide better branching structures over time, which will allow for more even flowering platforms when growing indoors and will create better looking, more manageable ornamental features in your residential garden.
When pruning ornamentally in your garden, apply the tips below:
Always cut out dead and crossing branches first
Then look for branches that have to be cut back because they are getting in the way of bedding edges, walkways, or other plants.
Trees and shrubs can often be hollowed out from their centers, allowing in more light to plants down below and allowing them to grow to an even more impressive size more quickly.
Get an idea of what you would like the plant to look like once trimmed, before staring to shape it and step back and review your progress from many angles at a distance during your progress.
Also cut branches back to the originating trunk. Only leave half branches if you would like them to bush out there later on. In these cases, at least cut the branch back to a node.
ALWAYS ONLY cut where you can SEE THE PRUNER BLADES!!!
Chikamasa PST-8 General Purpose Pruners are made in Sakai, Japan, by Chikamasa CO., Ltd, – making world renowned pruning shears and scissors for 105 years!
Garden HighPro Vertical Wall Propots: These strong and long lasting vertical fabric pot hangers have a waterproof canvas backing with metal mounting rings punched through them for easy installation. Please note that some moisture may however seep through the stitching in the canvas.
The breathable geotextile fabric that the front potting cavities are made out of promotes soil aeration and air-pruning and also allows the substrate to dry out, so that roots do not stay waterlogged.
Create a beautiful vertical plant wall quickly and easily or use them to grow a lot more plants where space is limited.
Dimensions of Canvas backings:
12Pot: 100cm (H) x 90cm (W)
8Pot: 100cm (H) x 60cm (W)
4Pot: 100cm (H) x 30cm (W)
We recommend using a light Coco Coir and Perlite substrate and to avoid heavy, dense potting soils when filling the pots for planting. Also water lightly (even if watering needs to happen more frequently) to avoid the strain that the additional weight of fully saturated substrate will place on the mountings of your vertical unit.
Watering your Garden HighPro Vertical Wall Propots can be made easier with automation: Button drippers that are connected to your current residential irrigation system can be installed to water each pot cavity. Choose a button dripped that will emit just the right amount of water for each pot during your regular watering schedule. Button drippers require a few Bars of water pressure to function correctly, so will not work with low pressure water pumps. If you are building an automated or semi-automated watering system for your vertical wall using a low pressure water pump, use arrow drippers instead.
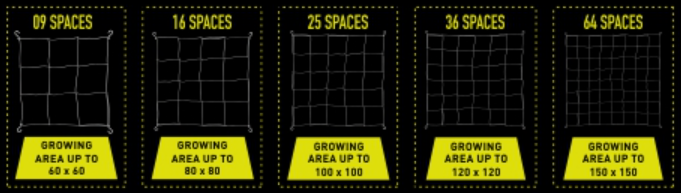
Garden HighPro ProNets are soft elastic rubber stretch nets (trellis nets) that provide versatile plant support for training, leveling or supporting flowering plants or climbing / vining vegetable plants. The nets can be installed vertically or horizontally depending on your application.
These durable and long-lasting stretchable nets include 2 hook sizes, enabling fitment on grow tent poles of up to 30mm in diameter. These hooks can also be used to clip multiple nets together when scrogginglarger areas.
Garden HighPro ProNets can be used in grow tents and other grow spaces of up to 1.5 square meters and the nets can be hooked together to cover even larger areas. Use the 120 sized net for tents up to 1.2m x 1.2m and the 150 sized net for 1.5m x 1.5m tents.
Trellising your plants into a flat canopy, a.k.a. scrogging (Screens of Green) has the advantage of creating a flat plane of plant tops/stems, where all budding sites can get uniform, maximized light from your light-source. There is a zone of about 6 to 10 inches from the top of your plant canopy where light still has a good chance of penetration and it is in this zone where you will get the best flower formation. Growers often trim off all shoots and leaves that are lower than this area of penetration early in the bloom cycle, knowing that the energy that would have gone into forming tiny little flowers in this dark, lower area will now put be put to much better use in forming bigger flowers and fruits in the well-lit top canopy.
We use cookies to ensure that we give you the best experience on our website. If you continue to use this site we will assume that you are happy with it. Privacy policy