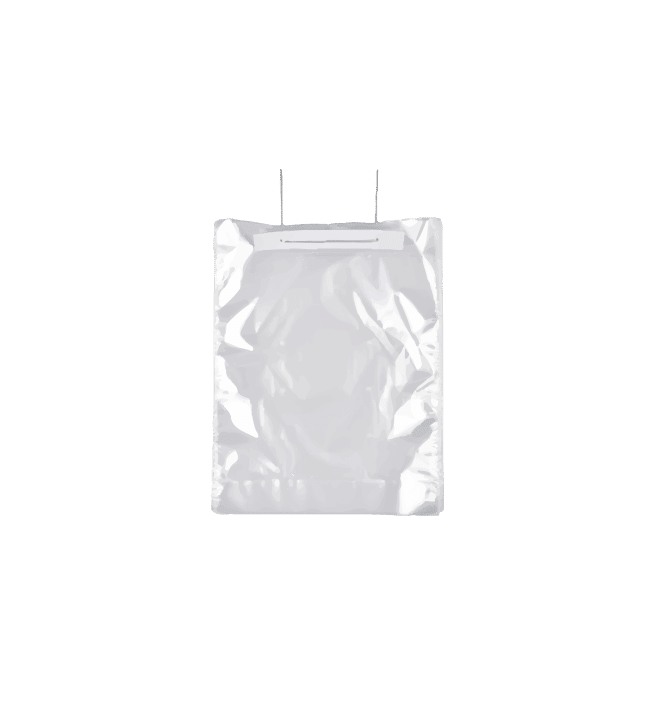
TerpLoc Wicket Bags – The world’s first packet-less modified atmospheric packaging for flower is now available in South Africa.
TerpLoc creates the optimal microclimate for storing cannabis by regulating the relative humidity in the packaging while protecting your product from exterior elements that would degrade its quality. TerpLoc is designed to provide peace of mind.
No more turkey bags! Our Wicket bags, made with TerpLoc Technology, are intended for backend storage before the product is packaged up. The small wicket bags (20 liters) are made for 500 – 1000 grams of cannabis and the large (100 liters) size can fit 2.2 – 4.4 kilograms depending on the density of the nugs. The cannabis can be placed into this bag after it has been properly dried and sweat. This style bag is intended to be tied off or sealed with a closure such as a zip tie or twist tie. This way the bag can be easily opened; the cannabis is still fresh at this point so you want the ability to burp it if needed. Our wicket bags will help solve your bulk storage needs and will constantly work to protect your crop from mold while maintaining valuable weight.
PLEASE NOTE: Steel and cardboard bulk holding bracket in photo is NOT INCLUDED, as the bags are sold individually.
5 gallon ( about 20 liters ) – bag Dimensions: 46 cm x 56 cm, when flat
27 gallon ( about 100 liters ) – bag Dimensions: 61 cm x 102 cm, when flat
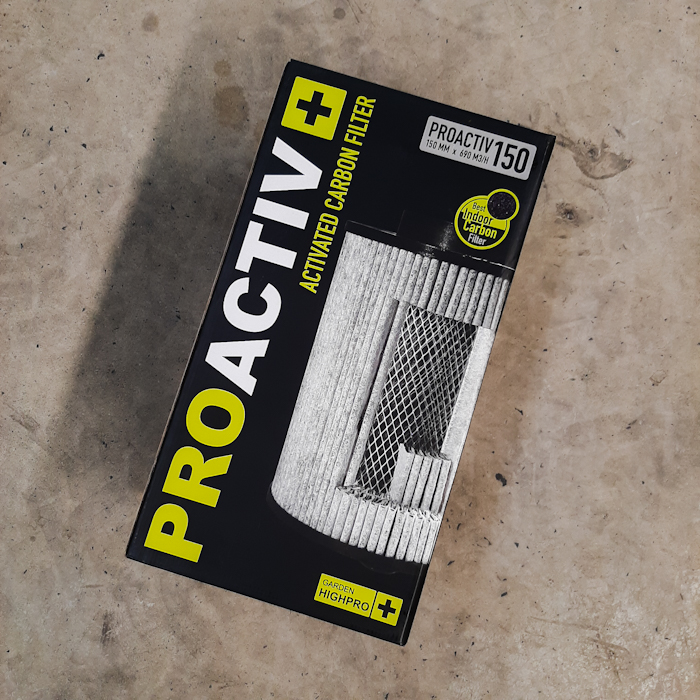
ProActiv Carbon Filters use only 100% food grade virgin coconut activated carbon, encased in multi-layer fleece mats that are sealed air-tight on both ends of the scrubber.
Installation is super easy – just clip each end of the filter onto a rope ratchet and attach your ducting!
Get rid of unwanted odours by attaching a carbon filter before your exhaust fan/s.
In a closed-system grow area, cycle your air through a carbon filter to help keep it free from dust, mold spores and bacteria. (Be sure to DEHUMIDIFY – carbon filters stop working in 85% + R.H. environments !)
Clean and scrub your incoming air supply and stop pests like spider mites and others from getting into your grow area by installing a carbon filter before your inlet fan/s.
How match your Garden HighPro ProActiv Carbon Filters up with the correct sized inline fans:
1) First, determine how much air-flow your will need through your grow space. If you are using fans to exhaust heat caused by hot HPS grow-lamps, a quick calculation can be done…
Number of lamps × Watts of each lamp ÷ 2 = Required cubic meters per hour of air flow needed.
(We recommend adding × 1.2 to this answer for our HOT ZA summers!)
2) Find one or more fans (whichever will best suit your area) that will provide a total airflow =/> than what has been worked out in step 1.
3) Match up each of your chosen fans with a carbon filter of the same diameter (preferably, to avoid the additional cost of ducting reducers). Also check the filter length if installing in cramped spaces.
VERY IMPORTANT: ALSO make sure that the filter’s air-flow capacity matches or exceeds the fan’s airflow rating, using the ProActive Filter table below. If too much air passes through the filter, it will not be able to scrub the passing air thoroughly!
4) Once your fans and filters have been matched up, it’s time to work out how many meters of ducting your will need, as well as other accessories, like Rope Ratchets, Ducting Clamps, or rolls of Aluminium Tape.
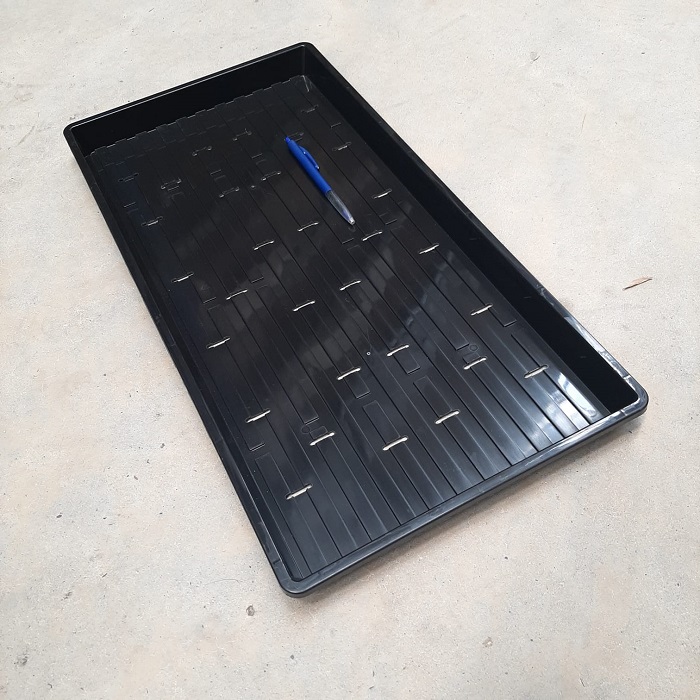
The 30mm Microgreen Tray With Holes (drainage slots, to be precise) and is 275mm wide and 535mm long. The drainage provided will help prevent overly wet substrates and potential rot.
With its low 30mm height, it can be filled to the brim using only about 4.5 liters of growing medium.
Coco coir based substrates/growing mediums are a very popular choice for growing microgreensat home, as it is a soft and airy medium with great moisture retention. Because the microgreen growing cycle is so short, with the seedling relying mostly on nutrients stored inside the seed itself, adding any supplements or additional nutrients to your substrate is not a necessity at all, although a lot of people do add a little bit of worm castings to their mixes, claiming better results.
Once you have added your substrate into the 30mm Microgreen Tray With Holes, water or mist spray lightly if the substrate is on the dry side and tamp the substrate down very lightly by hand, to get it to settle and flatten out nicely. Then gently sprinkle your seeds across the surface. Once this is done, a VERY thin layer of additional substrate may be sprinkled over the top of the seeds (using a baking sieve, for example)
Place the trays into a suitable environment for germination and mist or spray the top of the substrate regularly to prevent it from drying out. (A propagation dome will help keep substrate moist until your seeds have germinated, saving you a lot of effort. Remove the ). Do not overspray, as this will cause overly wet “swampy” subsurface conditions! Just keep the substrate slightly moist at all times.
Once your seeds have sprouted and grown to a harvestable size, you are able to clip off the delicious micro-leaves for your dishes and salads with a pair of pruning scissors.
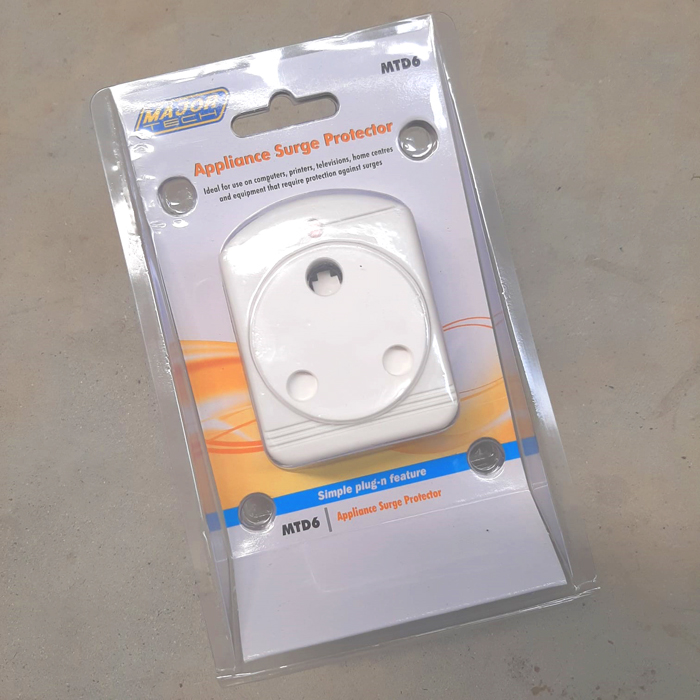
A Surge Protector will protect your valuable electrical equipment from surges in electrical supply. When a sudden increase in voltage occurs, such as from a lightning strike or damage to a power line, the surge protector detects the excess current and safely diverts it through the house’s grounding path.
These “point of use” or “plug-in” Surge Protectors will only work if plugged into grounded electrical outlets in locations where electrical wiring has proper grounding installed. Have your location inspected by a certified electrician if you are not certain about your wiring – this small expense is well worth the cost when compared to the possibility of destroyed electronics and other equipment or damages caused by an electrical fire.
These surge protectors are not only able to protect your growing equipment but also other household items, such as persnal computers, fridges and freezers, televisions, Hi-Fi’s, gaming consoles, etc. It is also worth mentioning that these units will not protect against “brown-outs”, where the electrical supply drops to levels lower than normal. If protection against current drops is also a requirement, then a UPS unit will be a better option.
Also see our Contact Relays – these are used when multiple lighting ballasts are powered on with a single timer. The relay will route the current through a 30 Amp relay when the ballasts come on, so that the time does not burn out.
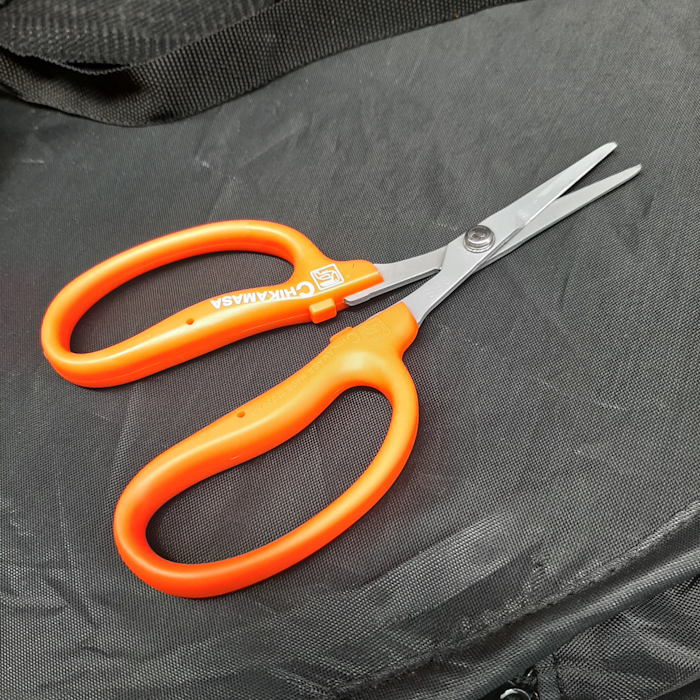
Chikamasa B-500SLF Pruning Shears are professional-grade garden trimmers that provide ergonomic comfort and surgically precise cuts that will make short work of trimming and pruning. Popular among hydroponics and indoor gardeners working with high-value crops, these Japanese made shears incorporate detailed design features such as rounded blade tips and a non-stick fluorine coating over the stainless steel blades. Light-weight and razor-sharp, Chikamasa pruning scissors are an excellent choice for jobs that require precision hand pruning and trimming.
No-stick, razor-sharp stainless steel blades at a slight angle from the ergonomically designed resin handle.
Excellent for detailed pruning, refined trimming, and high-quality cutting.
Chikamasa applies a non-toxic oil upon packaging to prevent rust/sticking blades after manufacture, which can be wiped off before first use. Grape seed oil or olive oil works really well when cleaning and storing your pruning shears after use.
Pruning scissors come in handy when cultivating prized plants and are ideal for fine pruning, where regular garden pruners are just too large and clumsy. These small types of shears are also frequently used when trimming dried Cannabis. The Chikamasa pruners’ ergonomic design will reduce hand fatigue over time when trimming larger volumes and the non-stick coating will help prevent sticky blades.
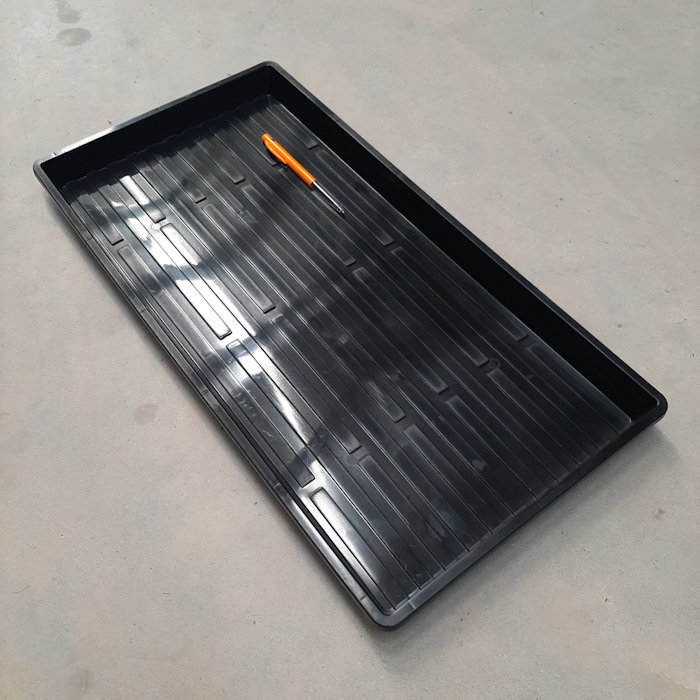
The 30mm Microgreen Tray Without Holes is 275mm wide and 535mm long.
With its low 30mm height, it can be filled to the brim using only about 4.5 liters of growing medium.
Coco coir based substrates/growing mediums are a very popular choice for growing microgreensat home, as it is a soft and airy medium with great moisture retention. Because the microgreen growing cycle is so short, with the seedling relying mostly on nutrients stored inside the seed itself, adding any supplements or additional nutrients to your substrate is not a necessity at all, although a lot of people do add a little bit of worm castings to their mixes, claiming better results.
Once you have added your substrate into the tray, water or mist spray lightly if the substrate is on the dry side and tamp the substrate down very lightly by hand, to get it to settle and flatten out nicely. Then gently sprinkle your seeds across the surface. Once this is done, a VERY thin layer of additional substrate may be sprinkled over the top of the seeds (using a baking sieve, for example)
Place the trays into a suitable environment for germination and mist or spray the top of the substrate regularly to prevent it from drying out. (A propagation dome will help keep substrate moist until your seeds have germinated, saving you a lot of effort. Remove the ). Do not overspray, as this will cause overly wet “swampy” subsurface conditions! Just keep the substrate slightly moist at all times.
Once your seeds have sprouted and grown to a harvestable size, you are able to clip off the delicious micro-leaves for your dishes and salads with a pair of pruning scissors.
The 30mm Microgreen Tray Without Holes can also be used as a drip tray for potted plants, which will catch runoff during watering or flushing.
An Autopot FlexiTank Tap comes in handy when you are planning or building an Autopot system and would like use a Click Fit Tank Adapter/Filter to run a trunk feeding line to multiple Autopot sets. These taps also serve to replace old, worn-out FlexiTank Taps.
The tap fits through the ready-made holes in both the FlexiTank and FlexiTank Pro ranges and includes 2 rubber washer seals that are hand-tightened to each side of the reservoir with the provided plastic nut. The tap can also be installed into any other suitable water reservoir through which the correct sized hole (26mm) can drilled to fit the tap. Hard plastic industrial drums are often use as water reservoirs when building hydroponic systems. When considering such a container, make sure that the plastic will not let sunlight through its walls. If sunlight penetrates into the nutrient solution, algae will start growing inside of it, causing nutrient depletion and Oxygen loss in the solution.
The outlet side of the Autopot FlexiTank Tap is threaded and fitted with a 26.5mm click connector, to which a Click Fit Tank Adapter/Filter can be fitted. Autopot piping (16mm) or irrigation piping (12mm) can then be connected to feed the Autopots in the system.
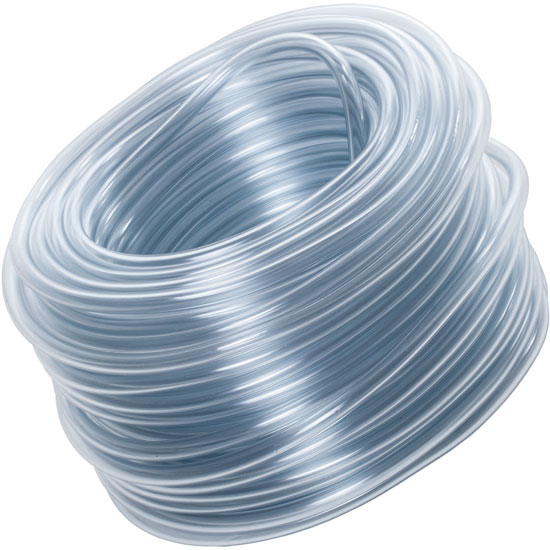
Air Tubing or air piping is used to connect air stones and air curtains to air pumps and air compressors, which in turn are used to aerate and agitate nutrient solutions in hydroponic growing systems, like DWC‘s (Deep Water Culture) or NFT’s (Nutrient Film Technique), etc. This provides oxygen to plant roots, helps prevent algae formation and prevents nutrients from settling to the bottom of feeding tanks over time.
5mm Air Tubing, made from clear flexible plastic or silicone, is compatible with most air pumps and air stones, and is sold per meter.
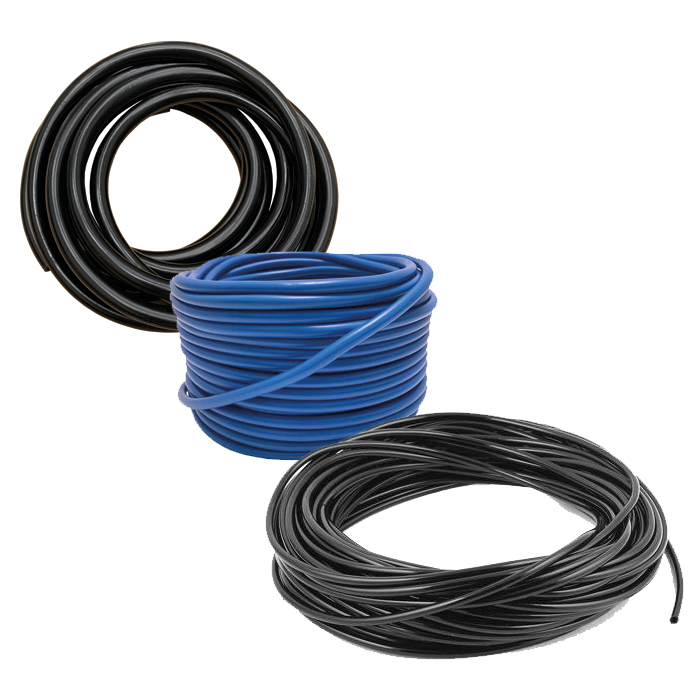
Regular plastic air piping is more rigid than the silicon air piping, but may form permanent “flat spots” over time if the piping remains bent for long periods – for example, when running the piping underneath a reservoir lid.
Silicon Air Piping will keep its original shape much better, but is softer and more pliable – which means that it can more easily be pressed shut and care will have to be taken to install the piping properly, so that it DOES NOT get pressed shut by a reservoir lid, for instance.
Air tubing should not be used to channel water, as the semi-transparent material will allow light though it and this will cause algae to grow inside the piping, which may spread to other parts of the system. This may not be a problem if present in small quantities, but will rob your plants of oxygen and nutrition when out of hand.
Always make sure that your air pump is installed HIGHER than the top of your water reservoir, so that water cannot run into the air pump form the reservoir and cause an electrical short-circuit. Alternatively, use Air Pump Check Valves to prevent water from getting into your air pump. If your system is set up outside, make sure that your air pump and electrical supply is properly waterproofed.
TIP: Air tubing can also be attached to a suitable syringe and can then be used to draw exact nutrient doses from bottles of organic or hydroponic nutrient ranges.
Autopot Piping comes in various thicknesses and is made from soft PVC, which is slightly softer and more pliable than agricultural LDPE or PVC irrigation pipe. The elasticity of the Autopot piping molds snugly around pipe fittings when attached, providing a leak-proof seal when used in low and no pressure applications, like Autopot’s gravity fed self watering systems. Fittings can also be removed from the this type of piping quite easily, allowing for easy deconstruction or changes in system layout.
We especially recommend using Autopot piping to connect your Autopot Aquavalves because of the soft fit.
Below is a table of the approximate inner diameter and outer diameter measurements of the various types of Autopot Piping that is available:
General Name
Inner Diameter
Outer Diameter
Compatible Fittings
6 mm
4.2 mm
6.3 mm
“5 or 6 mm” Fittings, 6 mm Top Hat Grommets*, Older Aquavalve systems
9 mm
6.5 mm
9 mm
“9 mm” Fittings (Used with the new Aquavalve 5 and Aquavalve 5 systems)
16 mm
12.5 mm
18.5 mm
“12 mm” Fittings & 16 mm Top Hat Grommets*. Used for trunk lines in multi-pot systems.
* Correct hole size must be drilled to house Top Hat Grommet.
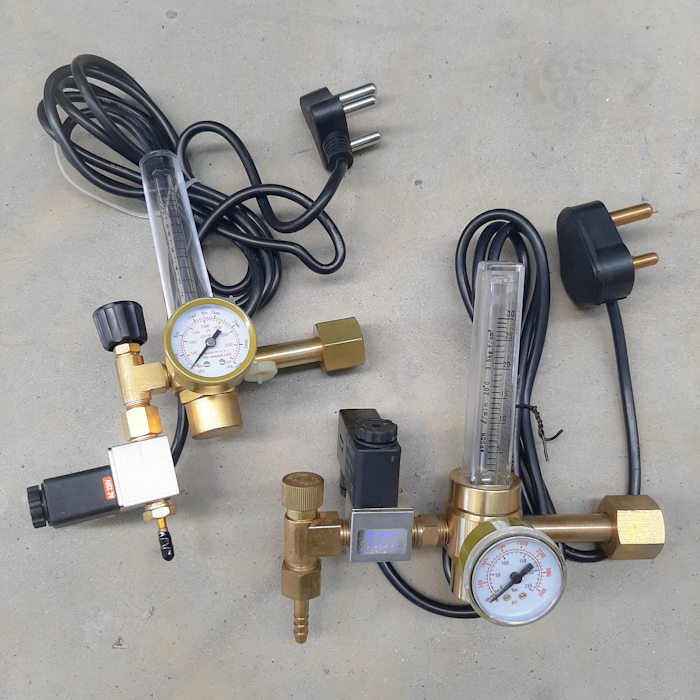
A CO2 Regulator helps with CO2 supplementation for your grow area and your plants will love you for it! CO2 supplementation using CO2 tanks and regulators become necessary when the grow area is too large to be accommodated by other means of CO2 supplementation that are best suited for smaller growing areas, like the average grow tent ( e.g. Yeast and sugar solutions / mycelium generators / compressed CO2 can dispensers, etc. )
There is great benefit to supplementing with CO2 when growing – as plants use the carbon gleaned from CO2 in the air to literally build themselves! ( Read more HERE )
Please Note: Our regulators may vary slightly in appearance and specification, depending on availability.
IMPORTANT: These types of regulators are NOT made to release gas for extended periods of time ( short bursts of up to around 30 seconds only, with enough time between bursts to allow the regulator to get back to normal temperature ). For LARGE rooms a thermostatically controlled electric heated regulator will be required! An unheated unit will freeze up and cease to operate correctly or trip power supply when it releases gas for extended periods of time / too frequently! If a regulator freezes up – it is either overworked, or faulty. Both of these conditions require urgent attention.
HANDY TIP: Apply Soapy water to (pressurized) parts and connections of your system to make sure that there are no leaks present.
These CO2 Regulators are fitted with a 220-volt solenoid which can be turned on and off manually, or using a digital timer. Both of these methods are NOT RECOMMENDED – increasing CO2 levels in the air without CO2 monitors or CO2 controllers CAN BE FATAL! Using a CO2 controller with the regulator is ideal, as the controller’s CO2 sensor will turn the CO2 supply from the tank OFF when the desired ( and still safe for humans ) PPM levels are reached. Growers often like add enrich their room air to concentration of up to 1200 PPM CO2.
CO2 tanks are normally rented or refilled with commercial gas suppliers, e.g. Afrox.
Our regulators have the following minimum specifications:
1.6m length of electrical cord and standard ZA Plug.
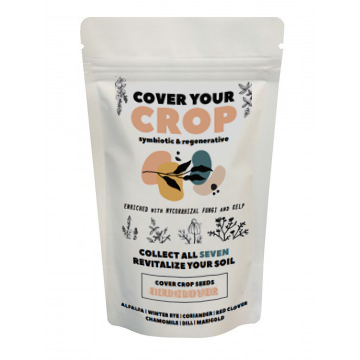
Cover Your Crop Seed Packs are here! Each seed pack is enriched with mycorrhizal fungi and kelp flake and will boost the micro-biome in each of your potted plants.
Companion planting is a natural and affordable long term organic solution to providing natural insecticides and fungicides for your Cannabis garden.
Cannabis responds to companion planting with stronger growth, greater resistance to disease and pests and better yields which results in more oil production. A collection of plants grown together that support each other and cannabis are called guilds.
Guilds act as diverse micro-ecosystems, that improve overall soil quality, water penetration and retention and bio-availability of nutrients. Healthy guilds attract beneficial insects and small creatures, that prey on pests that can damage cannabis. Companions often disguise the unique cannabis aroma of flowering plants and hides the strong smell unavoidable during flowering stage.
Small rocks placed randomly among the growing area can become homes for predatory spiders or reptiles that will also help keep insects under control. Lizards are very effective hunters of larger insect pests like moths and can get rid off ants extremely well.
Companions can also act as living mulch, provide shade, green manure, added nutrients, vitamins and minerals. This can all be achieved by planting the correct companions.
Types of cover crop seed packs available:
Winter Rye: Develops a deep root system that locks in soil nutrients and promotes oxygenation. A great way to add bio-available nitrogen into your compost pile. Cut young Rye and add to your smoothies!
Germination Temperature: 20°C – 28°C Prefered PH: 5.6 – 6.5 Light: Full sun
Red Clover: The low-growing clovers are very resilient and act as living mulch, encouraging soil friability. All the clovers fix nitrogen, which is released into the local neighbouring plants as it decomposes.
Germination Temperature: 10°C – 25°C Prefered PH: 5.5 – 7.5 Light: Full sun
Alfalfa: This meter high grass repels the dreaded Lygus Bug, while attracting friends to your patch, such as ladybugs, assassin beetles and several predatory wasps.
Germination Temperature: 18°C – 29°C Prefered PH: 6.8 – 7.5 Light: Full sun
Marigold: A companion planting staple, the powerful and pretty marigold repels beetles and leaf hoppers, Mexican beetle and objectionable nematodes. Its buoyant bloom attracts beneficial nectar-eating species.
Germination Temperature: 23°C – 28°C Prefered PH: 5.5 – 7.5 Light: Full sun
Dill: Dill attracts allies like honeybees and hoverflies, ichneumonids and other beneficial wasps. Swallowtail butterfly caterpillars will forgo your cannabis, as they prefer feasting on dill. Spider mites, the curse of the cannabis farmer, despise dill and will stay away in droves. Dill is also an effective repellent for aphids, cabbage looper and squash bugs.
Germination Temperature: 15°C – 22°C Prefered PH: 5.5 – 7.5 Light: Full sun
Chamomile: The carpet of small bright white flowers will always be buzzing with delighted honeybees and hoverflies while repelling mosquitoes and flies.
Germination Temperature: 20°C – 28°C Prefered PH: 5.6 – 7.5 Light: Full sun
Coriander: As a front-line deterrent, coriander repels aphids, potato beetles and the dreaded spider mite and helps attract tachninid flies, hoverflies and a variety of parasitoid wasps that prey on bad bugs or their larvae.
Germination Temperature: 18°C – 21°C Prefered PH: 6.1 – 7.8 Light: Full sun
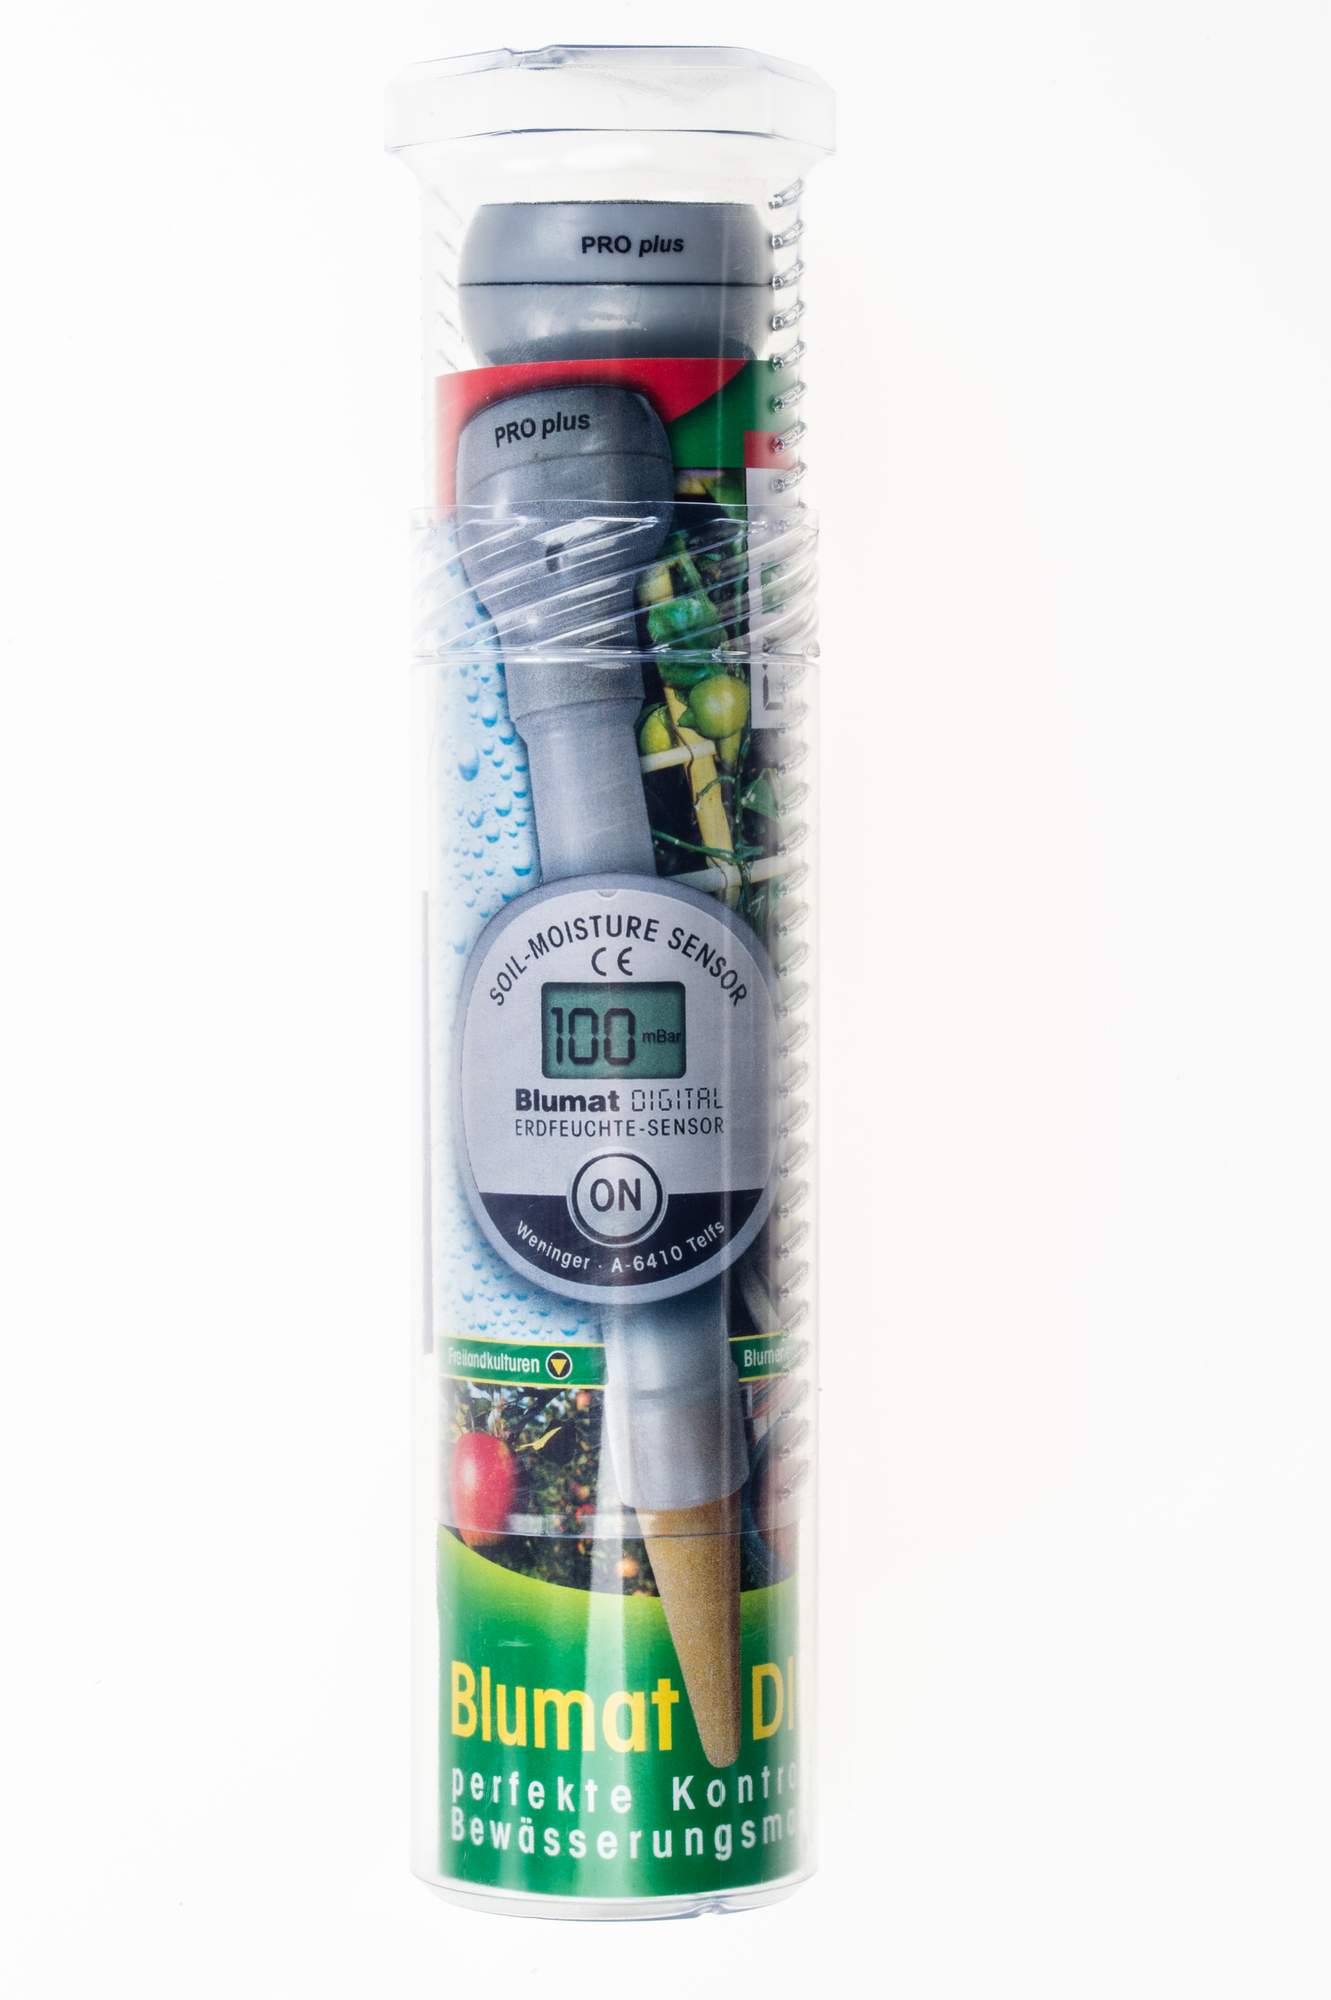
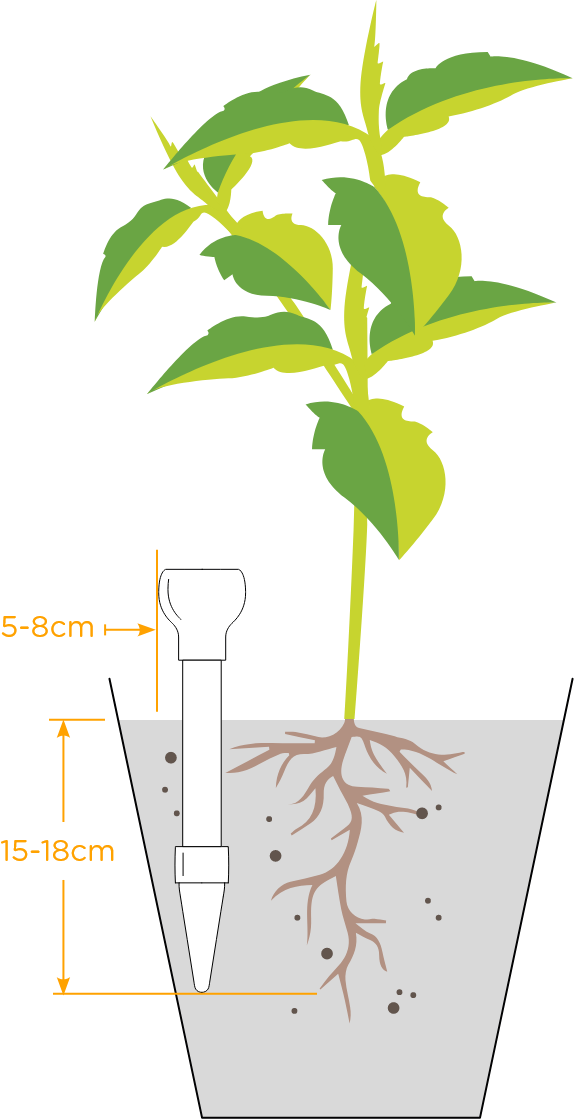
The Blumat Digital Soil Moisture Meter is a professional moisture meter allowing you to accurately check the moisture content of your soil or substrate. The meter uses Blumat’s porous clay cone sensor technology to measure the soil moisture. As the soil needs to “bond” to the clay “carrot” cone in order for the meter to give accurate readings ( in millibar ), the clay cone needs to be in the soil for 2 to 3 hours before the first readings are taken. This makes the meter most valuable as a permanent meter for plants that will require constant monitoring. Detailed operating instructions HERE.
The meter comes in very handy to apply the precise amounts of water needed to sensitive plants and prevents root damage caused by over-watering or by too much rainfall during the rainy season.
Be careful not to damage the clay cone “carrot” sensor when inserting the probe into harder soils – making a hole roughly the size of the probe beforehand in harder soils will help to prevent sensor damage.
Operation:
NEVER immerse the electronic measuring in water or get it wet. If used outside during the rainy season – remove the electronic measuring head from the sensor when not in use ( the sensor, or carrot, can be left in the soil during rainfall ) OR protect the head by covering it with the plastic protection cap ( included with the meter ).
N.B: Always monitor the water level in the plastic tube of the “carrot” sensor before using the meter. If need be, fill the tube up to the brim again.
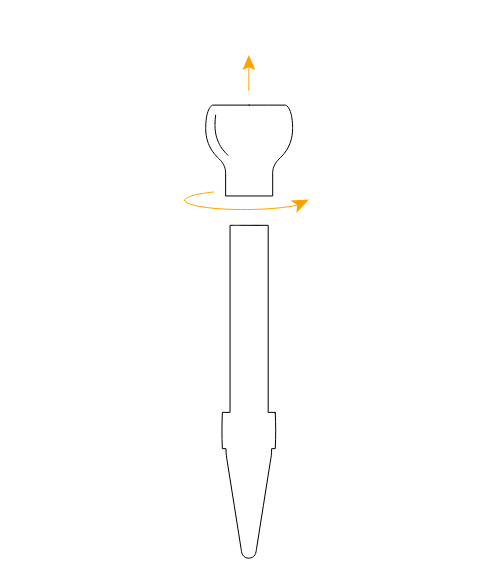
Unscrew measuring head
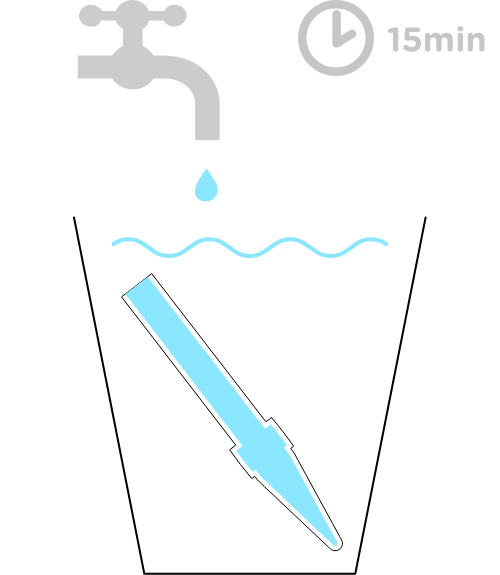
Soak plastic tube with ceramic tip in water for at least 15 minutes.
Fill plastic tube with tap water up to the brim.
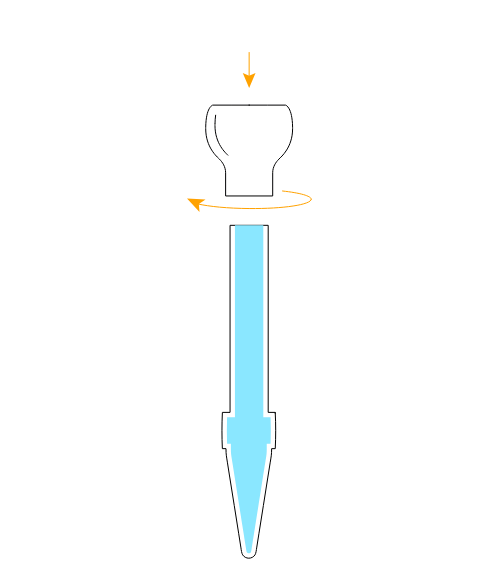
Screw measuring head back on as far as it will go.
Then insert into the soil, about 15 to 18 cm deep in the outer part of the root, for potted plants 5 to 8 cm from the edge of the pot.
For newly repotted plants, insert the cone directly into the soft soil always rotating to the right and then press the soil down slightly.
In case of dense root growth or very hard soil, pierce a suitable hole in the outer part of the root. Fill the hole halfway up with loose earth and water. Then insert the Blumat Digital rotating to the right, fill the hole with soil and press down.
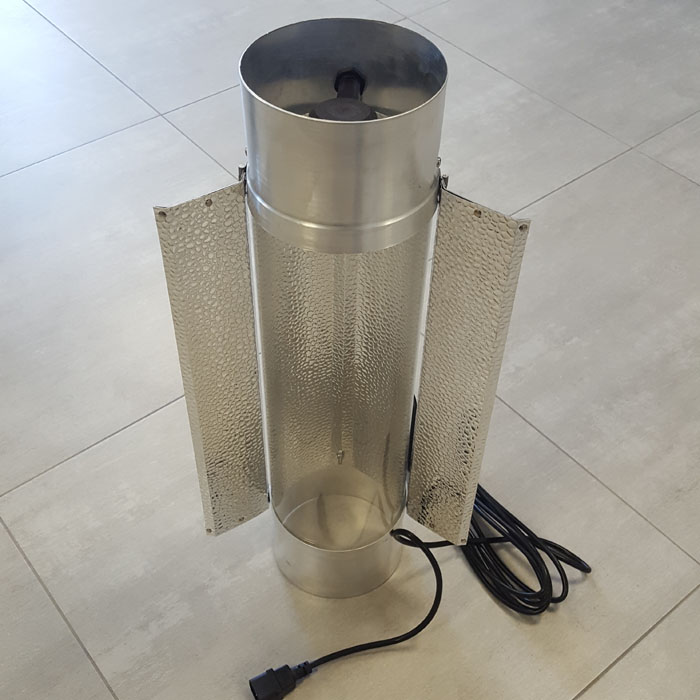
The Cooltube Reflector is an air-tight, fully sealed clear glass tube with a lamp mounting bracket in its center on the one end. Cooltube Reflectors are perfect for removing the excess heat generated by HPS or Metal Halide grow lights.
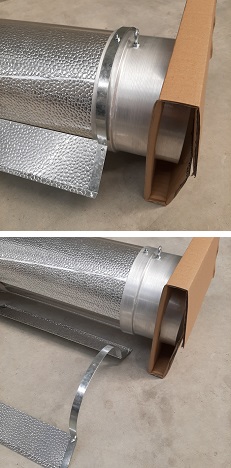
These Cooltubes have detachable side wings instead of being permanently attached on hinges that flip the wings up or down. (See photos on the left)
Cooltubes were one of the first air cooled reflectors to become available and all these years later they are still a firm favorite with many growers. They are effectively an inline glass tube that allows you to extract air through the reflector and over your lamp, taking the heat away before it can raise the temperature of your grow room. (Instructional video here)
Cooltubes can be mounted in series along the same length of flexible aluminium ducting.
The Cooltubes have a rounded internal reflector (inside the glass tube), as well as foldable outside reflector wings, for a slightly tighter light spread. They have a mounting hook on each side, to suspend from rope ratchets, come with a 4.5 m long male kettle plug power cord and can be used with up to 1000 Watt bulbs. The hood is fitted with a ceramic E40 light fitting.
Length of 6″ tube (150 mm diameter), end to end: 57 cm
Width of 6″ cooltube reflector wings (tip to tip): 27 cm
Length of 8″ tube (200 mm diameter), end to end: 72 cm
Width of 8″ cooltube reflector wings (tip to tip): 35 cm
We use cookies to ensure that we give you the best experience on our website. If you continue to use this site we will assume that you are happy with it. Privacy policy