📢 Important Notices: As part of our ongoing efforts to streamline operations and serve you more efficiently from one central hub, our Claremont store has integrated into our Brackenfell headquarters — we look forward to seeing you at our Brackenfell store!
Promo Ribbon
🍍✨ This month, get a FREE
Renegade Seed Co seed if your
cart totals R 500.00 or more! ✨🍍🔥 🔞
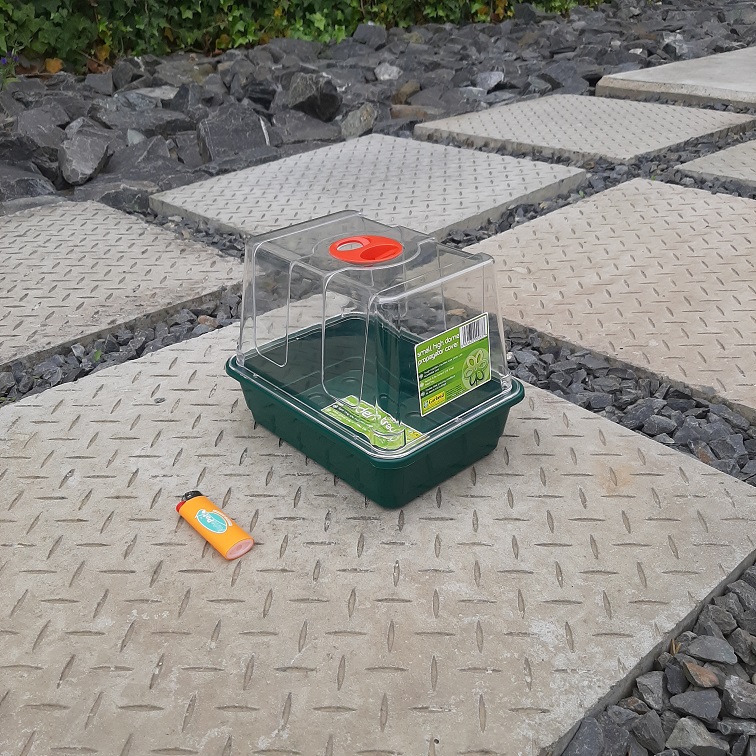
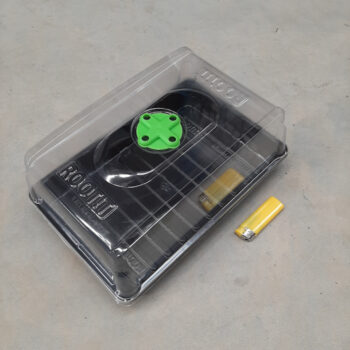
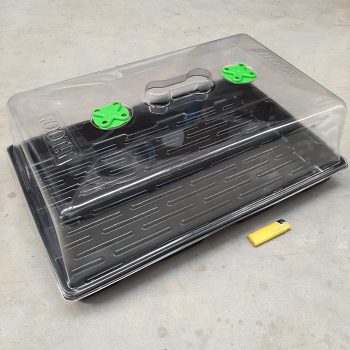
The Garland Small High Dome Propagator creates the perfect growing conditions for seeds and cuttings and is ideally sized for the windowsill.
The base tray features a generous 6cm planting depth, without any drainage holes, in order to promote healthy plant development.The lid is Injection molded in crystal clear shatter resistant material and features the easy to adjust ‘dial’ ventilator. The Garland Small Dome Propagator is an unheated high dome propagator which is perfect for cuttings because of the high dome.
This is a Premium range of propagation, all made from high quality recycled plastics. These items are super strong and durable, with thicker wall sections offering extra rigidity. The trays are easy to clean and can even be put in a dishwasher. Although injection molded trays are generally more expensive than vacuum formed equivalents, they will easily last for 10 years or more.
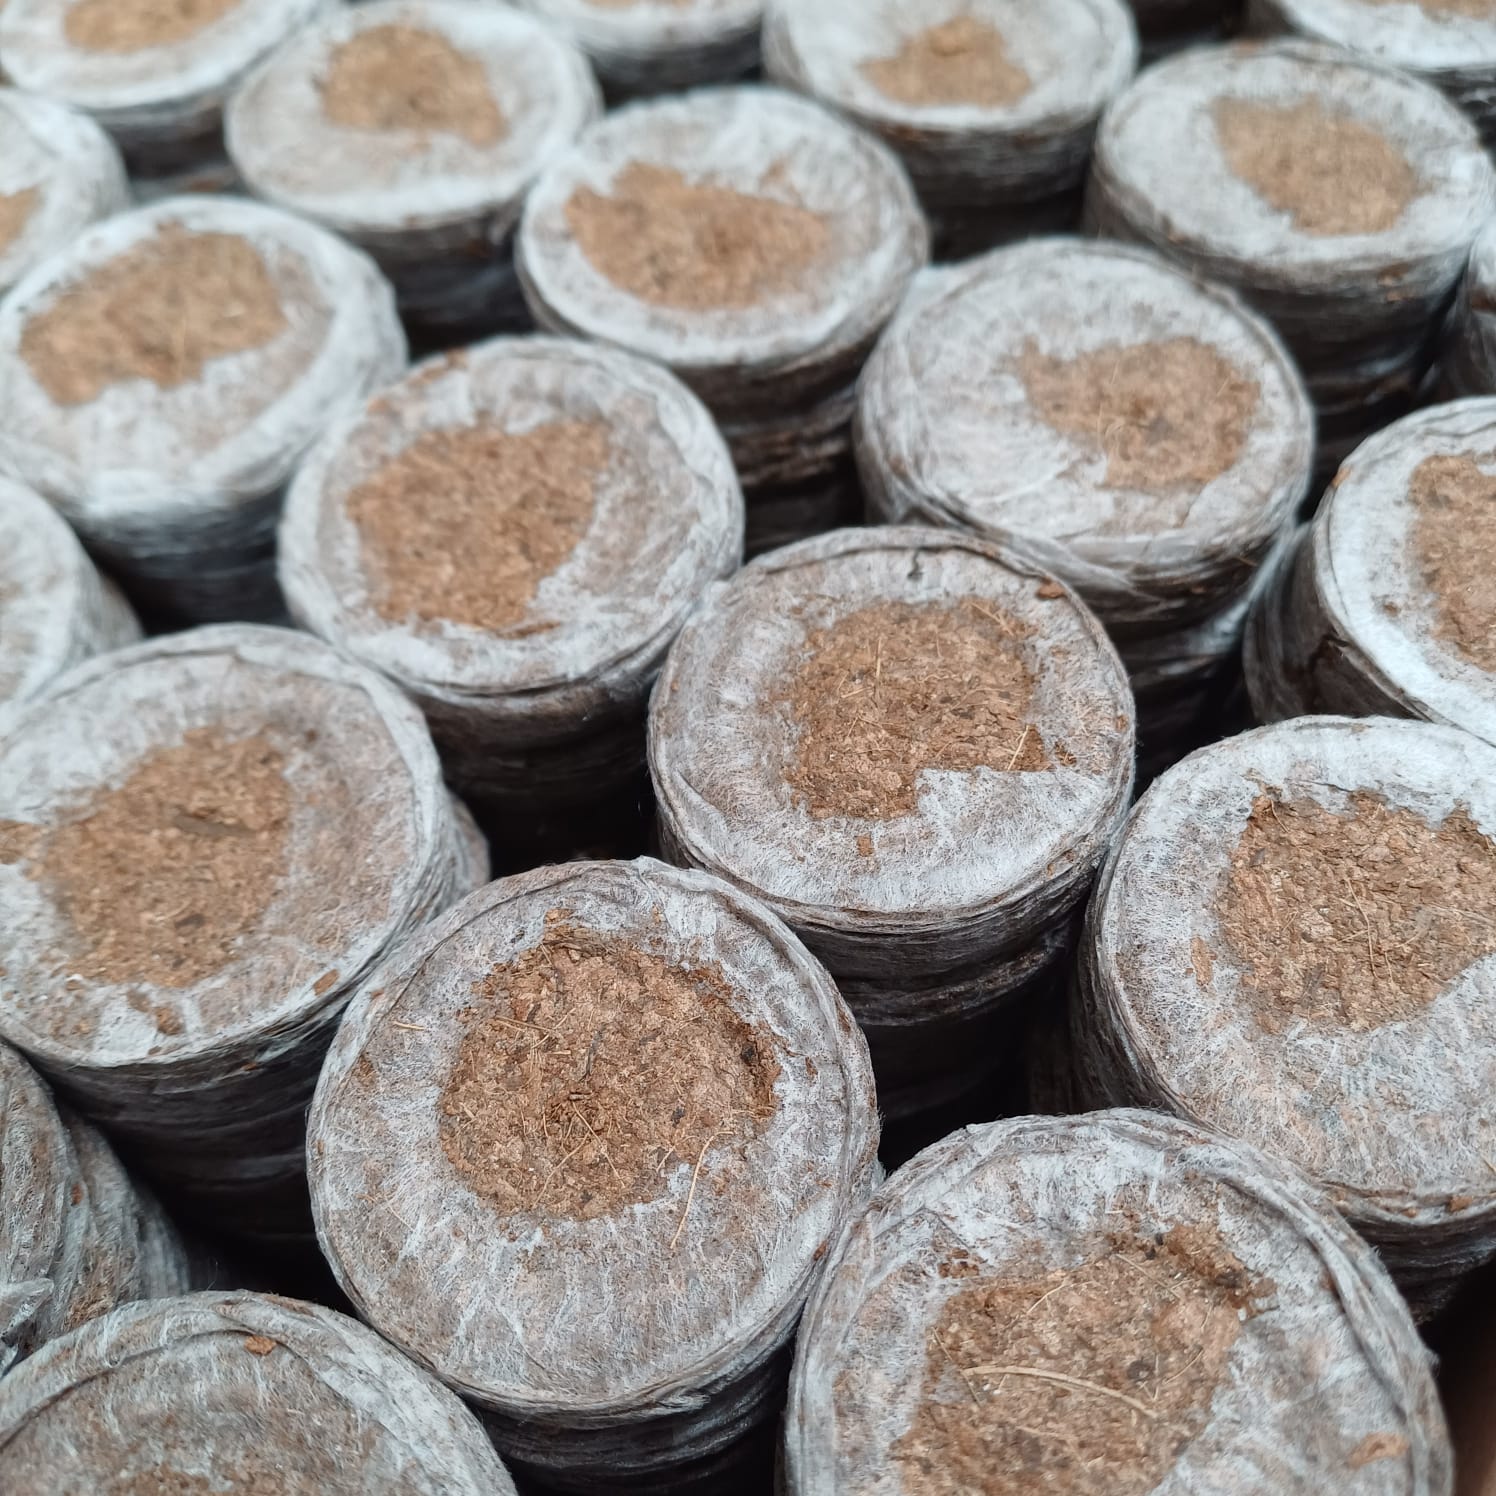
Jiffy 7 Pellet 39mm – Peat and Coco Coir mix Pellets: Width: 39mm (dry) x 42mm (wet) . May rise to between 35 and 40mm high when expanded.
Achieve faster, healthier germination with these premium germination / cloning pucks.
Key Features
Quick Expansion: Expands from 38mm to 41mm WIDE when hydrated, thanks to the updated 30% peat / 70% coco composition, which absorbs water faster for quicker plug expansion.
Biodegradable & Eco-Friendly: Made from natural, environmentally friendly materials that break down easily, reducing environmental impact.
Boosts Root Health: Structured substrate ensures excellent aeration and moisture retention, promoting strong, healthy roots and minimizing transplant shock.
Versatile Compatibility: Ideal for hydroponics, NFT systems, soil, coco coir setups, or any standard propagator. Seedlings can be transferred seamlessly into various systems or planted in pots or grow-bags.
Convenient & Easy to Use: Simply hydrate the pellet, drop in the seed or cutting, and place in a propagator– no mess, no fuss.
Why Choose Jiffy 7 Pellet 39mm
Jiffyis sold worldwide and trusted by professional growers and home enthusiasts alike.
Stable, high-quality substrate with base fertiliser content to support early growth.
Designed for fast, efficient propagation, whether starting seeds or cuttings.
Compact, space-saving design makes them easy to store and handle.
Soaking & Preparation Tips
For best results, soak Jiffy pucks in lukewarm water to encourage faster and more uniform expansion. Once fully hydrated, gently squeeze out any excess water to prevent overly soggy plugs that can hinder root development if needed. For an added boost, consider mixing in a light rooting solution, beneficial microbes or plant starter fertilizer during soaking to give seeds or cuttings an extra head start. Following these simple steps ensures your pellets are perfectly prepared to support strong, healthy growth from the very beginning.
Weighting in at only 142g, this handy LED fitting is quck and easy to install – while packing an 18W punch! (1 350 Lumens )
Its 6000 Kelvin colour temparature makes it ideal for the seedling and vegative growth phases of plants, white so-called “cool white” light spectrums have been found to be optimal.
Dimensions: 594 mm x 60 mm x 20 mm
NOT Waterproof – IP20 Indoor rating
The 18W LED Slim Batten Fittings come with a plastic frosted diffuser over the LED diode strips that are intergrated into the iron base of the fitting, and this makes the light fixture an easthetically pleasing option for shelves and cabinets where supplemental lighting may be needed. The diffuser can be removed if your goal is more operational and you want to maximise all available light for you plantings!
The fitting includes a set of 2 mounting clips that can be fastened to a surface with the 2 screws provided, then simply snap the fixture into place! Double sided tape can also be used to stick the fitting into place very quickly because of its light weight.
Connects directly to a 220V AC mains power supply.
We recommend using 2 of these fittings to cover one large or XL plant propagation dome, and to get the dome’s top as close to the LEDs as possible, because there is very little heat given off by the LEDs to worry about. In this case, closing the distance between the light and the leaves will maximise results! * This only applies to low wattage LEDs like this one!
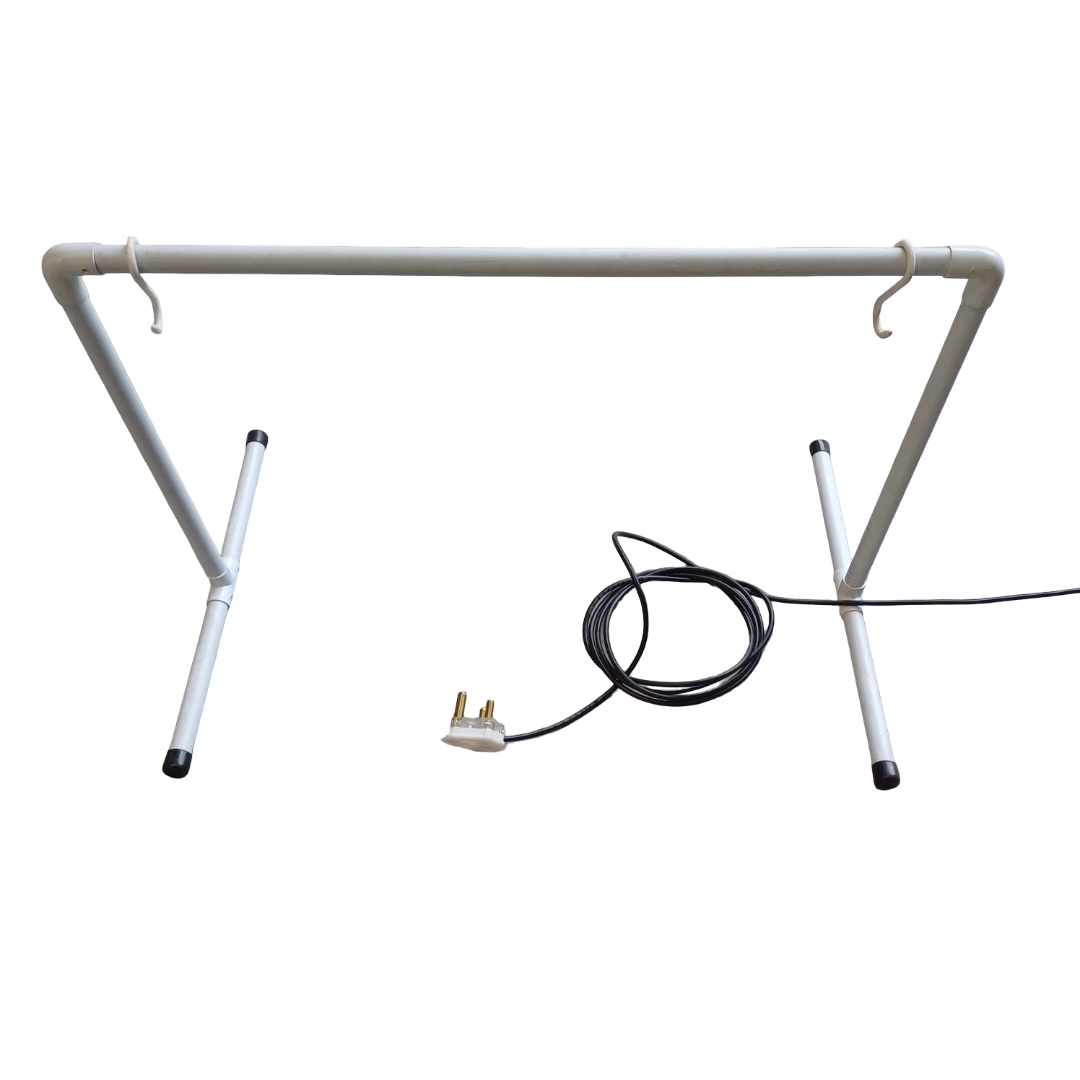
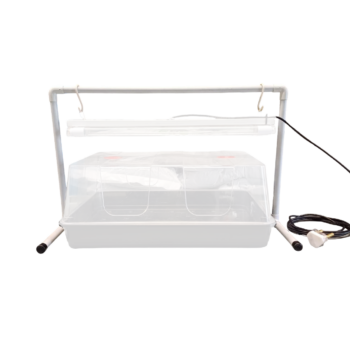
The 60cm T8 LED Fixture Hanging Frame is an excellent choice for indoor plant enthusiasts looking to enhance their propagation setup. Crafted from durable PVC, this sturdy frame is designed to easily suspend a 60cm T8 LED fixture and its 2 LED tubes (sold separately) above an XL propagation dome, ensuring optimal light distribution for successful germination and cutting propagation. The frame includes a length of 1.5m electrical cord and a 3-pin plug for straightforward installation and use.
Hanging the LED close to the top of the dome is crucial for optimal plant growth. This positioning maximizes the light output from our 18W fiture sets to the propagation dome, promoting seedling development and robust cutting rooting. The proximity ensures that plants receive the maximum amount of light with the least electicy usage.
Ideal for hobbyists and professional growers alike, this hanging frame offers a quick, easy and efficient solution for their propagation lighting, making it a must-have addition to any propagation station. Please note that the 6000K T8 LED fixture is not included and must be purchased separately.
With our T8 LED fixture installed in the hanging frame, the frame offers 29cm vertical and 62cm horizontal clearance for a propagation dome, allowing even the Garland XL High Dome Propagator to fit underneath.
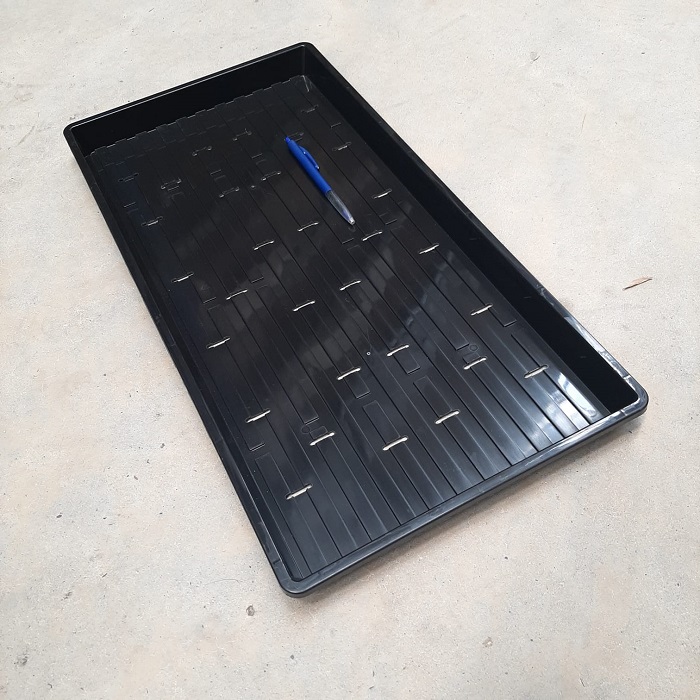
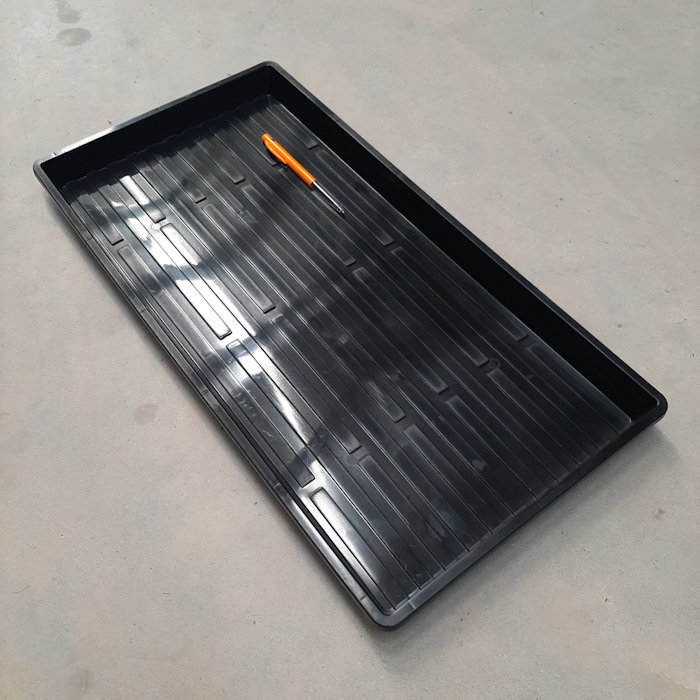
The 30mm Microgreen Tray Mesh Bottom is 275mm wide and 535mm long. The mesh bottom makes this tray suitable for multiple uses.
With its low 30mm height, it can be filled to the brim using only about 4.5 liters of growing medium.
Coco coir based substrates/growing mediums are a very popular choice for growing microgreensat home, as it is a soft and airy medium with great moisture retention. Because the microgreen growing cycle is so short, with the seedling relying mostly on nutrients stored inside the seed itself, adding any supplements or additional nutrients to your substrate is not a necessity at all, although a lot of people do add a little bit of worm castings to their mixes, claiming better results.
Once you have added your substrate into the 30mm Microgreen Tray With Holes, water or mist spray lightly if the substrate is on the dry side and tamp the substrate down very lightly by hand, to get it to settle and flatten out nicely. Then gently sprinkle your seeds across the surface. Once this is done, a VERY thin layer of additional substrate may be sprinkled over the top of the seeds (using a baking sieve, for example)
Place the trays into a suitable environment for germination and mist or spray the top of the substrate regularly to prevent it from drying out. (A propagation dome will help keep substrate moist until your seeds have germinated, saving you a lot of effort. Remove the ). Do not overspray, as this will cause overly wet “swampy” subsurface conditions! Just keep the substrate slightly moist at all times.
Once your seeds have sprouted and grown to a harvestable size, you are able to clip off the delicious micro-leaves for your dishes and salads with a pair of pruning scissors.
30mm Microgreen Tray Mesh Bottom trays can also be used for other home and hobby purposes, like sifting out Mealworm Beetles if you are breedingthem, or to sift grains, seeds, Perlite, etc.
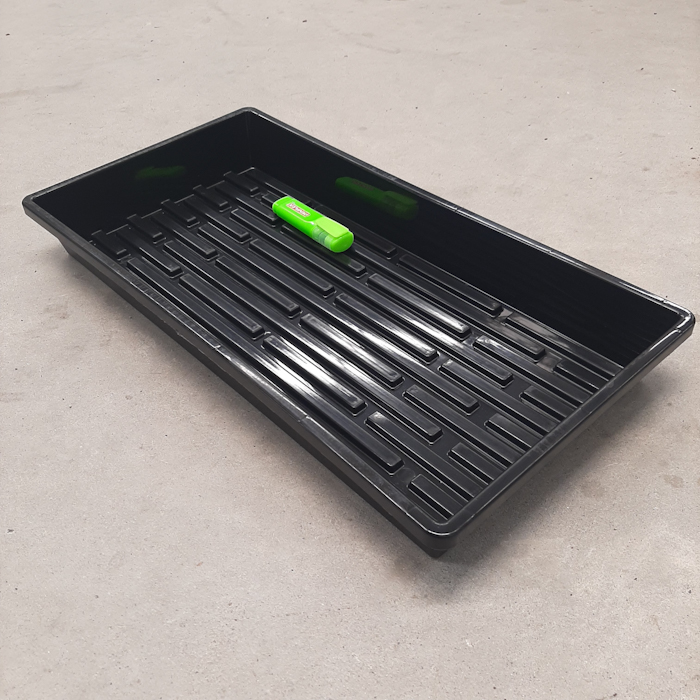
The 50mm Microgreen Tray Without Holes has no drainage holes and is 275mm wide and 535mm long.
With its 50mm height, it can be filled to the brim using only about 7.5 liters of growing medium.
Coco coir based substrates/growing mediums are a very popular choice for growing microgreensat home, as it is a soft and airy medium with great moisture retention. Because the microgreen growing cycle is so short, with the seedling relying mostly on nutrients stored inside the seed itself, adding any supplements or additional nutrients to your substrate is not a necessity at all, although a lot of people do add a little bit of worm castings to their mixes, claiming better results.
Once you have added your substrate into the tray, water or mist spray lightly if the substrate is on the dry side and tamp the substrate down very lightly by hand, to get it to settle and flatten out nicely. Then gently sprinkle your seeds across the surface. Once this is done, a VERY thin layer of additional substrate may be sprinkled over the top of the seeds (using a baking sieve, for example)
Place the trays into a suitable environment for germination and mist or spray the top of the substrate regularly to prevent it from drying out. (A propagation dome will help keep substrate moist until your seeds have germinated, saving you a lot of effort. Remove the ). Do not overspray, as this will cause overly wet “swampy” subsurface conditions! Just keep the substrate slightly moist at all times.
Once your seeds have sprouted and grown to a harvestable size, you are able to clip off the delicious micro-leaves for your dishes and salads with a pair of pruning scissors.
The 50mm Microgreen Tray Without Holes can also be used as a drip tray for potted plants, which will catch runoff during watering or flushing.
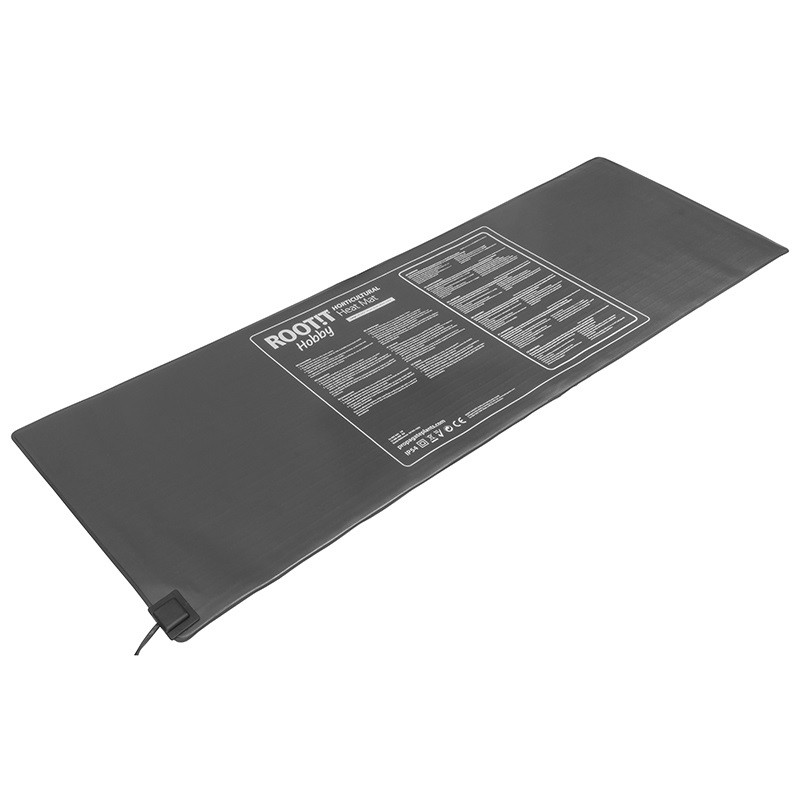
The ROOTiT Large Heat Mat will raise your propagator temperatures 10 to 15 °C above the ambient temperature. This will enable you to germinate and clone successfully during the colder times of the year and will also help you to sprout seeds that require higher temperatures to germinate.
ROOTiT Heat Mats produce a gentle heat, generated by the single mesh element encased inside a waterproof, fray-proof matting. Place the mat under a propagator or similar non-draining container, not inside of them. The mats’ surface temperate may however exceed 50 °C when turned on and should ideally be used with a temperature controller. Inserting a temperature controller’s waterproof temperature probe into the substrate used inside the propagator will enable you to regulate your substrate temperature automatically. Always try to match up your propagator size to your heat mat size. If the pad is larger than the propagator there will be heat loss on the exposed mat areas. If the pad is smaller than the propagator, the substrate will not be heated uniformly and/or adequately.
ROOTiT Large Heat Mat Specs:
Power cord: 1.8m, with 2 pin plug
Dimensions: 40 cm x 120 cm
Power draw: 60 W
Waterproof: NO
Fire or electrical shock may result form improper use
Do not place mat inside seed trays or cover with soil
Never submerge heat mat in water, or get it wet
Ensure unit is not plugged in during installation, handling, or removal.
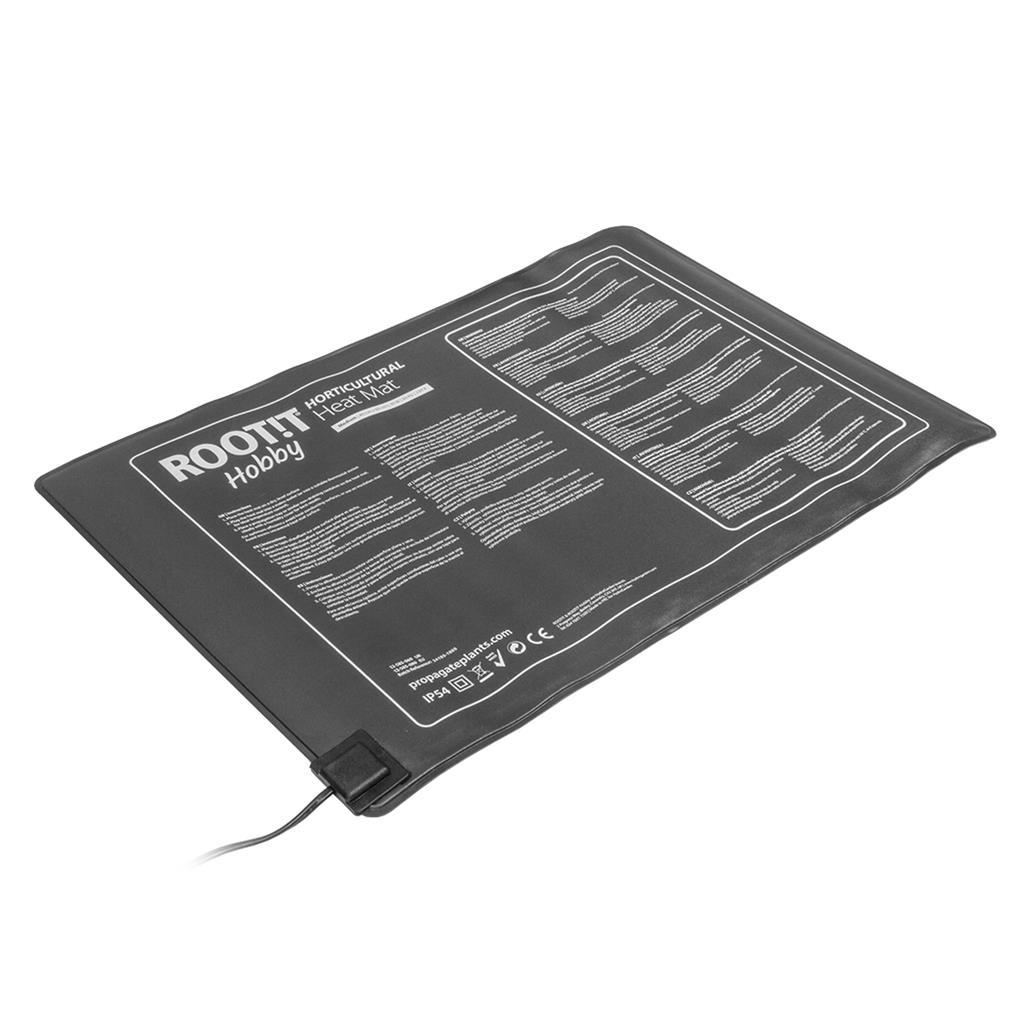
The ROOTiT Medium Heat Mat will raise your propagator temperatures 10 to 15 °C above the ambient temperature. This will enable you to germinate and clone successfully during the colder times of the year and will also help you to sprout seeds that require higher temperatures to germinate.
ROOTiT Heat Mats produce a gentle heat, generated by the single mesh element encased inside a waterproof, fray-proof matting. Place the mat under a propagator or similar non-draining container, not inside of them. The mats’ surface temperate may however exceed 50 °C when turned on and should ideally be used with a temperature controller. Inserting a temperature controller’s waterproof temperature probe into the substrate used inside the propagator will enable you to regulate your substrate temperature automatically. Always try to match up your propagator size to your heat mat size. If the pad is larger than the propagator there will be heat loss on the exposed mat areas. If the pad is smaller than the propagator, the substrate will not be heated uniformly and/or adequately.
ROOTiT Medium Heat Mat Specs:
Power cord: 1.8m, with 2 pin plug
Dimensions: 40 cm x 60 cm
Power draw: 30 W
Waterproof: NO
Fire or electrical shock may result form improper use
Do not place mat inside seed trays or cover with soil
Never submerge heat mat in water, or get it wet
Ensure unit is not plugged in during installation, handling, or removal.
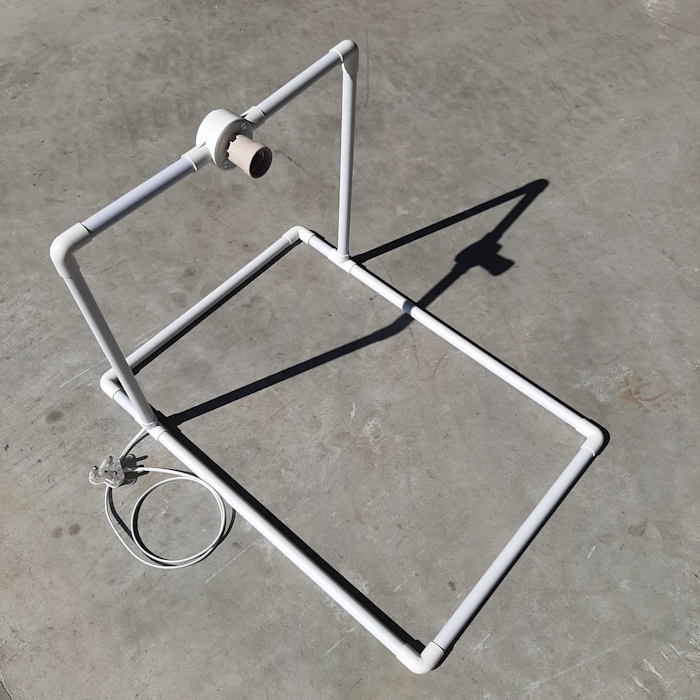
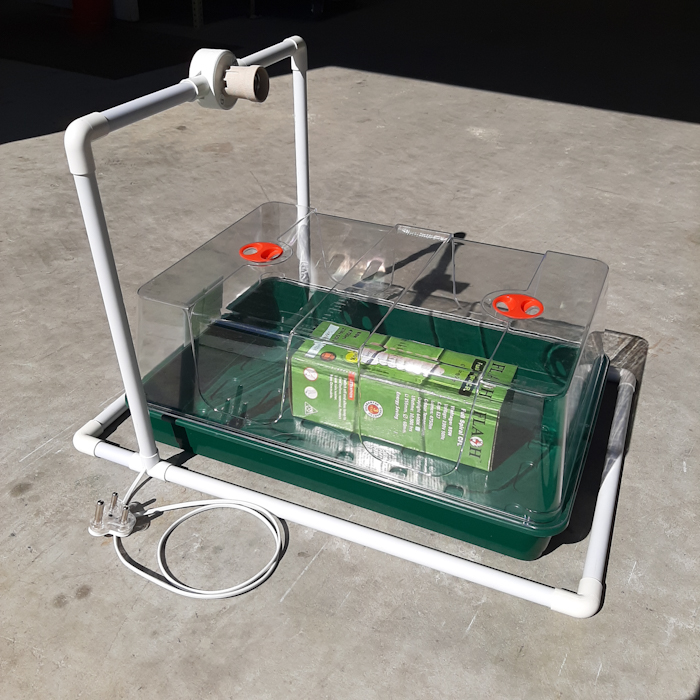
The Clone Dome Light Frame is another great addition to the Pot Scrog’s arsenal of simple and effective solutions to growers’ everyday problems.
The light frame was designed to work with 85W Fluorescent CFL lamps that have an E27 fitting, but other E27 lamps and bulbs can be used as well, as long as they can be plugged directly into a regular power outlet and have the right intensity and spectrum to germinate or root cuttings under. ( An E27light fitting has a screw-in thread with a 27mm diameter )
Learn more about the art of cloning and plant propagation HERE.
The base of the Clone Dome Light Frame has also been designed to be large enough to accommodate various sizes of plant propagators and can even house a Garland XL High Dome Propagator, as can be seen in the picture below…
Any propagator or humidity dome with base dimensions of up to 44cm x 64cm can sit inside the base of this unit.
The height of the center of the E27 light fitting is approx. 44 cm above the surface on which the light frame rests on, which means that the unit will easily accommodate various types of high dome propagators.
The light frame comes with a 1m long electrical cord and standard 3-point South African plug.
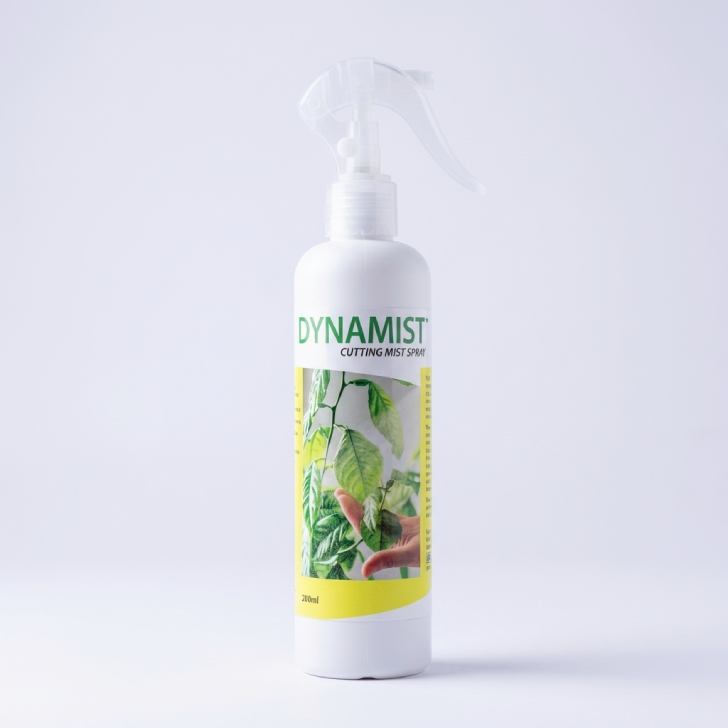
DynaMist Cutting Mist Spray (200ml spray bottles) is specially formulated to help enhance the health and vigor of tender young plants while promoting robust root development and elongation of of root hairs and is ideal for use on soft and semi-hardwood cuttings and clones.
DynaMist Cutting Mist Spray helps to prevent losses in the critical first few days when cuttings are at their most vulnerable. This handy spray contains and essential vitamin and mineral blend and also helps prevent dehydration of your cuttings.
It can be used to pre-treat donor plants 2-3 days before taking cuttings and also to treat cutting for the first 3 days after separation for the donor or mother plants. DynaMist Cutting Mist Spray is also a great tonic to spray onto your cutting if they are flagging to give them a boost and bring them back to good health.
Store safely away from children, pets and food and read instructions and warnings before using.
INSTRUCTIONS:
Shake well before use.
If possible, spray mother plants once or twice in the 2 weeks before taking cuttings.
Also spray onto mother plants during the 2 or 3 days before taking cuttings.
Spray cuttings again when set into your substrate and humidity dome of choice .
Mist cuttings once every 2 or 3 days after that, until rooted.
Can also be apply whenever clones / cutting look dry.
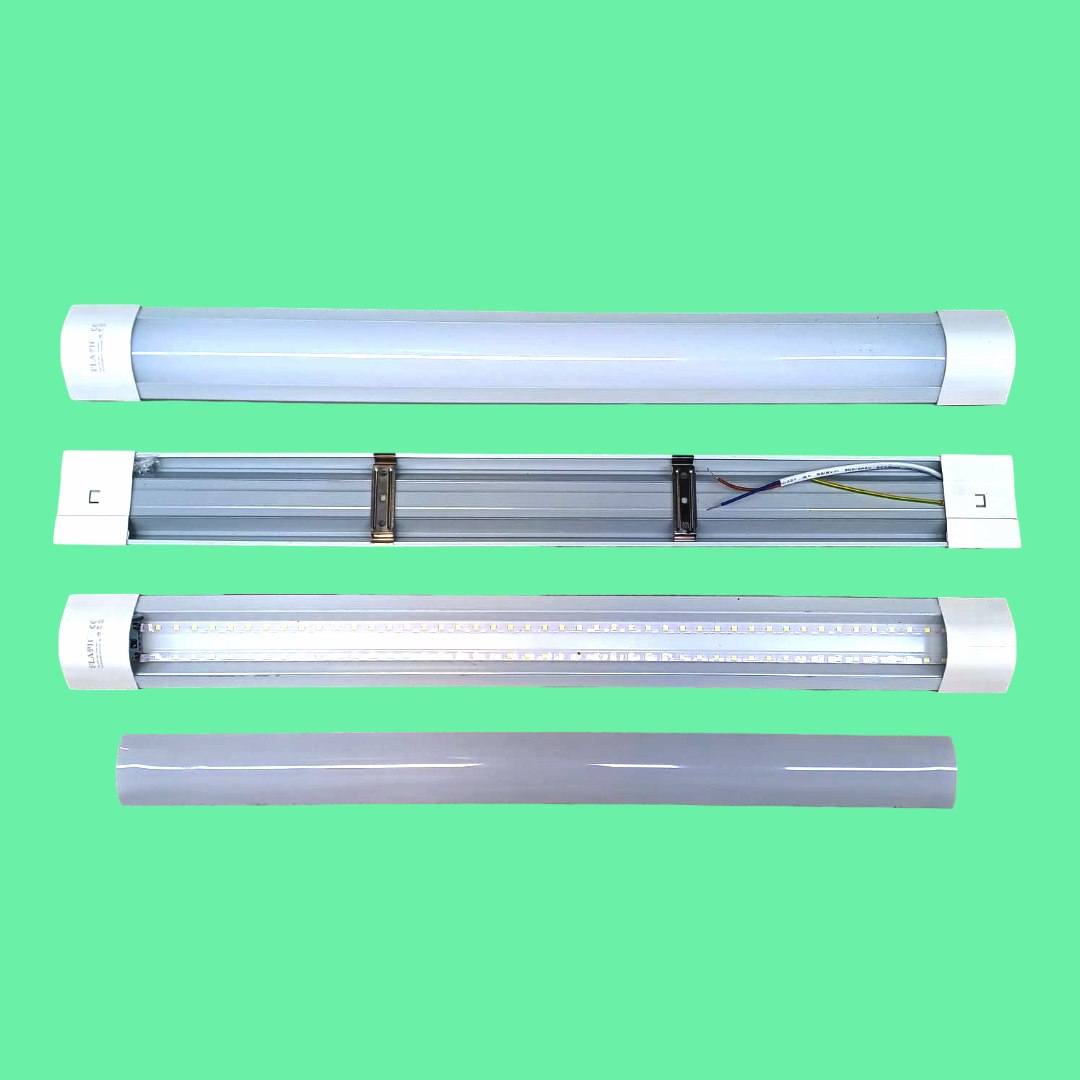
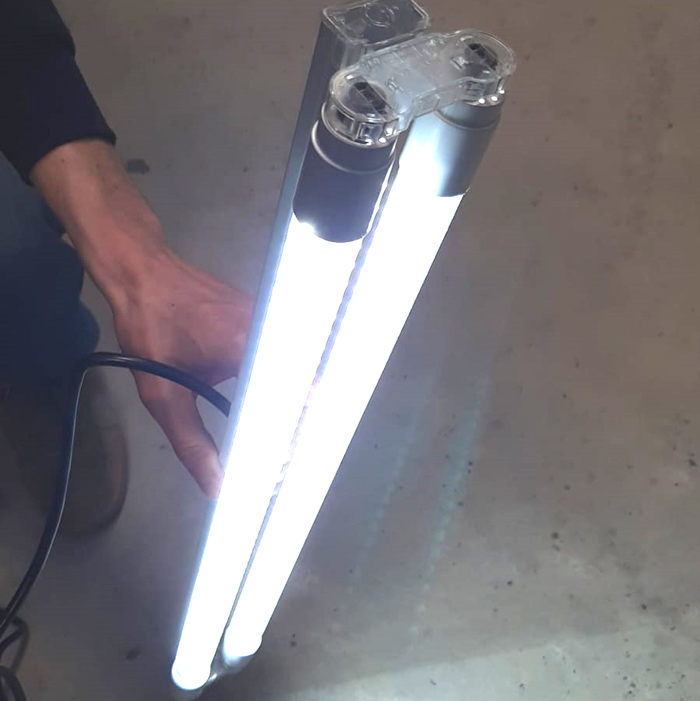
Low cost, slim-line and ultra light, these can easily be installed over propagators or inside a propagation tent. They can also be hung vertically to be used as supplemental lighting for dark tent corners and in between plantings.
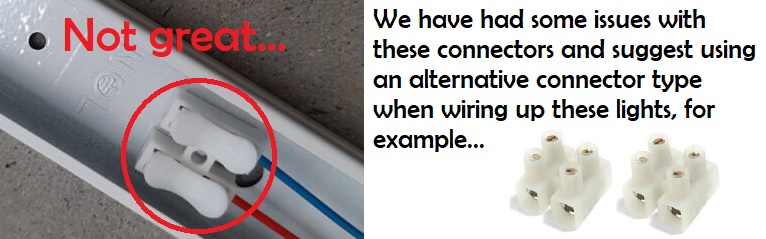
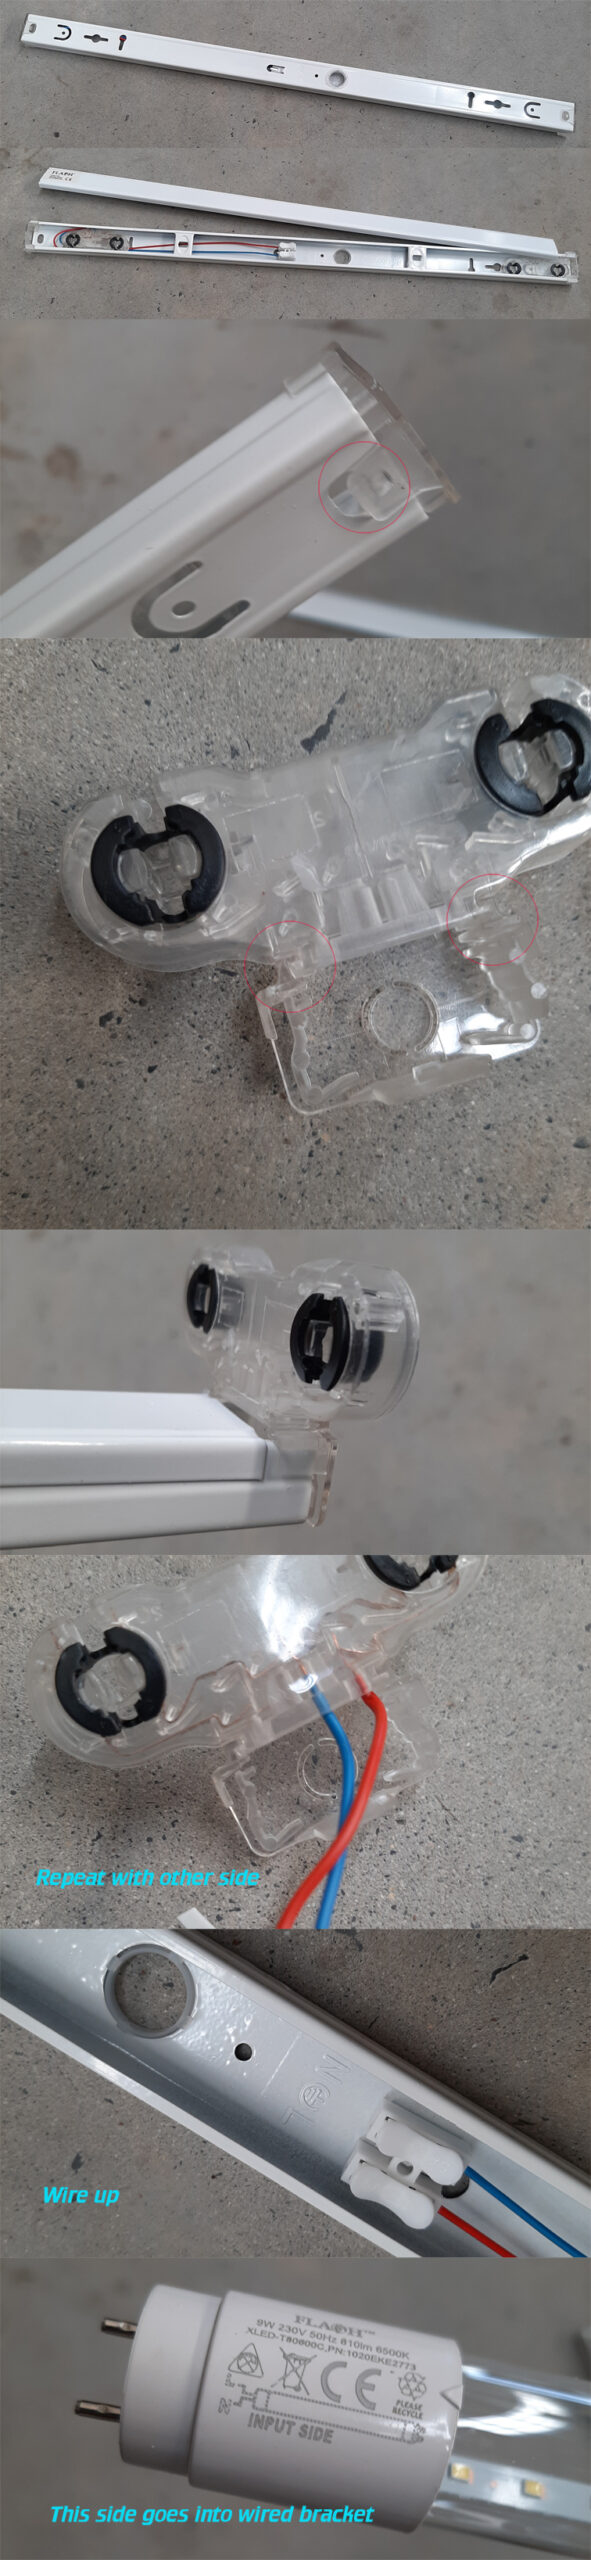
Each Double T8 LED Fitting is 615mm long and fits 2 x T8 LED tubes. PLEASE NOTE: These fittings are not the same as older fluorescent fittings (which have ballasts and starters) and should not be used for fluorescent tubes!
Each Clear T8 LED Tube is 600mm long, has a 9 Watt power draw, 6500K colour temperature, and Lumen output of 810 Lumens. PLEASE NOTE: These tubes are not the same as older fluorescent tubes and should not be used in fluorescent fittings!
For best results 4 to 6 T8 tubes are recommended above a single large sized propagator, like the Garland XL High Dome Propagator.
The LED tubes produce hardly any heat and can be hung as close to the cuttings or seedlings as possible to maximize the light intensity.
NEW in store – 60cm T8 LED Fixture Hanging Frames (Below):
T8 LED Tubes and Fittings 60cm Assembly:
Always wire up and use correctly.
Never put strain on the connected electrical wire. Do not hang from electrical wire.
PLEASE NOTE: The holes of the hanging eyelets ( that are folded up, out of the casing, if needed, one on each side ) are too small to clip into standard rope ratchet clips. Use something like a round key-holder ring to go into the hanging eyelets and then clip the key ring into the rope ratchet clips if needed.
Take care when handling these units as they are light-duty items and can easily damage if dropped by accident.
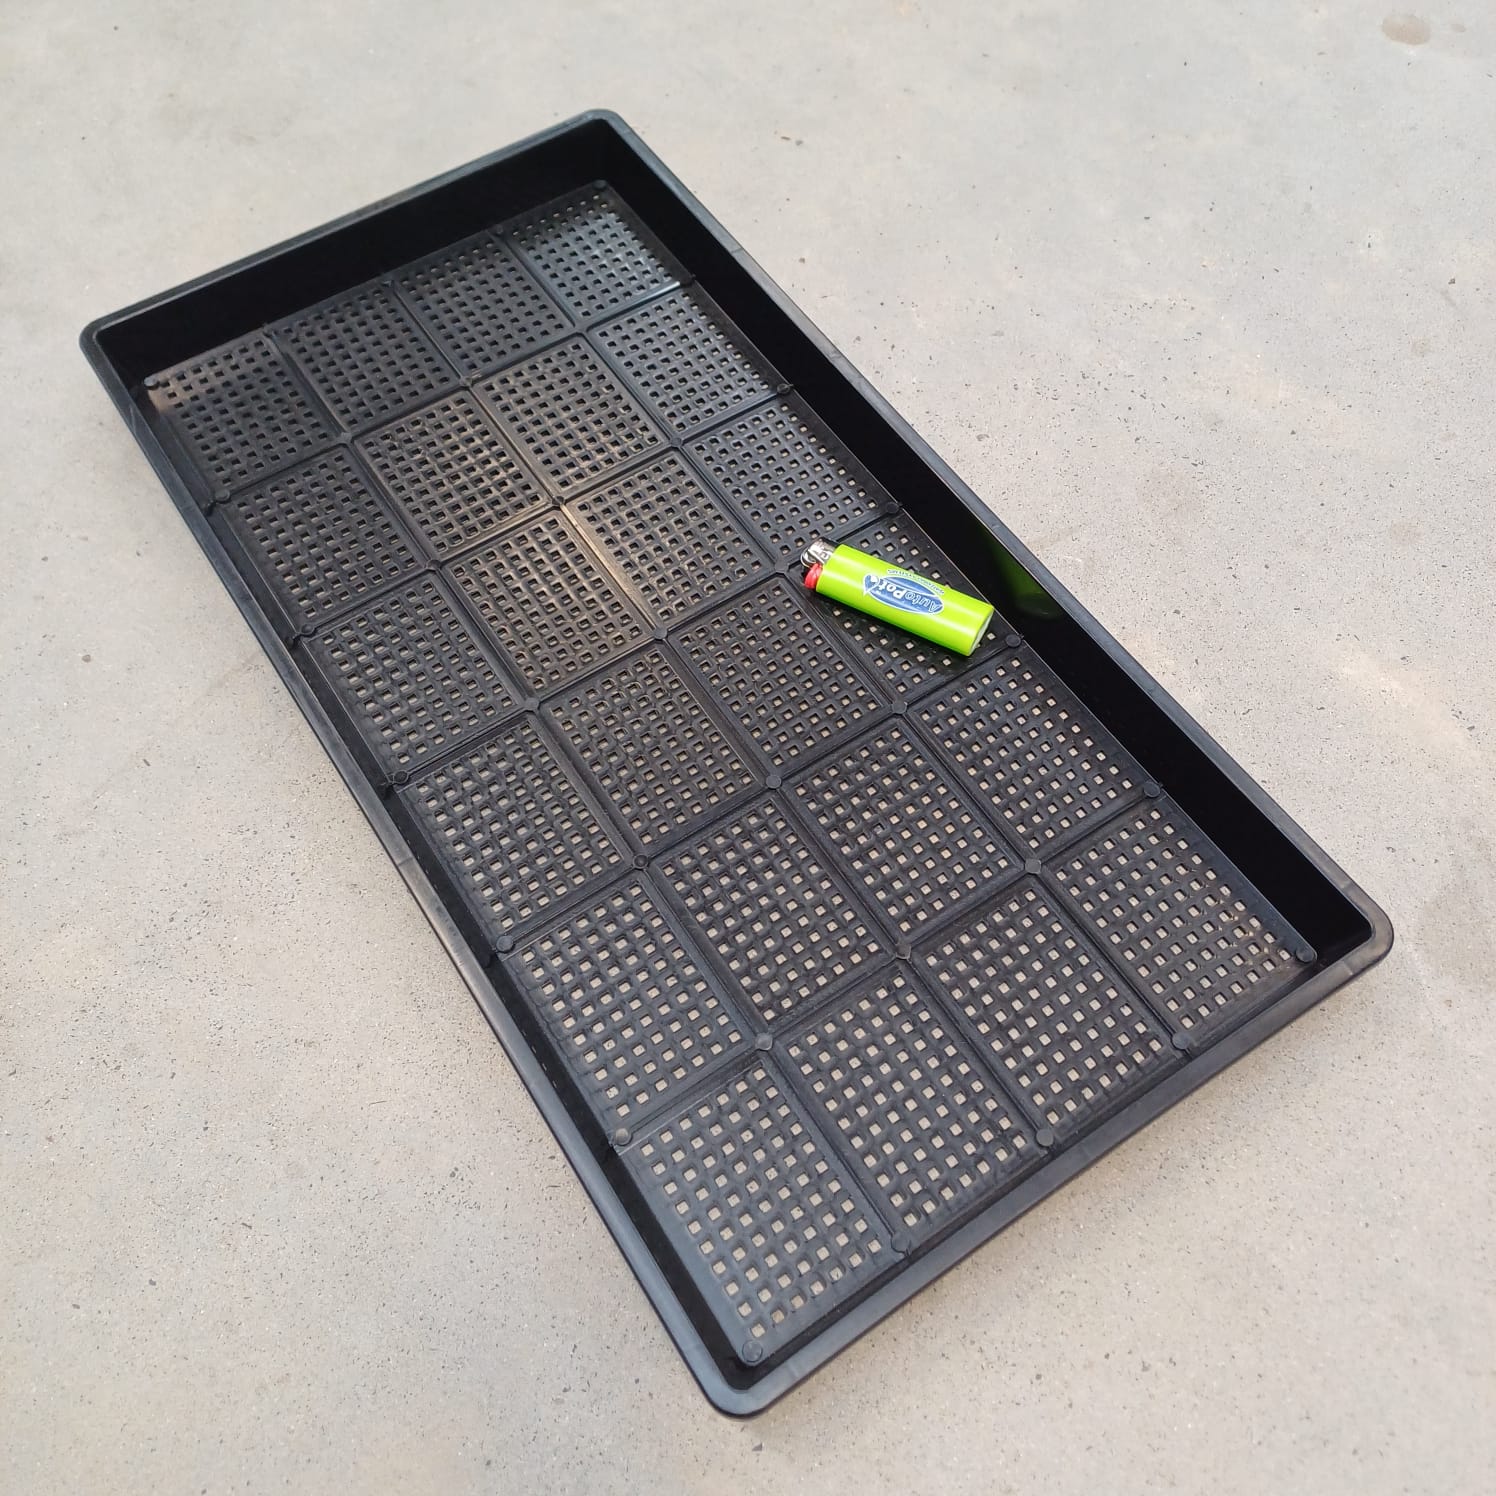
The 30mm Microgreen Tray With Holes (drainage slots, to be precise) and is 275mm wide and 535mm long. The drainage provided will help prevent overly wet substrates and potential rot.
With its low 30mm height, it can be filled to the brim using only about 4.5 liters of growing medium.
Coco coir based substrates/growing mediums are a very popular choice for growing microgreensat home, as it is a soft and airy medium with great moisture retention. Because the microgreen growing cycle is so short, with the seedling relying mostly on nutrients stored inside the seed itself, adding any supplements or additional nutrients to your substrate is not a necessity at all, although a lot of people do add a little bit of worm castings to their mixes, claiming better results.
Once you have added your substrate into the 30mm Microgreen Tray With Holes, water or mist spray lightly if the substrate is on the dry side and tamp the substrate down very lightly by hand, to get it to settle and flatten out nicely. Then gently sprinkle your seeds across the surface. Once this is done, a VERY thin layer of additional substrate may be sprinkled over the top of the seeds (using a baking sieve, for example)
Place the trays into a suitable environment for germination and mist or spray the top of the substrate regularly to prevent it from drying out. (A propagation dome will help keep substrate moist until your seeds have germinated, saving you a lot of effort. Remove the ). Do not overspray, as this will cause overly wet “swampy” subsurface conditions! Just keep the substrate slightly moist at all times.
Once your seeds have sprouted and grown to a harvestable size, you are able to clip off the delicious micro-leaves for your dishes and salads with a pair of pruning scissors.
The 30mm Microgreen Tray Without Holes is 275mm wide and 535mm long.
With its low 30mm height, it can be filled to the brim using only about 4.5 liters of growing medium.
Coco coir based substrates/growing mediums are a very popular choice for growing microgreensat home, as it is a soft and airy medium with great moisture retention. Because the microgreen growing cycle is so short, with the seedling relying mostly on nutrients stored inside the seed itself, adding any supplements or additional nutrients to your substrate is not a necessity at all, although a lot of people do add a little bit of worm castings to their mixes, claiming better results.
Once you have added your substrate into the tray, water or mist spray lightly if the substrate is on the dry side and tamp the substrate down very lightly by hand, to get it to settle and flatten out nicely. Then gently sprinkle your seeds across the surface. Once this is done, a VERY thin layer of additional substrate may be sprinkled over the top of the seeds (using a baking sieve, for example)
Place the trays into a suitable environment for germination and mist or spray the top of the substrate regularly to prevent it from drying out. (A propagation dome will help keep substrate moist until your seeds have germinated, saving you a lot of effort. Remove the ). Do not overspray, as this will cause overly wet “swampy” subsurface conditions! Just keep the substrate slightly moist at all times.
Once your seeds have sprouted and grown to a harvestable size, you are able to clip off the delicious micro-leaves for your dishes and salads with a pair of pruning scissors.
The 30mm Microgreen Tray Without Holes can also be used as a drip tray for potted plants, which will catch runoff during watering or flushing.
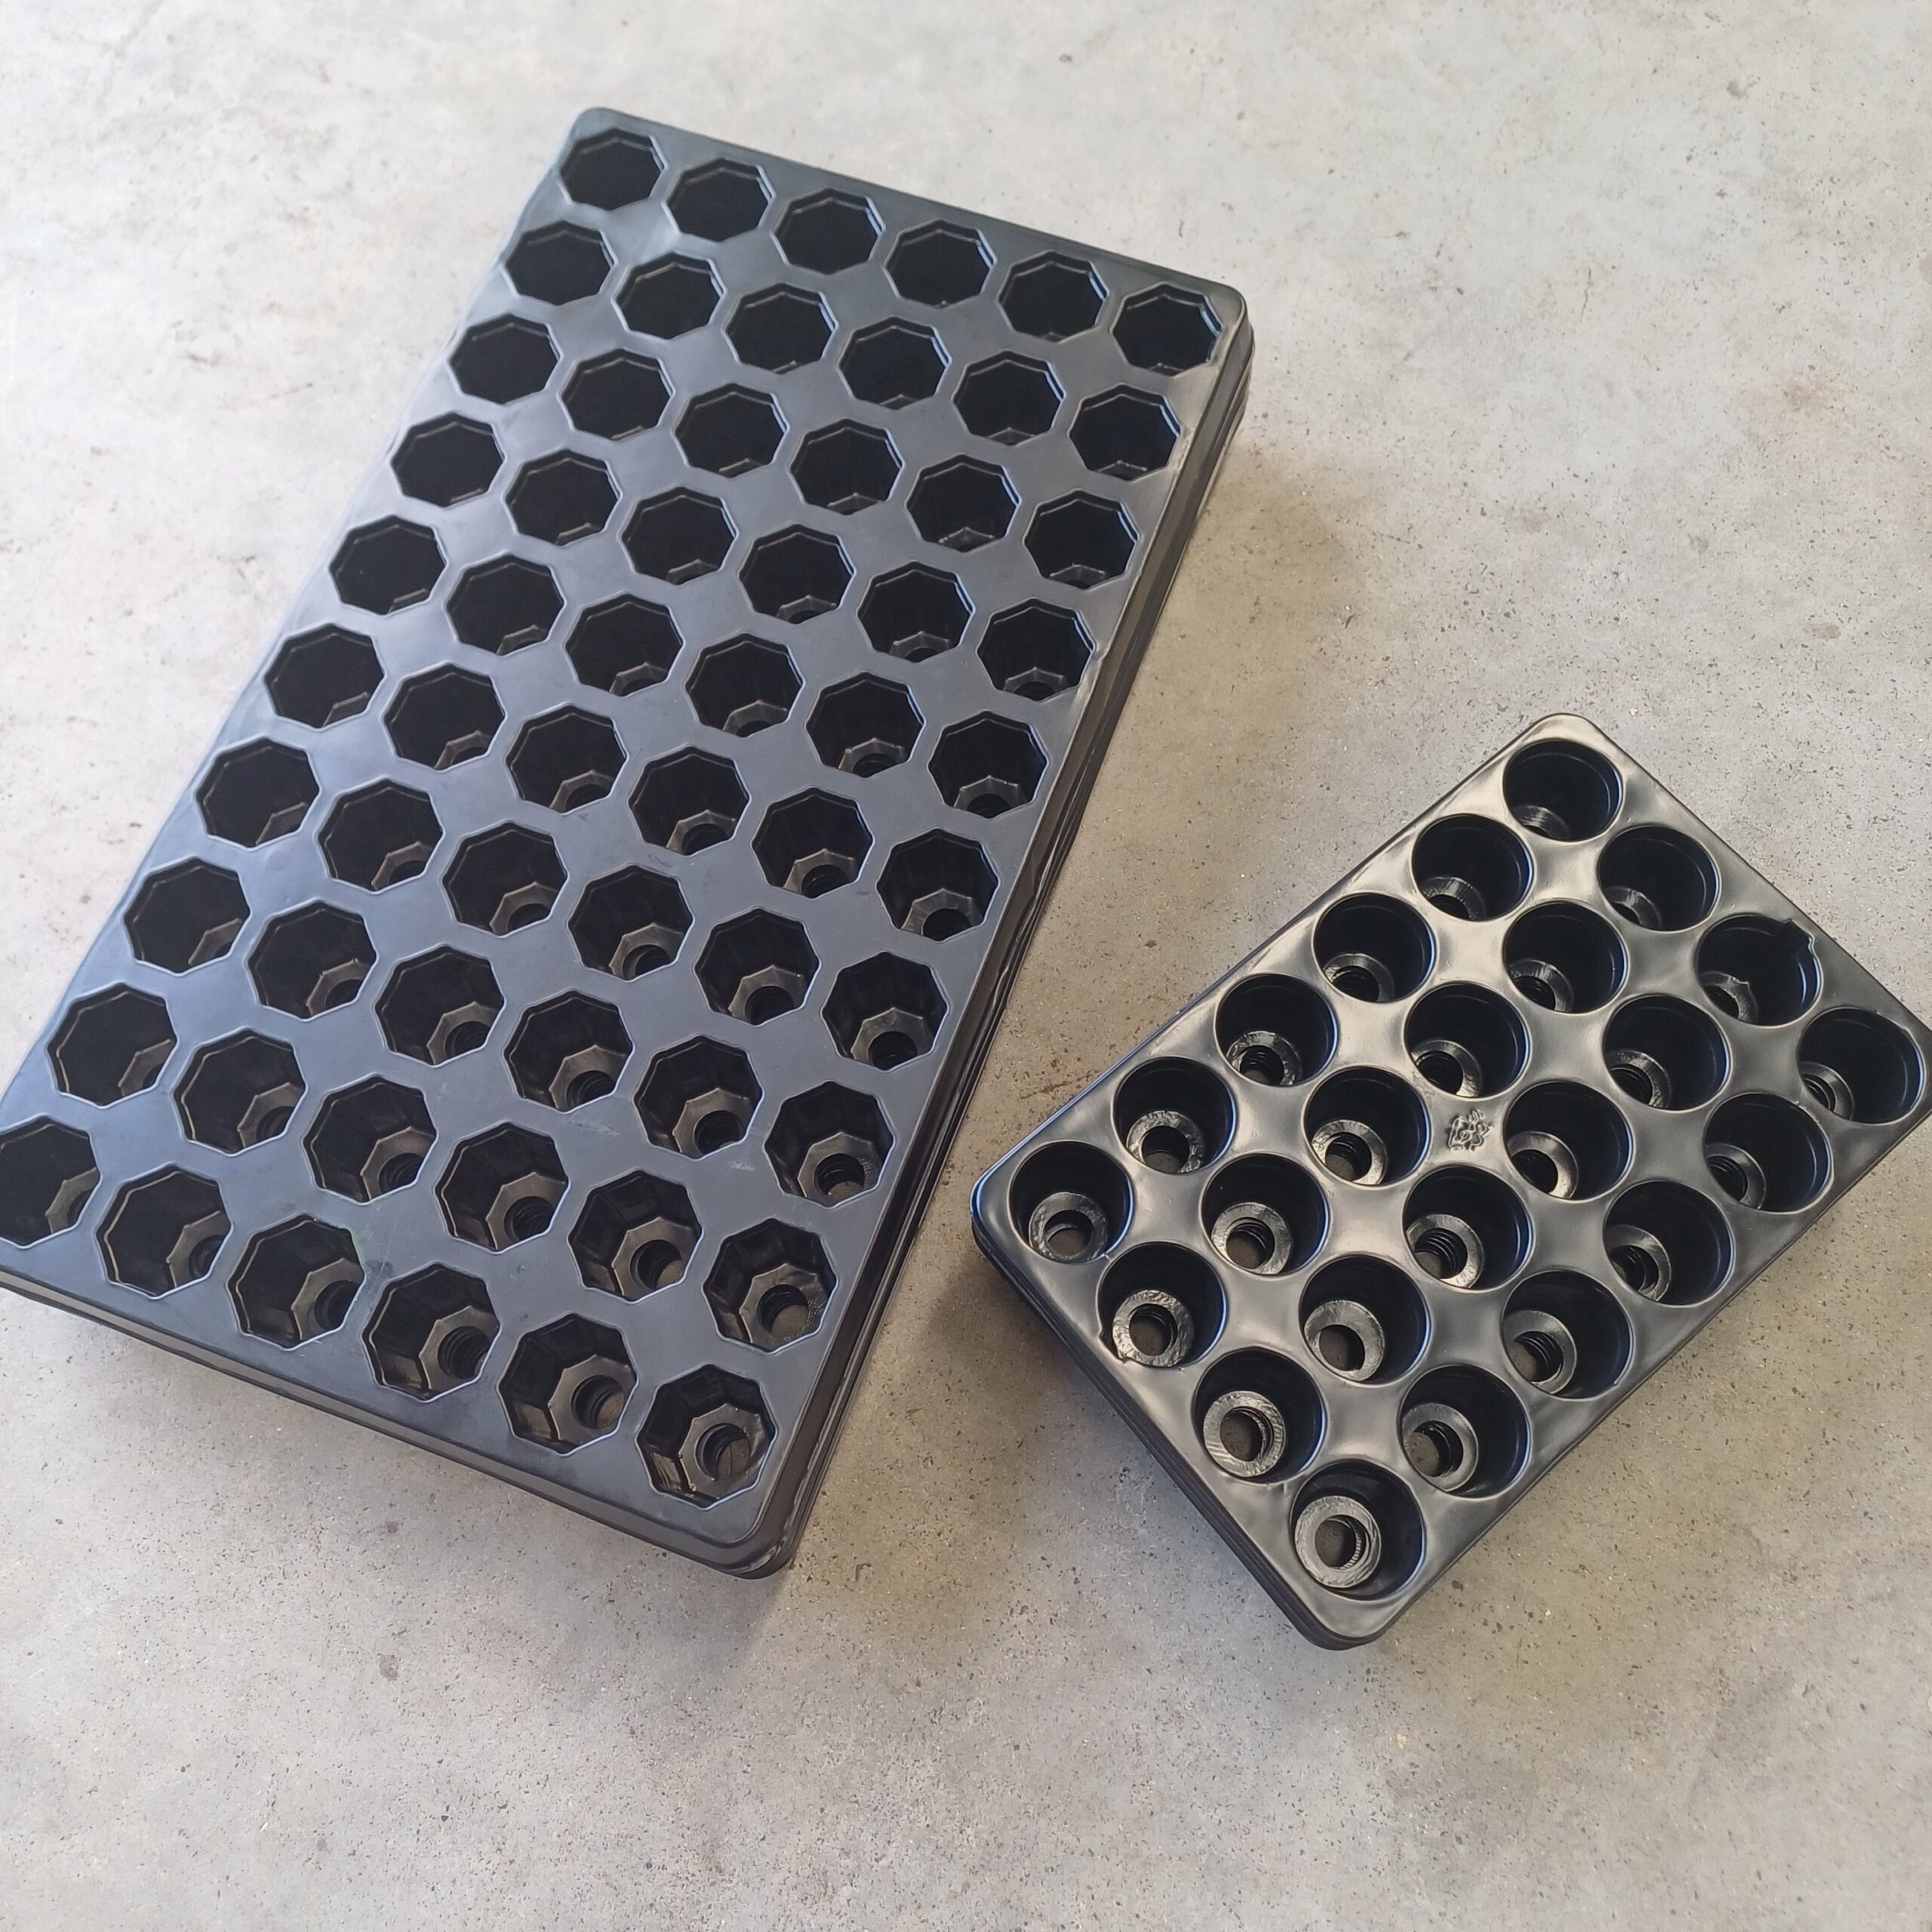
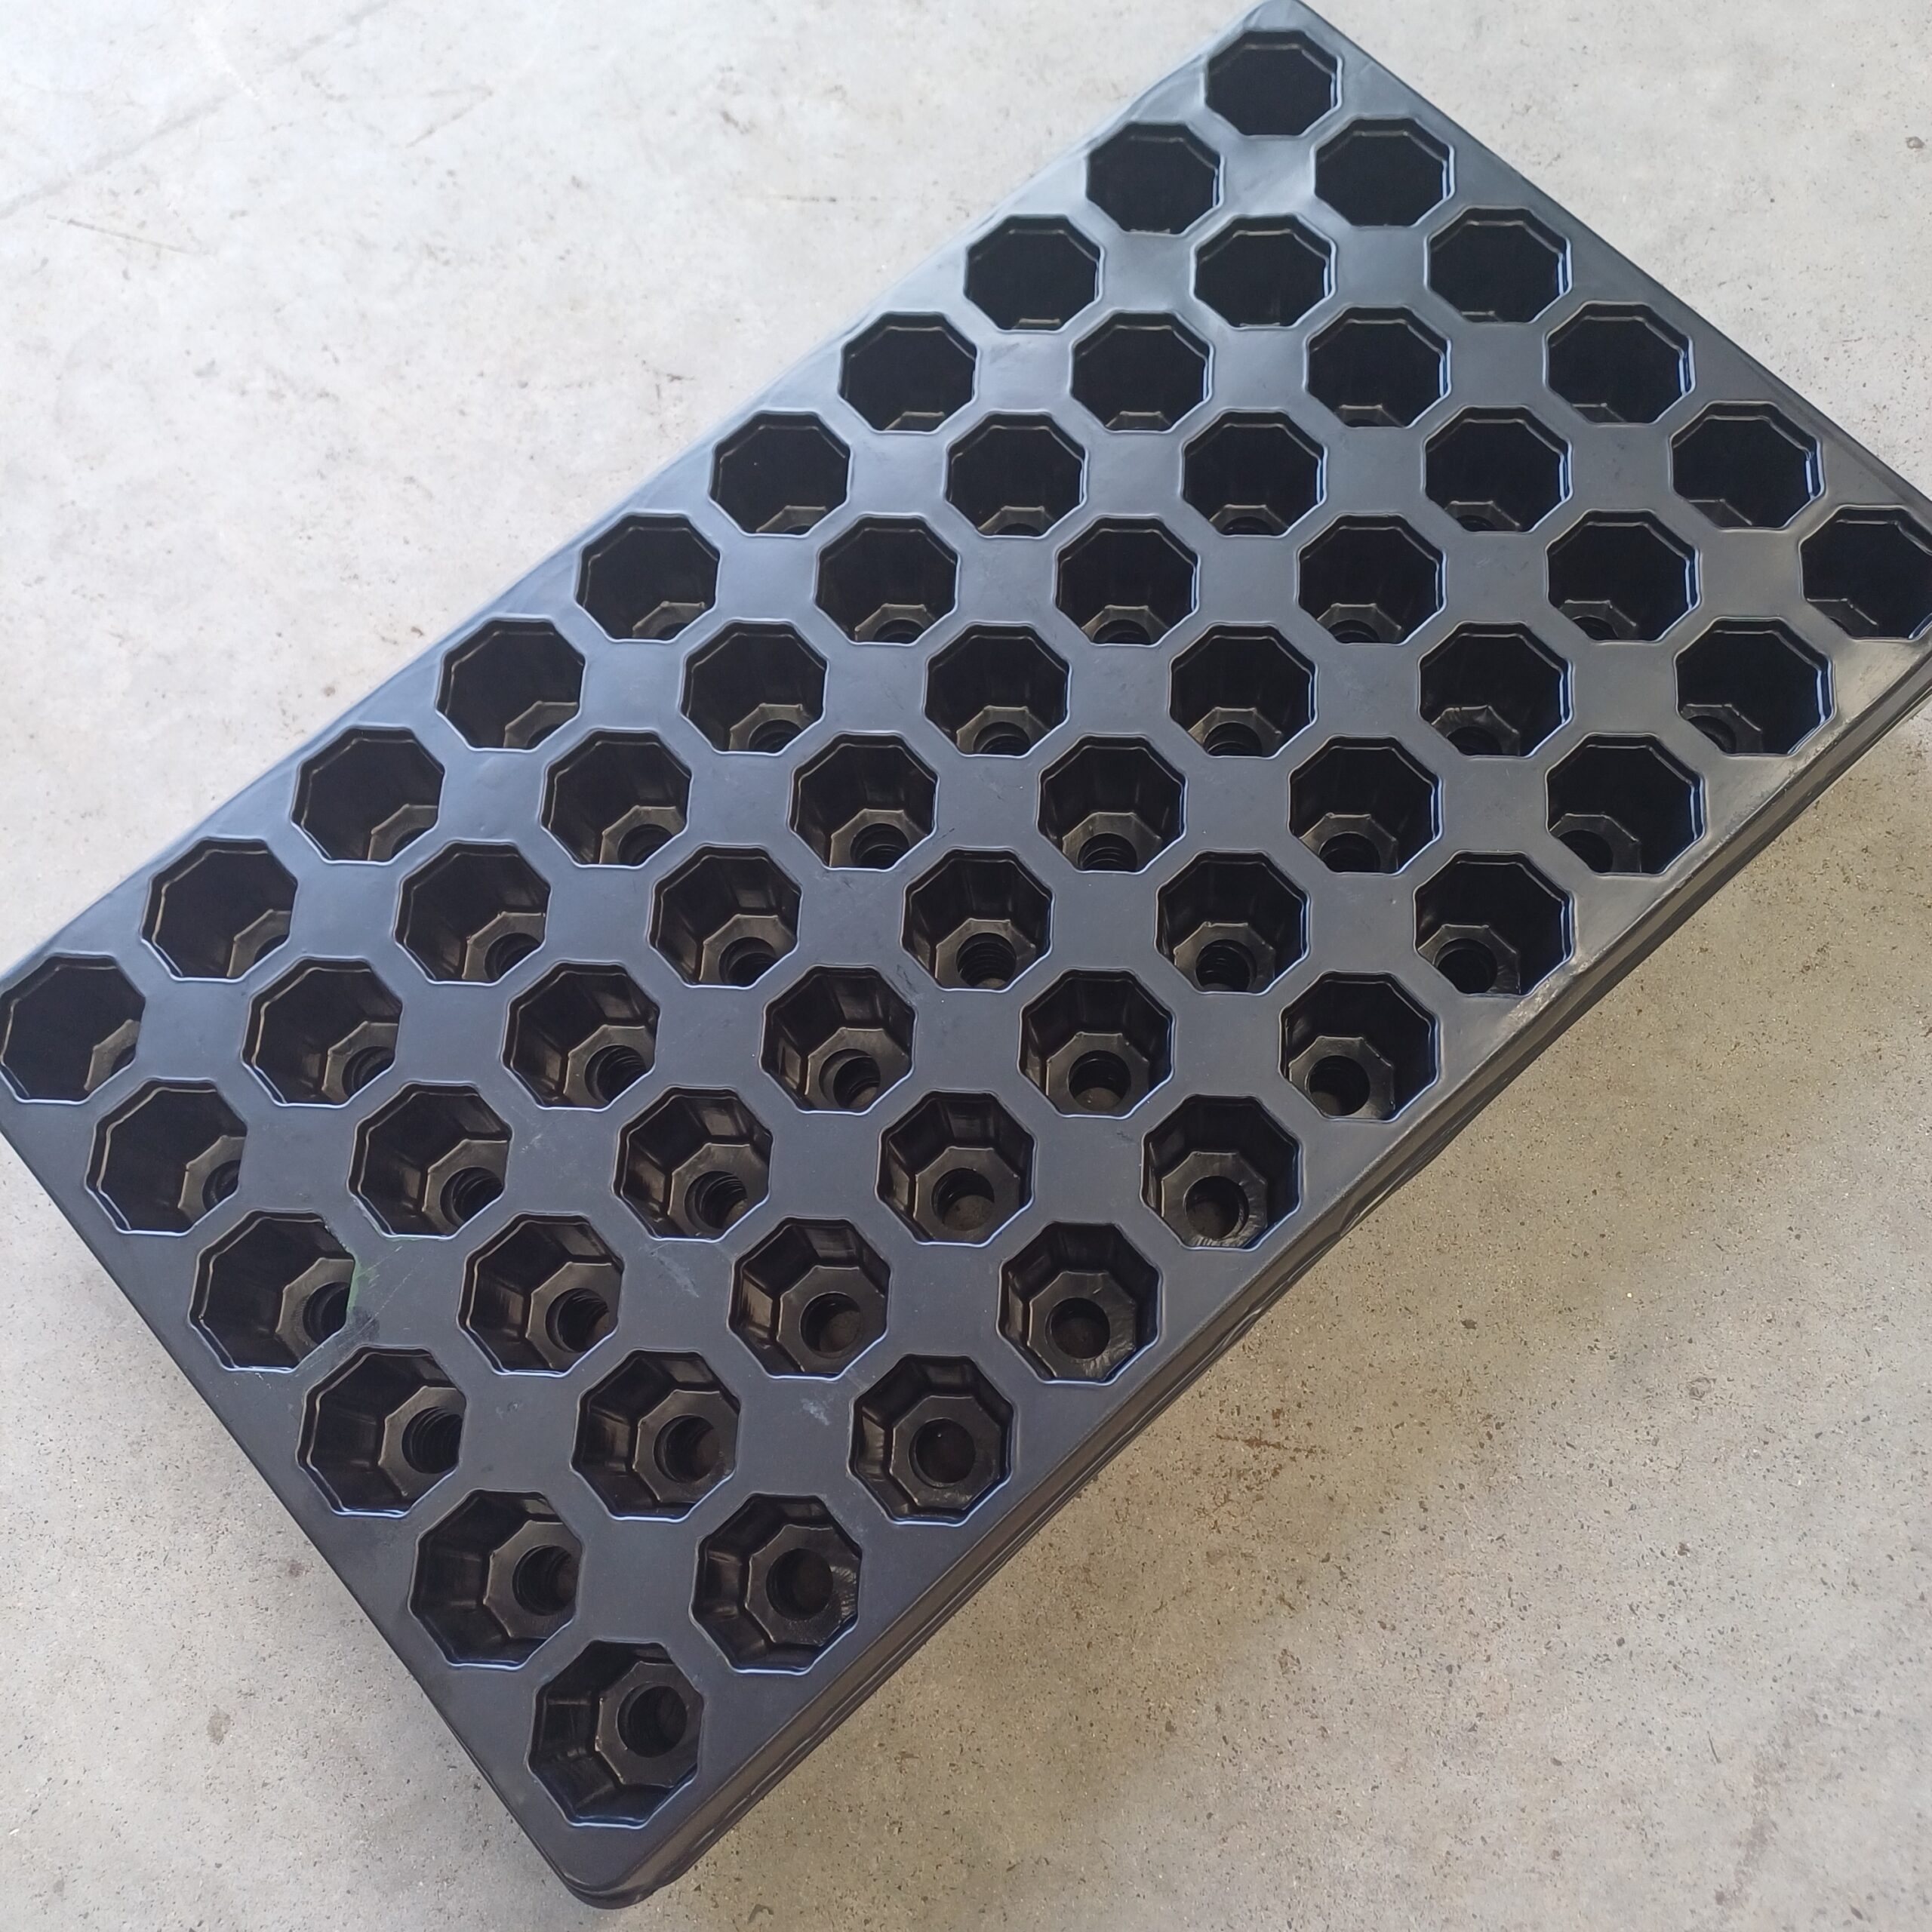
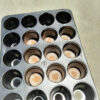
ROOTiT Seedling Trays are now available and are made to fit into the 2 sizes of ROOTiT Propagators that are available on our website.
ROOTiT Seedling trays are suitable for plant propagation, seed germination, plant cuttings, etc.
The trays have cells (42mm diameter on the top lip, reducing in size towards the bottoms of the cells) that will hold most pre-formed propagation media, e.g. Rock Wool plugs or Jiffy Preforma (“Glue)” plugs.
PLEASE NOTE: The new 60 Cell Tray design has octagonal sides, but is still the same sized cavity…
The ROOTiT Small Heat Mat will raise your propagator temperatures 10 to 15 °C above the ambient temperature. This will enable you to germinate and clone successfully during the colder times of the year and will also help you to sprout seeds that require higher temperatures to germinate.
ROOTiT Heat Mats produce a gentle heat, generated by the single mesh element encased inside a waterproof, fray-proof matting. Place the mat under a propagator or similar non-draining container, not inside of them. The mats’ surface temperate may however exceed 50 °C when turned on and should ideally be used with a temperature controller. Inserting a temperature controller’s waterproof temperature probe into the substrate used inside the propagator will enable you to regulate your substrate temperature automatically. Always try to match up your propagator size to your heat mat size. If the pad is larger than the propagator there will be heat loss on the exposed mat areas. If the pad is smaller than the propagator, the substrate will not be heated uniformly and/or adequately.
ROOTiT Small Heat Mat Specs:
Power cord: 1.8m, with 2 pin plug
Dimensions: 25 cm x 35 cm
Power draw: 11 W
Waterproof: NO
Fire or electrical shock may result form improper use
Do not place mat inside seed trays or cover with soil
Never submerge heat mat in water, or get it wet
Ensure unit is not plugged in during installation, handling, or removal.
We use cookies to ensure that we give you the best experience on our website. If you continue to use this site we will assume that you are happy with it. Privacy policy
 cart totals R 500.00 or more! ✨🍍🔥 🔞