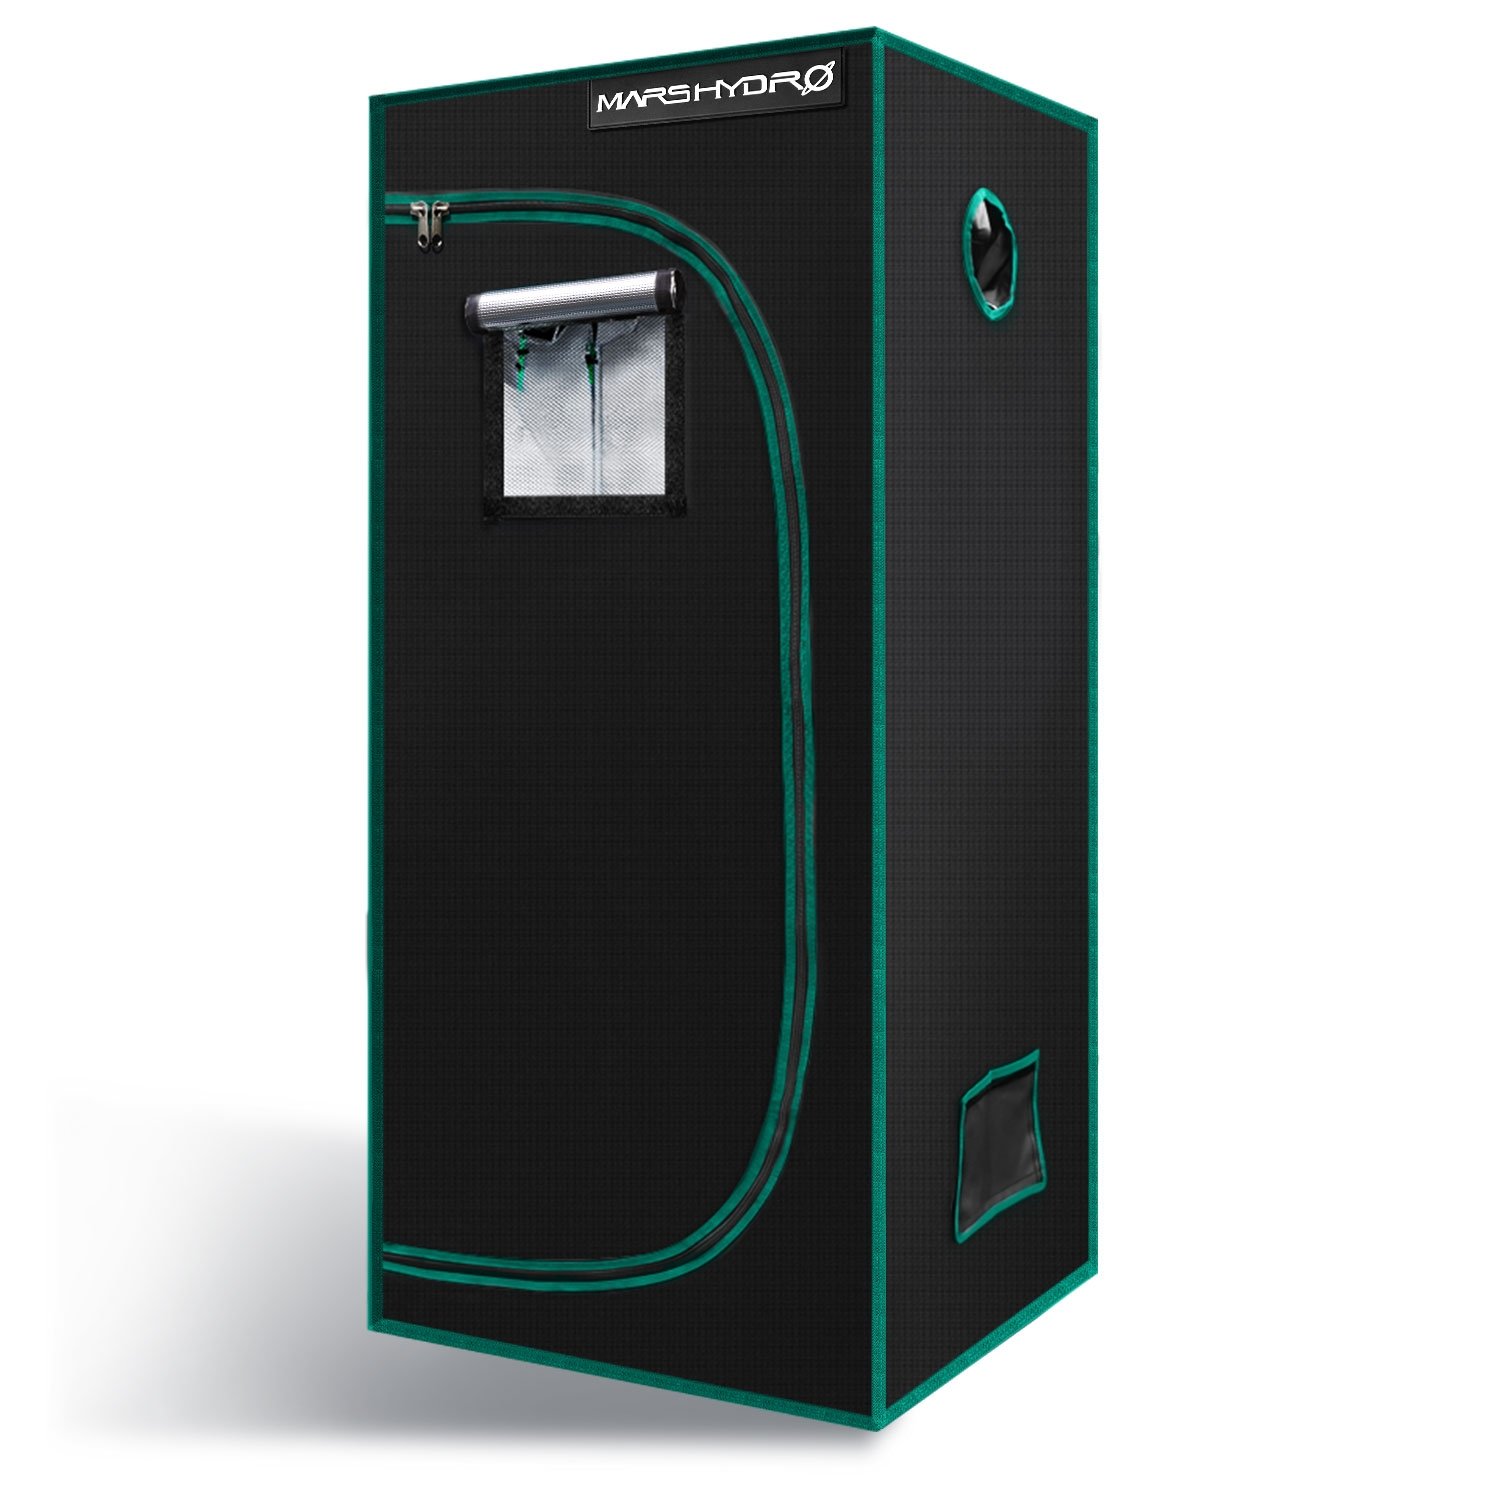
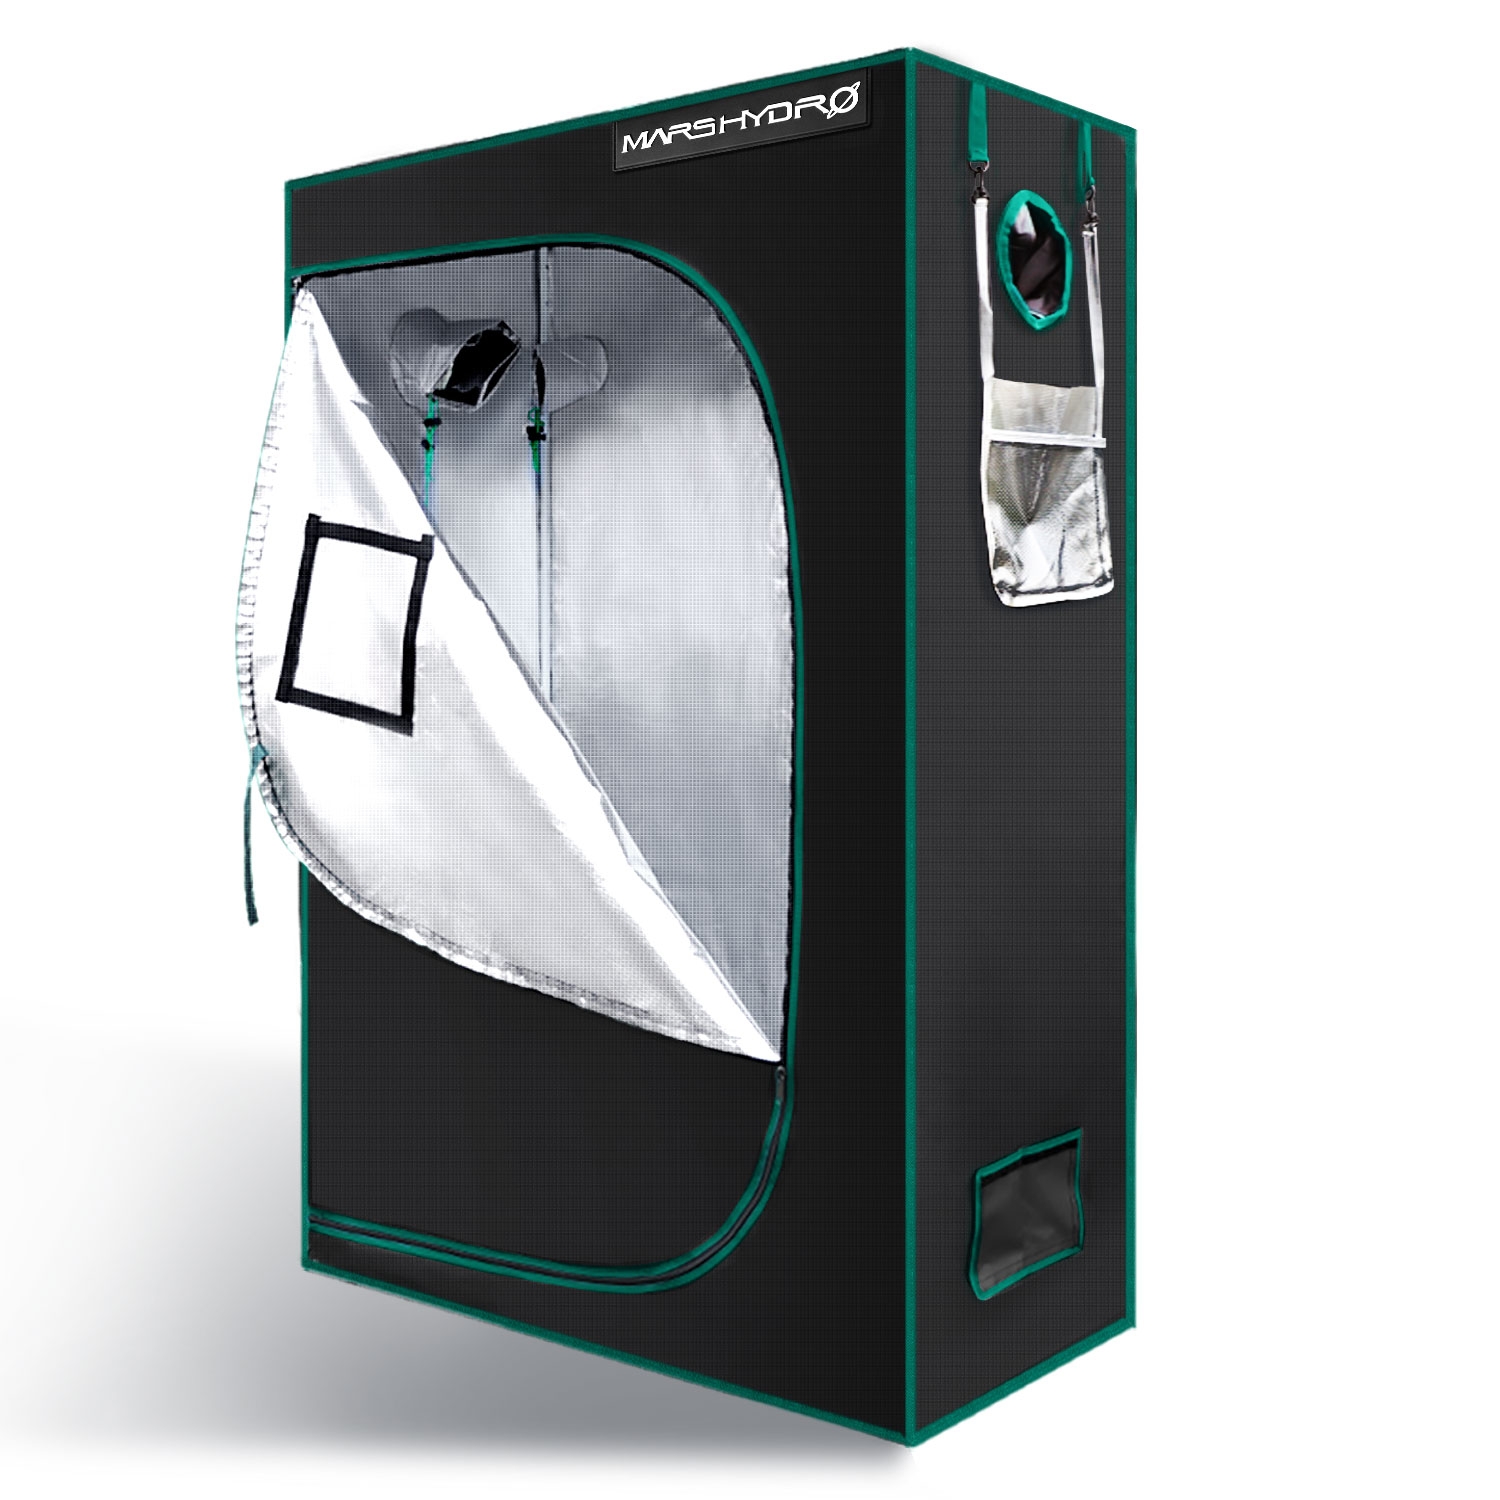
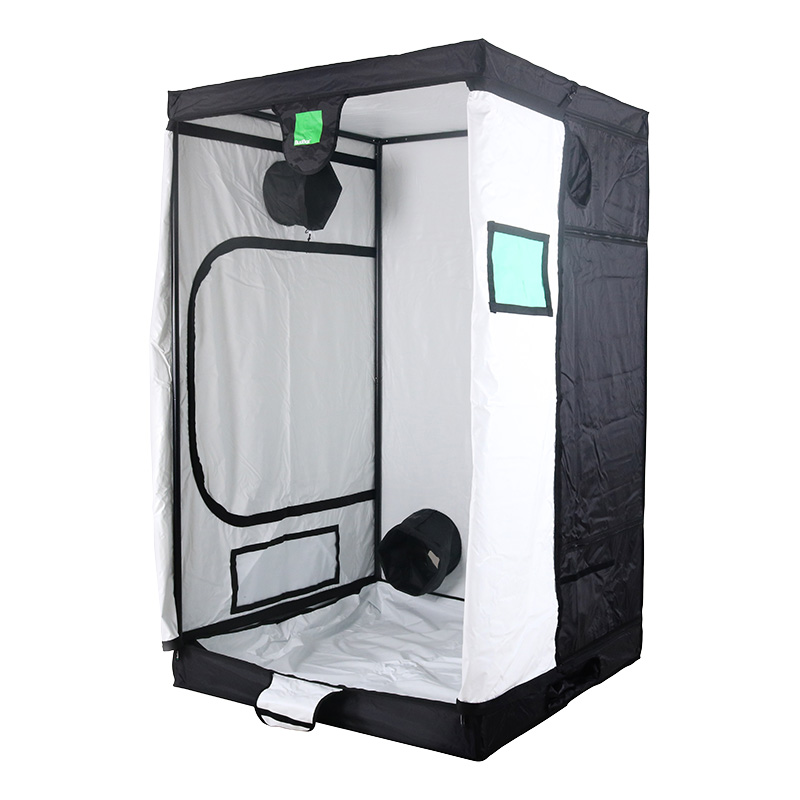
The Mars Grow Tent 70cm x 70cm x 1.6m is very quick and easy to assemble and comprises of all the useful features you would expect. Provides a practical solution to creating a controlled horticultural environment.
It features top quality double thick Mylar with a 99% efficient reflective surface. The tents collect and then reflect any light emitted outside of the canopy footprint and delivers it directly back to the plant. These tents are designed to reflect the spectrum’s provided by Mars Hydro LED grow lights and other HID grow lights. HID Grow lights such as Metal Halide (MH) and High Pressure Sodium (HPS) lamps can also be used in this grow tent. This special surface easily outperforms any other grow tents available. The Mars Grow Tents are one of the first LED engineered Grow tent specifically for growing with Mars Hydro products.
Features of Mars Grow Tent:
Ultra-Reflective Lined Mylar for superior light reflectivity and dispersal.
Premium Mylar sides: 2X stronger & thicker than the competition.
Vented flaps with screens: helps maintain a light proof environment.
Steel construction: Including poles, fixture braces & corners.
Supports up to 65Kg fixture for a a safe grow environment.
Removable waterproof material floor liner tray: contains spills/water within tent.
Completely non-toxic bug and disease resistant ”no off-gassing”.
Step-by-step tent setup video below:
Mars Grow Tent 70cm x 70cm x 1.6m Specifications:
Size of Tent: 70cm x 70cm x 1.6m
Material: Double thick Mylar fabric, all steel frame construction
Vent Size: 2 x 7.5cm, 2 x 15cm, 1 x 20cm
Ventilation System: 1 x 20cm roof mount; 2 x 15cm upper side mount; 3 x 15cm square lower vents
Mesh Window Size: 12.5cm x 30cm
Fixture weight capacity: 65Kg
Fixture hanging system 3 steel bar hanging and bracing system.
Additional Features Included waterproof material floor liner tray
Reflective Mylar Tent Skin
Full steel frame with fixture mounts
Assembly instruction & users guide
USAGE NOTES AND WARNINGS
Please read through all instructions. If grow tent is improperly installed and/or maintained, there is potential for damage or possible injury or death.
Assemble correctly to avoid tent tipping over and causing injury.
Use extreme care when handling sharp object in or around tent.
Do not place grow tent near a deck, stairs, chair, or other unsafe structure.
Do not hang equipment on or from grow tent that is above the supported weight range.
Keep electrical wires safely away from equipment and areas in and or around the tent that may collect water.
Do not expose grow tent to direct sunlight, near an open flame, or a heat source.
Do not use your grow tent if any part of your tent material is cracked, ripped, or broken.
Do not permit children to play on, in, or around grow tent.
Provide proper air circulation in your grow tent to prevent air from going stale.
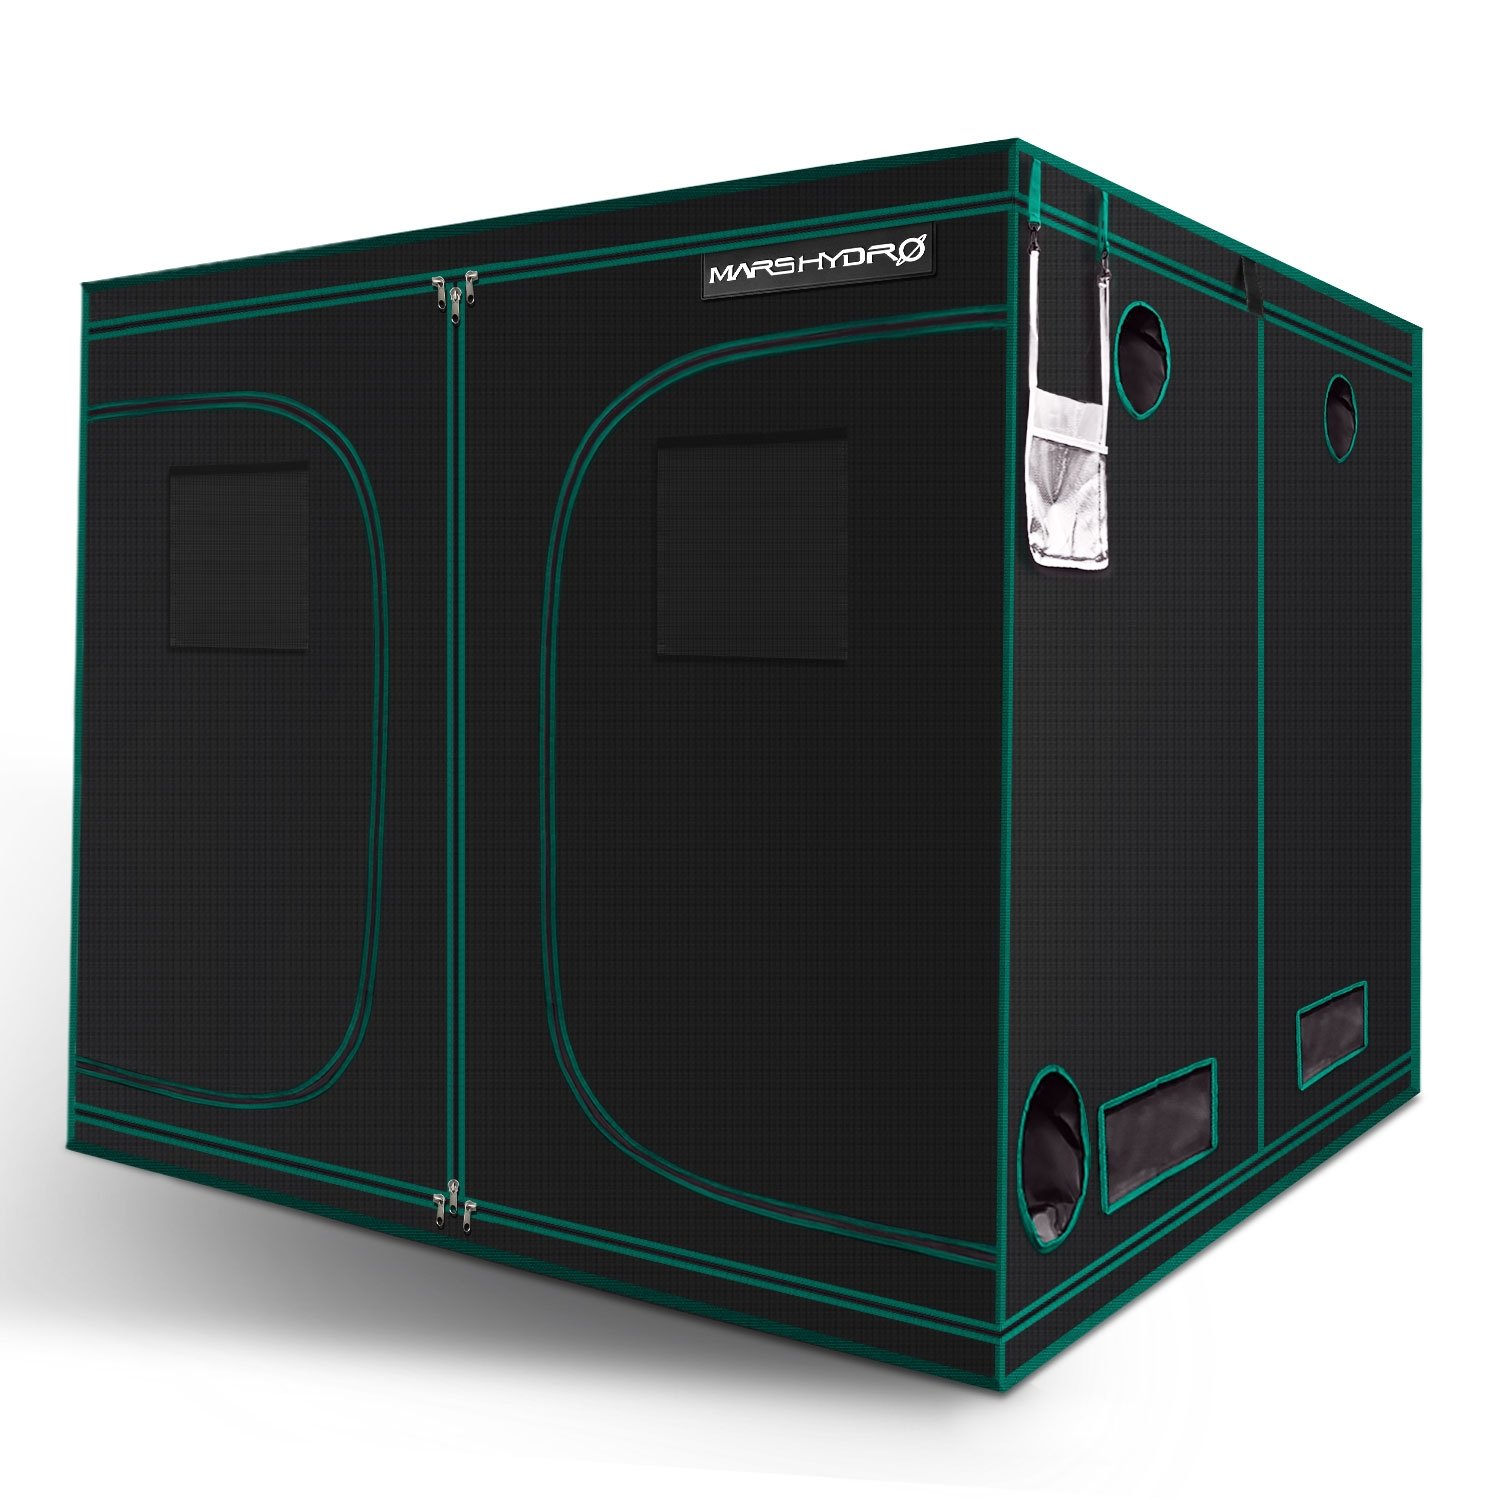
The Mars Grow Tent 2.4m x 2.4m x 2m is very quick and easy to assemble and comprises of all the useful features you would expect. Provides a practical solution to creating a controlled horticultural environment.
It features top quality double thick Mylar with a 99% efficient reflective surface. The tents collect and then reflect any light emitted outside of the canopy footprint and delivers it directly back to the plant. These tents are designed to reflect the spectrum’s provided by Mars Hydro LED grow lights and other HID grow lights. HID Grow lights such as Metal Halide (MH) and High Pressure Sodium (HPS) lamps can also be used in this grow tent. This special surface easily outperforms any other grow tents available. The Mars Grow Tents are one of the first LED engineered Grow tent specifically for growing with Mars Hydro products.
Features of Mars Grow Tent:
Ultra-Reflective Lined Mylar for superior light reflectivity and dispersal.
Premium Mylar sides: 2X stronger & thicker than the competition.
Vented flaps with screens: helps maintain a light proof environment.
Steel construction: Including poles, fixture braces & corners.
Supports up to 65Kg fixture for a a safe grow environment.
Removable waterproof material floor liner tray: contains spills/water within tent.
Completely non-toxic bug and disease resistant ”no off-gassing”.
Step-by-step tent setup video below:
Mars Grow Tent 2.4m x 2.4m x 2m Specifications:
Size of Tent: 2.4m x 2.4m x 2m
Material: Double thick Mylar fabric, all steel frame construction
Vent Size: 2 x 7.5cm, 4 x 20cm, 4 x 30cm
Ventilation System: 1 x 20cm roof mount; 2 x 15cm upper side mount; 3 x 15cm square lower vents;
Mesh Window Size: 18cm x 50cm
Fixture weight capacity: 65Kg
Fixture hanging system 3 steel bar hanging and bracing system.
Additional Features Included waterproof material floor liner tray
Reflective Mylar Tent Skin
Full steel frame with fixture mounts
Assembly instruction & users guide
USAGE NOTES AND WARNINGS
Please read through all instructions. If grow tent is improperly installed and/or maintained, there is potential for damage or possible injury or death.
Assemble correctly to avoid tent tipping over and causing injury.
Use extreme care when handling sharp object in or around tent.
Do not place grow tent near a deck, stairs, chair, or other unsafe structure.
Do not hang equipment on or from grow tent that is above the supported weight range.
Keep electrical wires safely away from equipment and areas in and or around the tent that may collect water.
Do not expose grow tent to direct sunlight, near an open flame, or a heat source.
Do not use your grow tent if any part of your tent material is cracked, ripped, or broken.
Do not permit children to play on, in, or around grow tent.
Provide proper air circulation in your grow tent to prevent air from going stale.
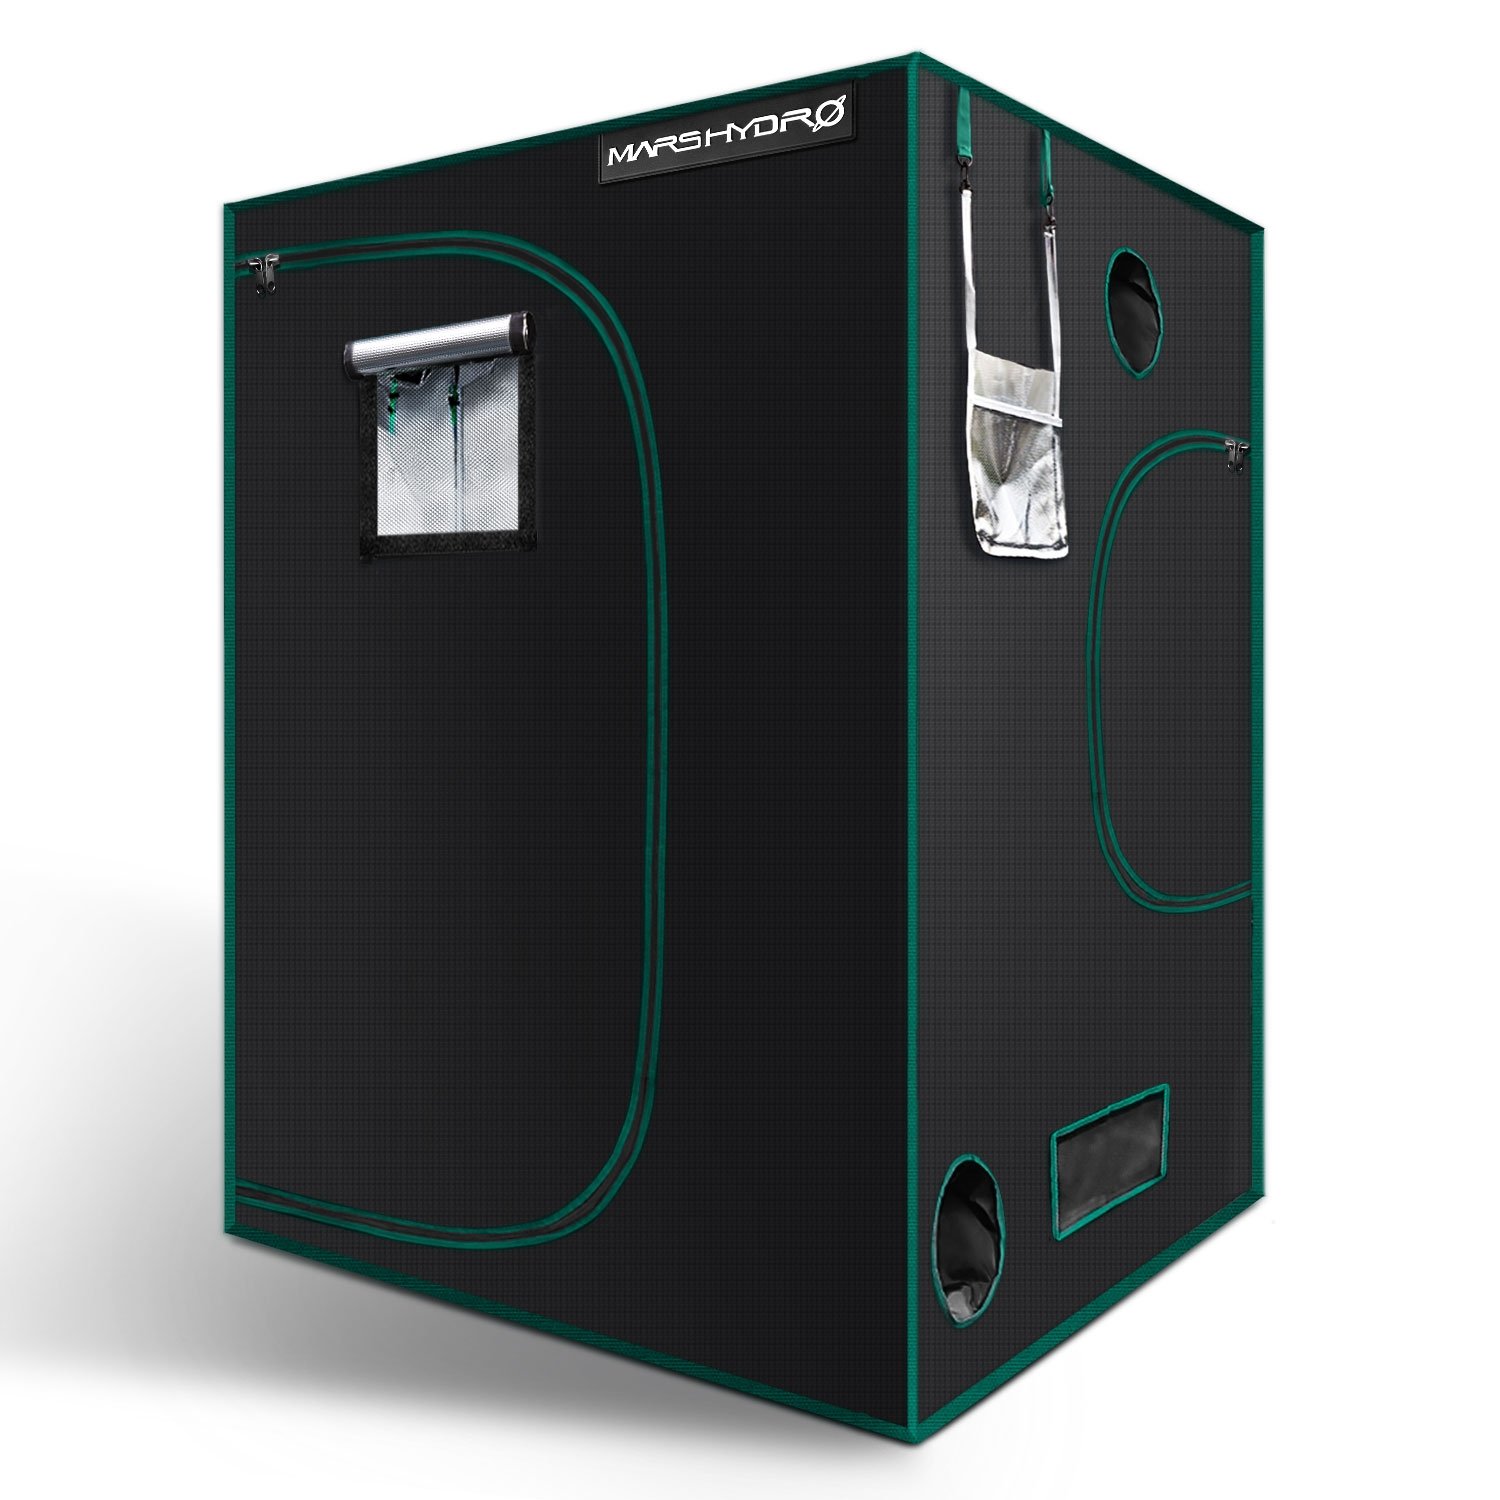
The Mars Grow Tent 1.5m x 1.5m x 2m is very quick and easy to assemble and comprises of all the useful features you would expect. Provides a practical solution to creating a controlled horticultural environment.
It features top quality double thick Mylar with a 99% efficient reflective surface. The tents collect and then reflect any light emitted outside of the canopy footprint and delivers it directly back to the plant. These tents are designed to reflect the spectrum’s provided by Mars Hydro LED grow lights and other HID grow lights. HID Grow lights such as Metal Halide (MH) and High Pressure Sodium (HPS) lamps can also be used in this grow tent. This special surface easily outperforms any other grow tents available. The Mars Grow Tents are one of the first LED engineered Grow tent specifically for growing with Mars Hydro products.
Features of Mars Grow Tent:
Ultra-Reflective Lined Mylar for superior light reflectivity and dispersal.
Premium Mylar sides: 2X stronger & thicker than the competition.
Vented flaps with screens: helps maintain a light proof environment.
Steel construction: Including poles, fixture braces & corners.
Supports up to 65Kg fixture for a a safe grow environment.
Removable waterproof material floor liner tray: contains spills/water within tent.
Completely non-toxic bug and disease resistant ”no off-gassing”.
Step-by-step tent setup video below:
Mars Grow Tent 1.5m x 1.5m x 2m Specifications:
Size of Tent: 1.5m x 1.5m x 2m
Material: Double thick Mylar fabric, all steel frame construction
Vent Size: 2 x 7.5cm, 2 x 20cm, 4 x 25cm
Ventilation System: 1 x 20cm roof mount; 2 x 15cm upper side mount; 3 x 15cm square lower vents;
Mesh Window Size: 17.5cm x 50cm
Fixture weight capacity: 65Kg
Fixture hanging system 3 steel bar hanging and bracing system.
Additional Features Included waterproof material floor liner tray
Reflective Mylar Tent Skin
Removable water-proof floor tray
Full steel frame with fixture mounts
Assembly instruction & users guide
USAGE NOTES AND WARNINGS
Please read through all instructions. If grow tent is improperly installed and/or maintained, there is potential for damage or possible injury or death.
Assemble correctly to avoid tent tipping over and causing injury.
Use extreme care when handling sharp object in or around tent.
Do not place grow tent near a deck, stairs, chair, or other unsafe structure.
Do not hang equipment on or from grow tent that is above the supported weight range.
Keep electrical wires safely away from equipment and areas in and or around the tent that may collect water.
Do not expose grow tent to direct sunlight, near an open flame, or a heat source.
Do not use your grow tent if any part of your tent material is cracked, ripped, or broken.
Do not permit children to play on, in, or around grow tent.
Provide proper air circulation in your grow tent to prevent air from going stale.
The Mars Grow Tent 1.2m x 0.6m x 1.8m is very quick and easy to assemble and comprises of all the useful features you would expect. Provides a practical solution to creating a controlled horticultural environment.
It features top quality double thick Mylar with a 99% efficient reflective surface. The tents collect and then reflect any light emitted outside of the canopy footprint and delivers it directly back to the plant. These tents are designed to reflect the spectrum’s provided by Mars Hydro LED grow lights and other HID grow lights. HID Grow lights such as Metal Halide (MH) and High Pressure Sodium (HPS) lamps can also be used in this grow tent. This special surface easily outperforms any other grow tents available. The Mars Grow Tents are one of the first LED engineered Grow tent specifically for growing with Mars Hydro products.
Features of Mars Grow Tent:
Ultra-Reflective Lined Mylar for superior light reflectivity and dispersal.
Premium Mylar sides: 2X stronger & thicker than the competition.
Vented flaps with screens: helps maintain a light proof environment.
Steel construction: Including poles, fixture braces & corners.
Supports up to 65Kg fixture for a a safe grow environment.
Removable waterproof material floor liner tray: contains spills/water within tent.
Completely non-toxic bug and disease resistant ”no off-gassing”.
Step-by-step tent setup video below:
Mars Grow Tent 1.2m x 0.6m x 1.8m Specifications:
Size of Tent: 1.2m x 0.6m x 1.8m
Material: Double thick Mylar fabric, all steel frame construction
Vent Size: 2 x 7.5cm, 2 x 20cm, 1 x 25cm
Ventilation System: 1 x 20cm roof mount; 2 x 15cm upper side mount; 3 x 15cm square lower vents;
Mesh Window Size: 12.5cm x 45cm
Fixture weight capacity: 65Kg
Fixture hanging system 3 steel bar hanging and bracing system.
Additional Features Included waterproof material floor liner tray
Reflective Mylar Tent Skin
Full steel frame with fixture mounts
Assembly instruction & users guide
USAGE NOTES AND WARNINGS
Please read through all instructions. If grow tent is improperly installed and/or maintained, there is potential for damage or possible injury or death.
Assemble correctly to avoid tent tipping over and causing injury.
Use extreme care when handling sharp object in or around tent.
Do not place grow tent near a deck, stairs, chair, or other unsafe structure.
Do not hang equipment on or from grow tent that is above the supported weight range.
Keep electrical wires safely away from equipment and areas in and or around the tent that may collect water.
Do not expose grow tent to direct sunlight, near an open flame, or a heat source.
Do not use your grow tent if any part of your tent material is cracked, ripped, or broken.
Do not permit children to play on, in, or around grow tent.
Provide proper air circulation in your grow tent to prevent air from going stale.
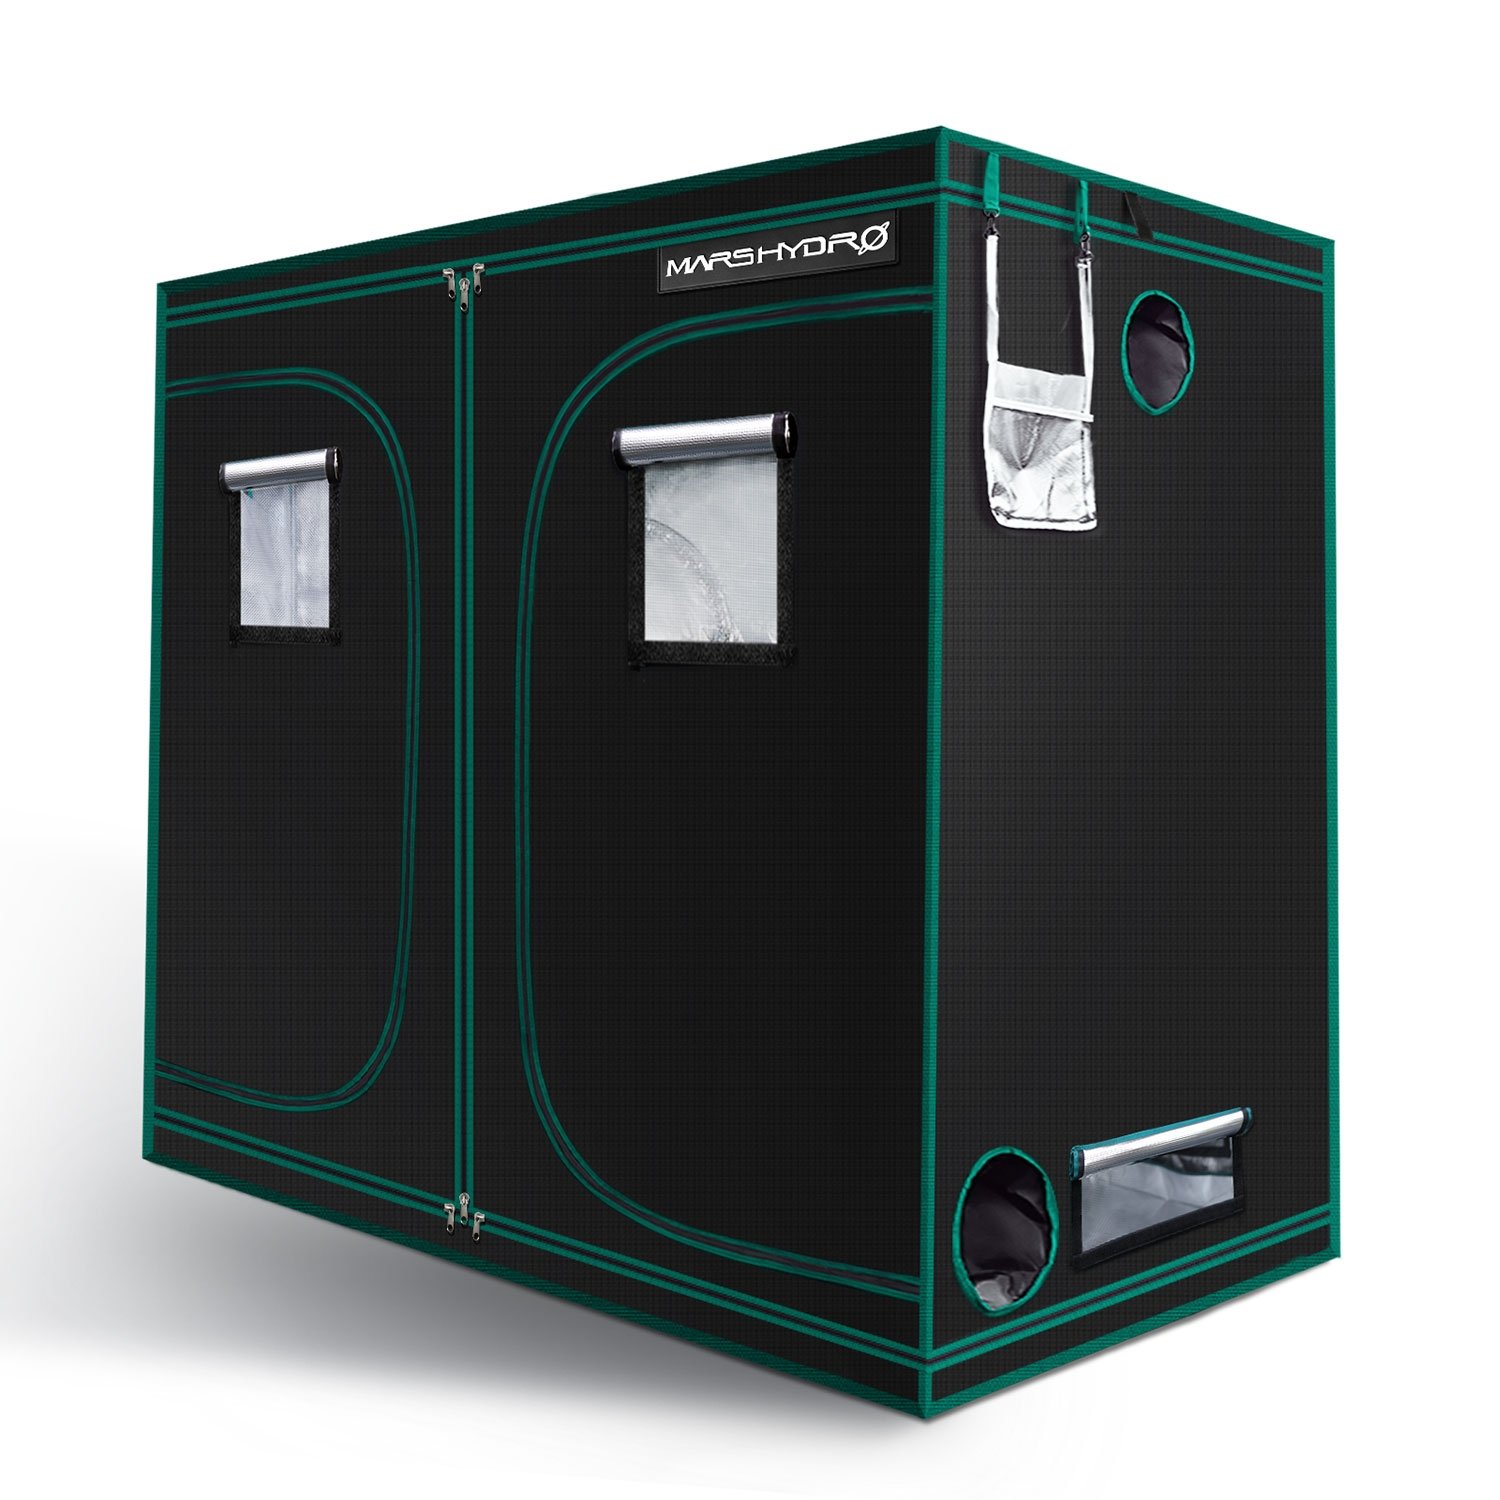
The Mars Grow Tent 2.4m x 1.2m x 2m is very quick and easy to assemble and comprises of all the useful features you would expect. Provides a practical solution to creating a controlled horticultural environment.
It features top quality double thick Mylar with a 99% efficient reflective surface. The tents collect and then reflect any light emitted outside of the canopy footprint and delivers it directly back to the plant. These tents are designed to reflect the spectrum’s provided by Mars Hydro LED grow lights and other HID grow lights. HID Grow lights such as Metal Halide (MH) and High Pressure Sodium (HPS) lamps can also be used in this grow tent. This special surface easily outperforms any other grow tents available. The Mars Grow Tents are one of the first LED engineered Grow tent specifically for growing with Mars Hydro products.
Features of Mars Grow Tent:
Ultra-Reflective Lined Mylar for superior light reflectivity and dispersal.
Premium Mylar sides: 2X stronger & thicker than the competition.
Vented flaps with screens: helps maintain a light proof environment.
Steel construction: Including poles, fixture braces & corners.
Supports up to 65Kg fixture for a a safe grow environment.
Removable waterproof material floor liner tray: contains spills/water within tent.
Completely non-toxic bug and disease resistant ”no off-gassing”.
Step-by-step tent setup video below:
Mars Grow Tent 2.4m x 1.2m x 2m Specifications:
Material: Double thick Mylar fabric, all steel frame construction
Vent Size: 4 x 7.5cm, 2 x 20cm, 4 x 25cm
Ventilation System: 1 x 20cm roof mount; 2 x 15cm upper side mount; 3 x 15cm square lower vents;
Mesh Window Size: 12.5cm x 50cm
Fixture weight capacity: 65Kg
Fixture hanging system 3 steel bar hanging and bracing system.
Additional Features Included waterproof material floor liner tray
Reflective Mylar Tent Skin
Full steel frame with fixture mounts
Assembly instruction & users guide
USAGE NOTES AND WARNINGS
Please read through all instructions. If grow tent is improperly installed and/or maintained, there is potential for damage or possible injury or death.
Assemble correctly to avoid tent tipping over and causing injury.
Use extreme care when handling sharp object in or around tent.
Do not place grow tent near a deck, stairs, chair, or other unsafe structure.
Do not hang equipment on or from grow tent that is above the supported weight range.
Keep electrical wires safely away from equipment and areas in and or around the tent that may collect water.
Do not expose grow tent to direct sunlight, near an open flame, or a heat source.
Do not use your grow tent if any part of your tent material is cracked, ripped, or broken.
Do not permit children to play on, in, or around grow tent.
Provide proper air circulation in your grow tent to prevent air from going stale.
The Mars Grow Tent 60cm x 60cm x 1.4m is very quick and easy to assemble and comprise of all the useful features you would expect. Provides a practical solution to creating a controlled horticultural environment.
It features top quality double thick Mylar with a 99% efficient reflective surface and a full metal frame. The tents collect and then reflect any light emitted outside of the canopy footprint and delivers it directly back to the plant. These tents are designed to reflect the spectrum’s provided by Mars Hydro LED grow lights and other HID grow lights. HID Grow lights such as Metal Halide (MH) and High Pressure Sodium (HPS) lamps can also be used in this grow tent. This special surface easily outperforms any other grow tents available. The Mars Grow Tents are one of the first LED engineered grow tents, specifically for growing with Mars Hydro products.
Features of Mars Grow Tent:
Ultra-Reflective Lined Mylar for superior light reflectivity and dispersal.
Premium Mylar sides: 2X stronger & thicker than the competition.
Vented flaps with screens: helps maintain a light proof environment.
Steel construction: Including poles, fixture braces & corners.
Supports up to 65Kg fixture for a a safe grow environment.
Removable waterproof material floor liner tray: contains spills/water within tent.
Completely non-toxic bug and disease resistant ”no off-gassing”.
Step-by-step tent setup video below:
Mars Grow Tent 60cm x 60cm x 1.4m Features:
Size of Tent:
60cm x 60cm x 1.4m
Fixture weight capacity:
50 kg
Ventilation System:
1 x 20cm roof mount; 2 x 15cm upper side mount; 3 x (28cm x 7.5cm) rectangular lower vents
Electrical Outlets:
2 x 7.5cm Holes 1 upper and one lower
Material:
Double thick Mylar fabric, all steel frame construction
Garden HighPro Tent Pole Connector Packs – these hard plastic tent pole connector sets are great for DIY enthusiasts. Construct your own customized grow area with ease, by using 16mm light steel tubes or even wooden dowels(wood is more suitable for smaller, light-duty spaces). Please note that the fit is slightly loose, as these connectors are normally held in place by a sturdy and well fitting tent-canvas that keeps them in place.
PLEASE NOTE: These connectors are made for use with Garden HighPro tent poles, with a 16mm diameter end to end.
Many types of grow tent poles reduce down to a 14mm diameter on their ends, and use a spring loaded pin to clip the pole into place when inserted into another pole, or into a connector. This variance in diameter could cause problems when using the HighPro connectors… loose-fitting connections may lead to a wobbly, leaning tent that may not handle the strain of suspended light fixtures and other equipment well.
Types of Garden HighPro Tent Pole Connector Packs available:
ProBox Tents with widths and depths of between 60 and 150 cm – these are all the smaller sizes of square grow tents.
240L Probox Tents – width and depth of 240 x 120 cm
240 Probox Tents – Large square tents – width and depth of 240 x 240 cm
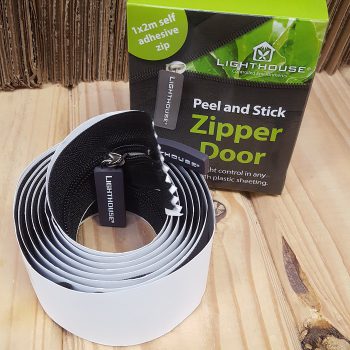
If planning a DIY growing space, make sure that you have your covering material of choice on hand before completing the tent frame completely – this way you would be better able to plan how you will be securing the coving material to your frame and not run into any unpleasant surprises, like forgetting to take overlap into account. ( If your chosen material is 1m wide, for example, your tent frame should ideally be a good bit smaller than 1m, to leave room for fastening and/or overlap )
Products like Black & White Panda Plastic Sheet, Sisalation or Diamond Mylar can can used as covering material, but these materials can be tricky to work with and secure, due to their flexible and relatively thin nature.
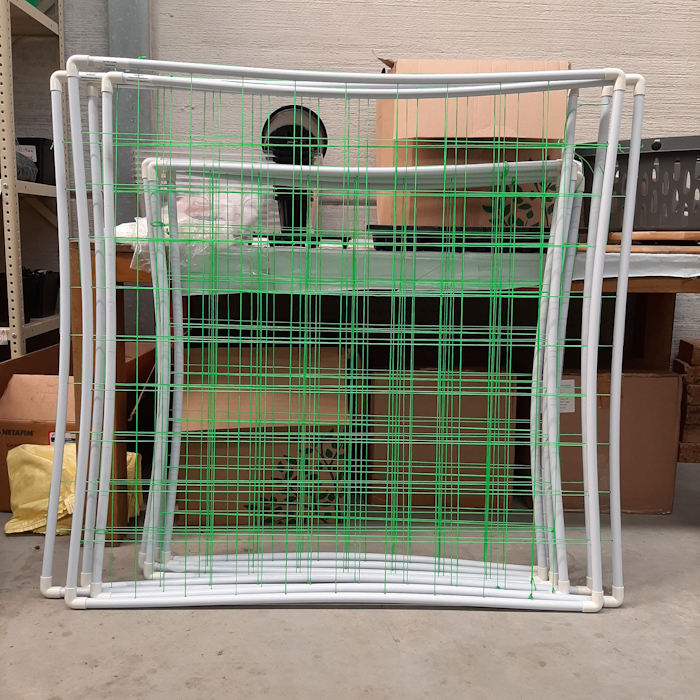
Tent SCROG Scrog Frames – These pre-made scrog frames are easy to tie onto grow tent poles With these scrog frames in place you can trim and train your plants’ shoots into a flat, uniform canopy, full of potential bud sites.
PLEASE NOTE: Tent SCROGs are now shipped “rolled up” to minimize courier fees and damages in transit. They are easily assembled once received. ( video here )
Training plants into a flat canopy (“Screen of Green”) enables the formation of many bud sites along the same horizontal plane. The leaves and bud sites along this plane will then be able to make the most of the light that is emitted by the grow light in the tent, and will generate more yield per plant when it comes to harvest time.
We currently offer Tent SCROG Scrog Frames that fit into the following popular grow tent sizes. PLEASE NOTE that the frames themselves are slightly smaller than the tent dimensions, to make sure that the frame can easily fit inside the tent, even if the tent frame has thicker diameter poles:
1 m x 1 m ( actual frame dimensions are approx. 95 cm x 95 cm )
1.2 m x 1.2 m ( actual frame dimensions are approx. 115 cm x 115 cm )
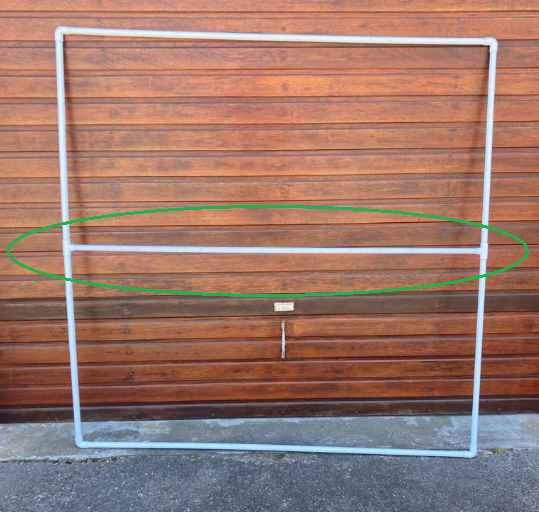
1.5 m x 1.5 m ( actual frame dimensions are approx. 145 cm x 145 cm ) Also has 1 x additional brace through middle for stability, see below…
You will need to have something on hand to secure the frame to the tent poles, for example, cable-ties or LightHouse Soft Garden Tie.
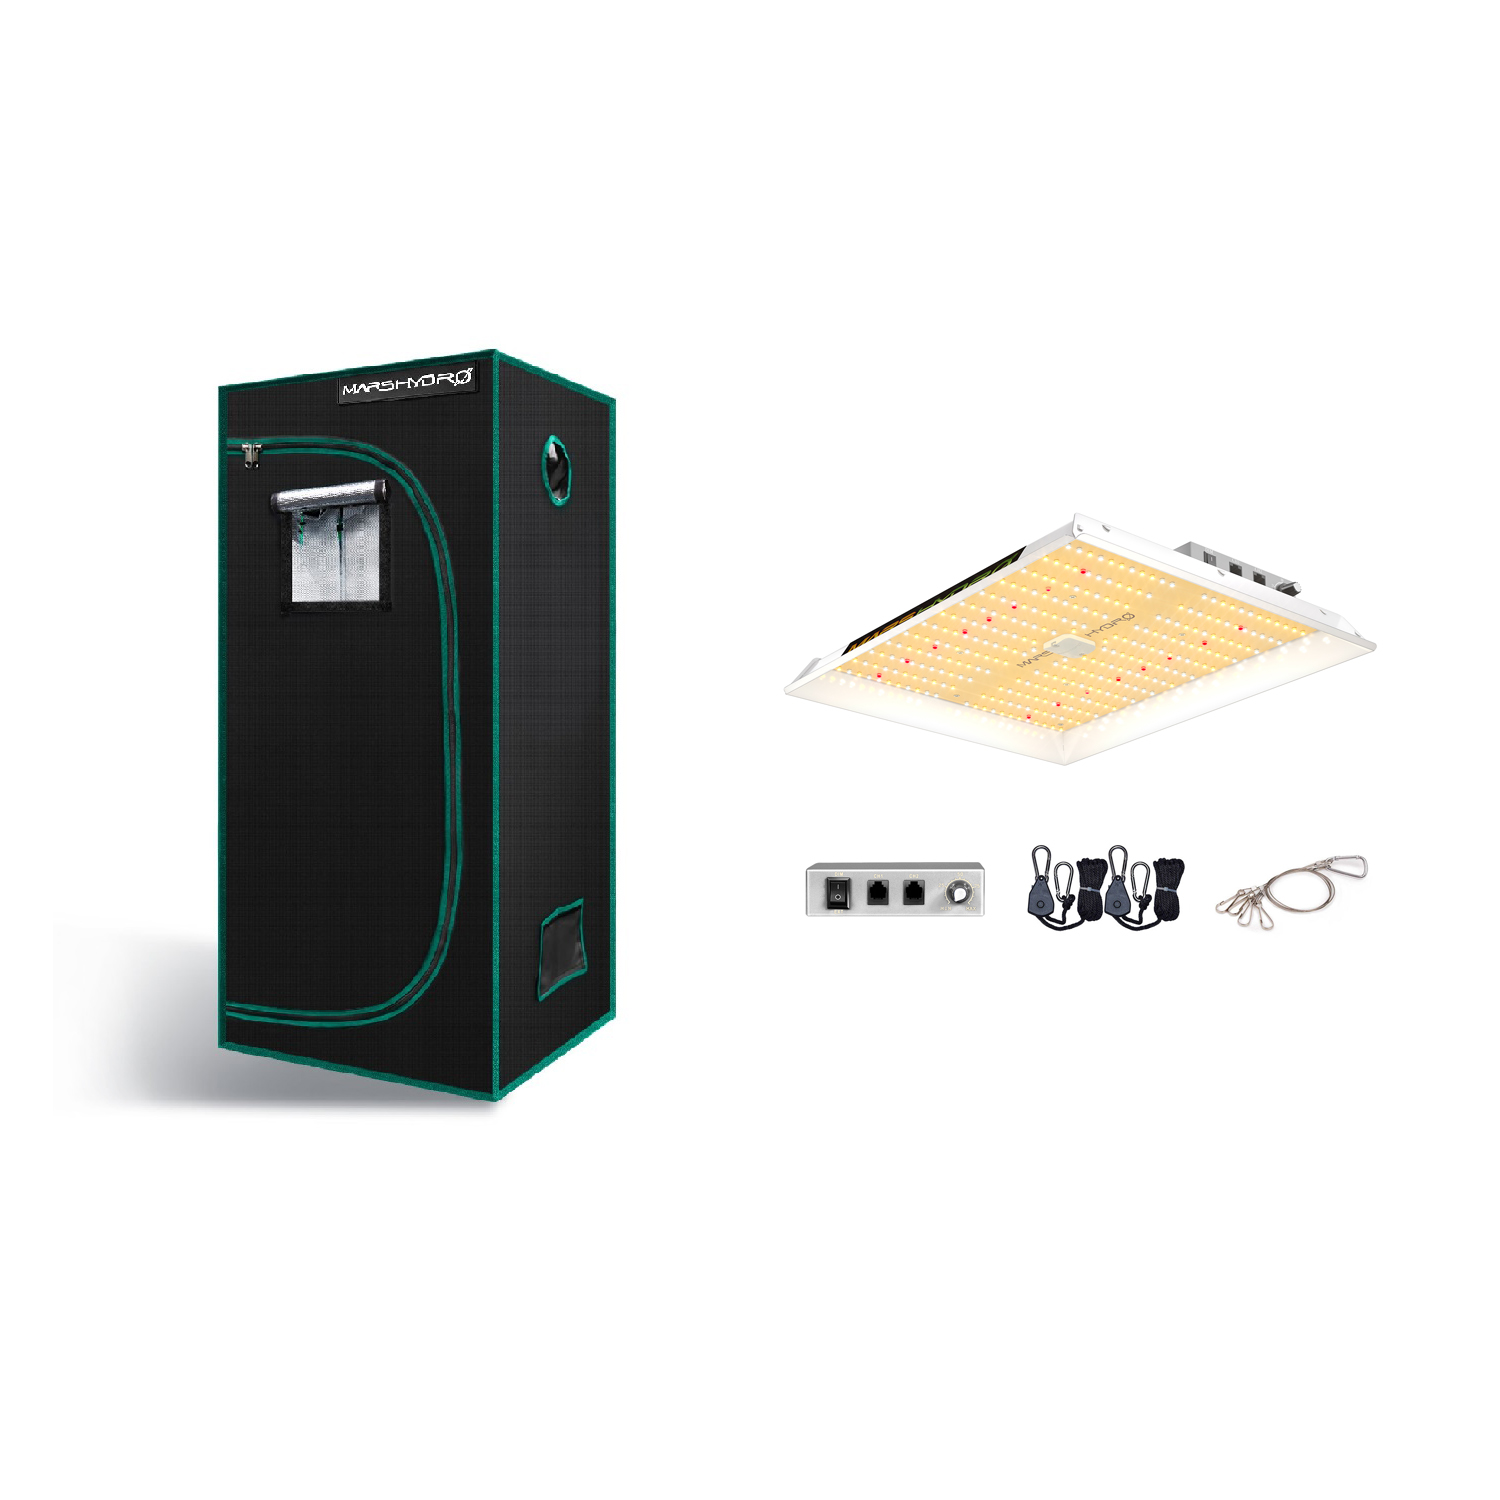
The TS-1000 Mars Hydro Combo celebrates the combination of the Mars Hydro TS-1000 2022 Upgrade
and the Mars-Hydro 70 x 70 x 160 cm grow tent.
The Mars TS-1000 LED grow light which is part of the TS-1000 Mars Hydro Combo has many advantages over traditional HPS and older LED grow lights.
The spectrum produced by the Mars TS-1000 is closer to natural light and glasses are not required.
Compared to the same wattage HPS, the TS-1000 is 50% more efficient.
No fans mean no noise.
Aluminum cover and reflector for better heat and light dissipation.
Easy dimming.
The Mars grow tent 70cm x 70cm x 1.6m is very quick and easy to assemble and comprises of all the useful features you would expect. Provides a practical solution to creating a controlled horticultural environment.
It features top quality double thick Mylar with a 99% efficient reflective surface. The tents collect and then reflect any light emitted outside of the canopy footprint and delivers it directly back to the plant. These tents are designed to reflect the spectrum’s provided by Mars Hydro LED grow lights and other HID grow lights. HID Grow lights such as Metal Halide (MH) and High Pressure Sodium (HPS) lamps can also be used in this grow tent. This special surface easily outperforms any other grow tents available. The Mars Grow Tents are one of the first LED engineered Grow tent specifically for growing with Mars Hydro products.
Features of Mars Grow Tent:
Ultra-Reflective Lined Mylar for superior light reflectivity and dispersal.
Premium Mylar sides: 2X stronger & thicker than the competition.
Vented flaps with screens: helps maintain a light proof environment.
Steel construction: Including poles, fixture braces & corners.
Supports up to 65Kg fixture for a a safe grow environment.
Removable waterproof material floor liner tray: contains spills/water within tent.
Completely non-toxic bug and disease resistant ”no off-gassing”.
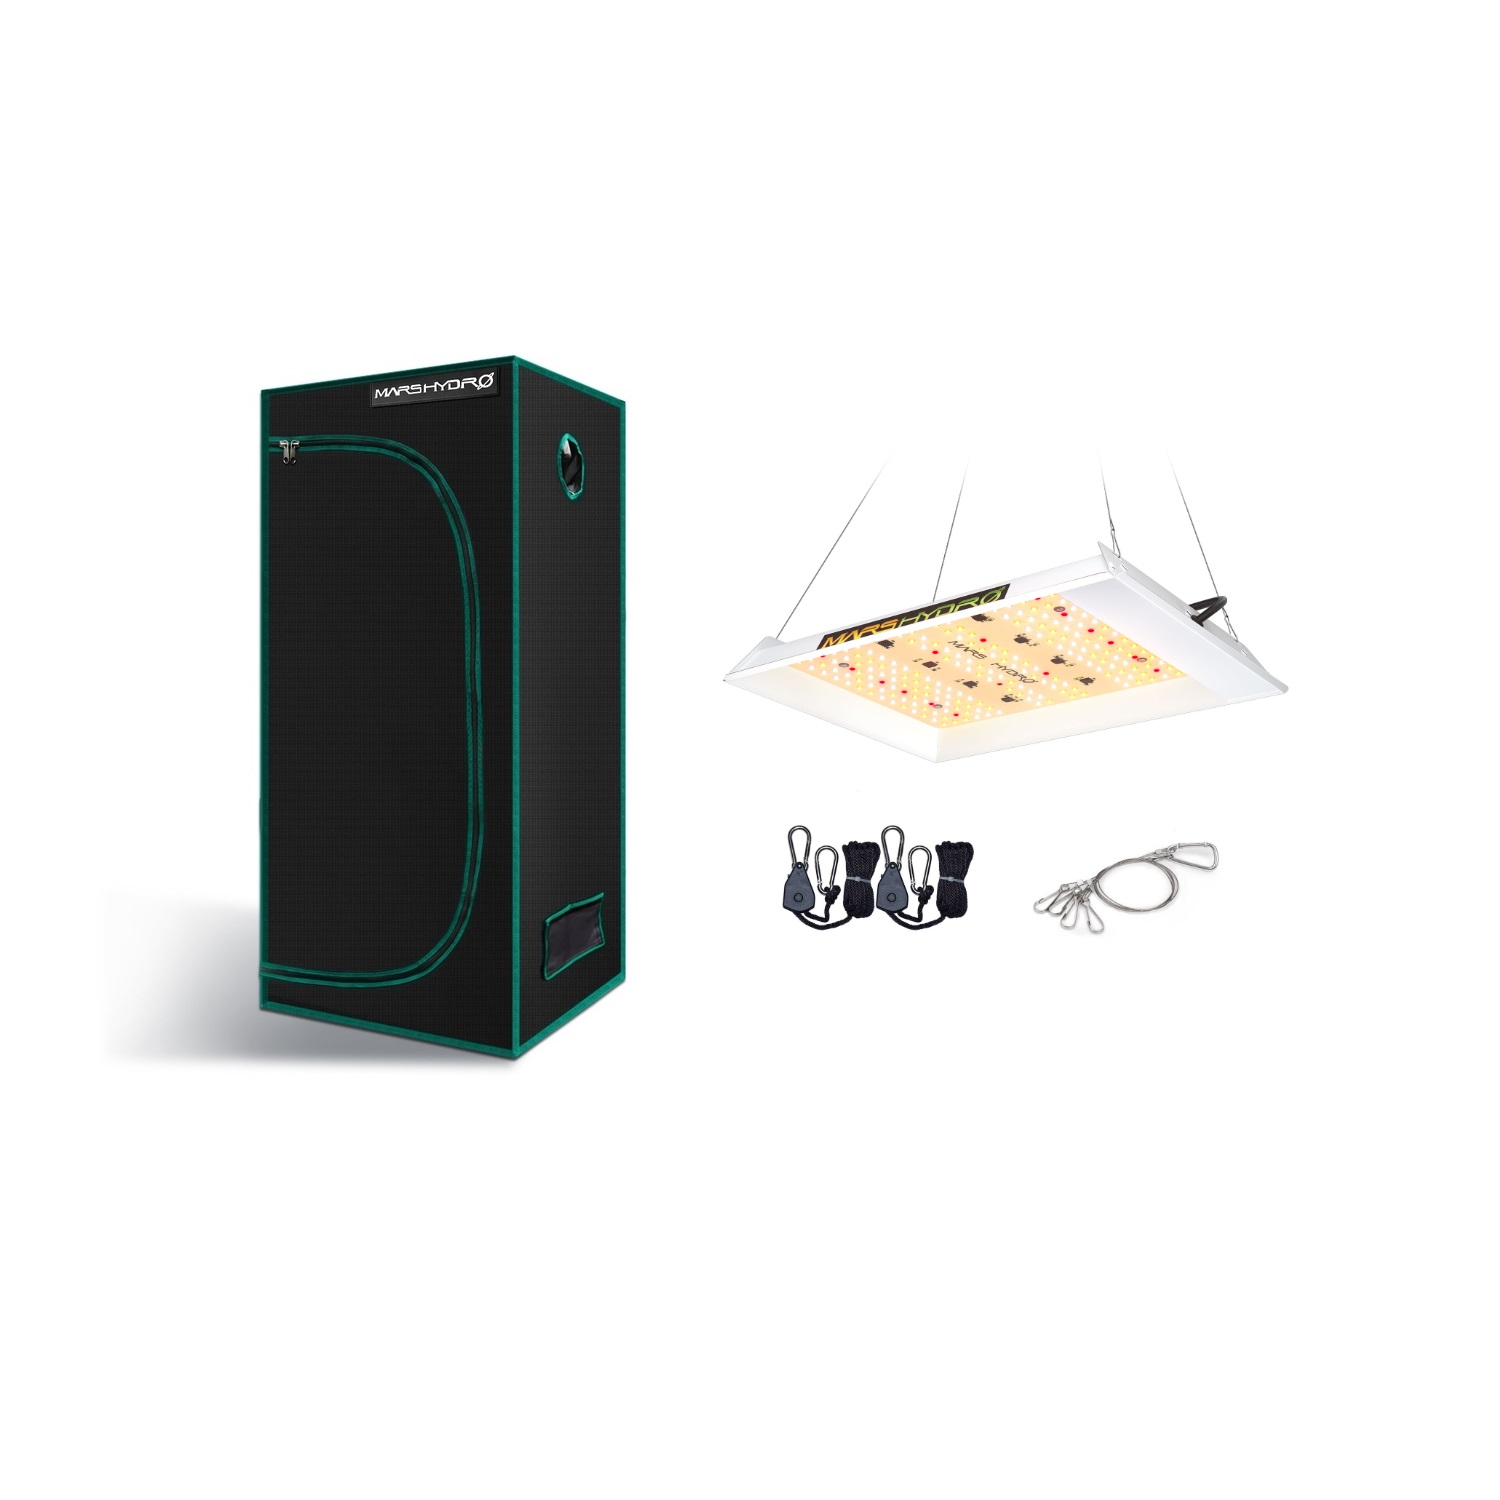
The Mars TS-600 LED grow light has many advantages over traditional HPS and older LED grow lights.
The spectrum produced by the Mars TS-600 is closer to natural light and glasses are not required.
Compared to the same wattage HPS, the TS-600 is 50% more efficient.
No fans mean no noise.
Aluminum cover and reflector for better heat and light dissipation.
The Mars grow tent 60cm x 60cm x 1.4m is very quick and easy to assemble and comprise of all the useful features you would expect. Provides a practical solution to creating a controlled horticultural environment.
It features top quality double thick Mylar with a 99% efficient reflective surface and a full metal frame. The tents collect and then reflect any light emitted outside of the canopy footprint and delivers it directly back to the plant. These tents are designed to reflect the spectrum’s provided by Mars Hydro LED grow lights and other HID grow lights. HID Grow lights such as Metal Halide (MH) and High Pressure Sodium (HPS) lamps can also be used in this grow tent. This special surface easily outperforms any other grow tents available. The Mars Grow Tents are one of the first LED engineered grow tents, specifically for growing with Mars Hydro products.
Features of Mars Grow Tent:
Ultra-Reflective Lined Mylar for superior light reflectivity and dispersal.
Premium Mylar sides: 2X stronger & thicker than the competition.
Vented flaps with screens: helps maintain a light proof environment.
Steel construction: Including poles, fixture braces & corners.
Supports up to 65Kg fixture for a a safe grow environment.
Removable waterproof material floor liner tray: contains spills/water within tent.
Completely non-toxic bug and disease resistant ”no off-gassing”.
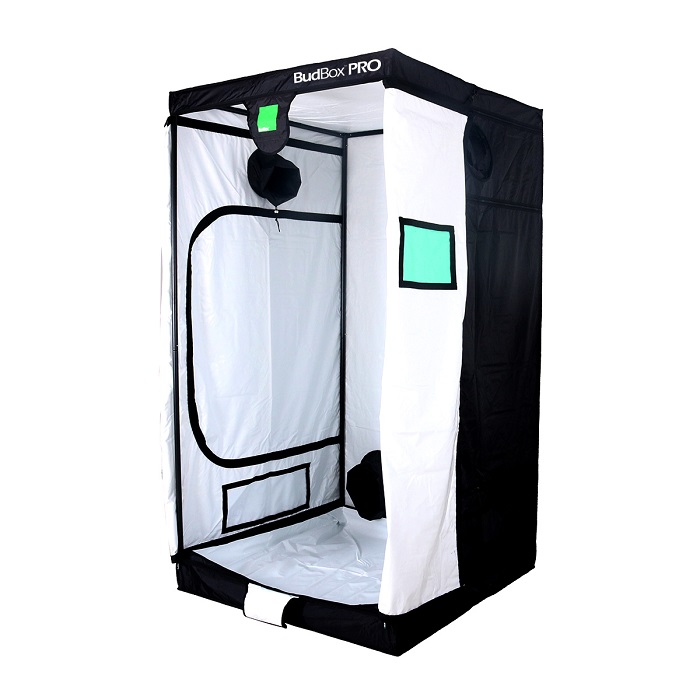
BudBox PRO White XL 1.2m x 1.2m x 2m tent features a strong framework to support more weight, metal click-lock connectors to keep the whole tent stable and sturdy, high quality tent fabric with precision stitching to keep light inside at all times. A green tinted viewing window lets you keep a close eye on your growing environment while eliminating any potential light leaks. In short, the BudBox Pro grow tent is a premium grade grow tent.
BudBox Pro – superbly designed and constructed, premier grow tents
Pro White material offers class leading PAR results
Strong, powder-coated 25mm steel framework
Metal, click-lock connectors for enhanced structural strength and long-term stability
Creates a sealed area that locks in light, smells and sounds
Tough, thick, durable yet lightweight outer shell that’s easy to fit in minutes
Features a green tinted viewing window, to keep a close eye on your growing environment without unzipping the door
Intake and extraction ports with tightening drawstrings attached, large enough for acoustic ducting
Military-grade, high-quality zips
Large ventilation panel/s for increased passive air flow
BudBox™ is still the ONLY grow tent that takes the time and care to powder coat our poles and connectors, delivering the best possible anti-corrosion protection and a very clean and reflective look.
Let’s talk about light. You plants need PAR light to grow and flower. PAR is an acronym for Photosynthetic Active Radiation; plants love the blue and red light from 400 to 750nm. Blue light tends to help the plants grow strong leaves and stems and the red part helps with flowering. BudBox™ Pro–White models reflects more PAR than Mylar material and at the same time reduce troublesome hot spots (concentrated heat energy) and, as such, will always the professional’s choice when it comes to horticulture. Not only is the flat white material reflecting more PAR light directly to your plants it reflects less of the overall unused spectrum. With light energy comes heat energy and the Pro-white lining will always run cooler than a standard Mylar tent. The Mylar material will reflect more heat energy, therefore, will run hotter (around 6-8degC) as such, the these units require greater ventilation, or the use of less powerful lighting, so the environment does not overheat and damage your plants.
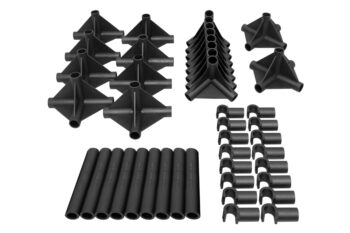
BudBox PRO White XL 1.2m x 1.2m x 2m Contains:
1 x Carry bag
1 x White lined fabric tent
8 x Upright poles
8 x Horizontal bars
8 x Corner pieces
3 x Hanging rails
6 x Plastic hanging rail covers
3 x Hanging straps
1 x Waterproof spill-tray
Dimensions:
120cm x 120cm x 200cm
Specs:
Pole thickness: 25mm rolled steel
Connector pieces: Rolled steel
Ventilation panels: 2 (64cm x 25cm)
Viewing window: Yes
Irrigation bar and port: Yes (1 x irrigation bar, 2 x irrigation port)
Intake ports: 1 (26cm diameter)
Extraction ports: 1 (26cm diameter)
Cable ports: 2 (10cm diameter)
Cooltube ports: 2 (22cm diameter)
Doors: 2 (front doors that zip all the way around to the sides), 2 x side access doors
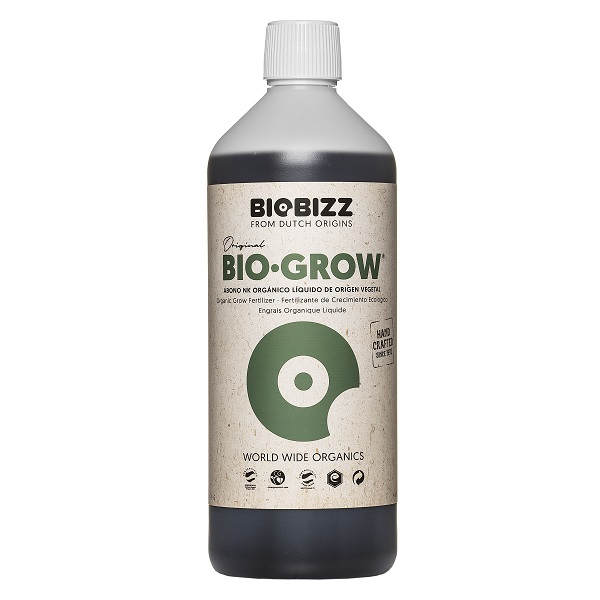
BioBizz Bio-Grow is a liquid growth fertilizer which can be applied to most types of soil and substrate mixtures. BioBizz Bio-Grow is an Organic Nutrient Fertiliser.
BioBizz Bio-Grow activates the bacterial flora in the substrate thanks to it basis of 100% Dutch organic sugar beet extract, commonly known as molasses. Molasses is a syrup that contains sugar. It forms as a by-product of sugar manufacturing using sugar beet or sugar cane. Wheat starch is the other important raw material used for the production of grain alcohol.
Before being fermented, starch is transformed into glucose with the help of enzymes. So, in other words, molasses are a by-product or residue of a natural fermentation process. They differ from other raw materials due to their high betaine content that helps activate micro activity in the soil through a process of organic facilitation. Bio·Grow® contains 70 trace elements and vitamins B1, B2, C, and E. Just like all Biobizz® products it has a low phosphate content, as this substance is considered harmful to our bodies and the environment.
It is not recommended to use Bio Bizz in a Hydroponic system (NFT, DWC etc)
Bio Bizz is recommended for Hand Feeding into Coco Peat or Soil.
Storage instructions: Store all your Biobizz products in a cool, dry, dark place (away from direct sunlight) with low humidity and an average (room) temperature of 18 degrees. Don´t store them in the fridge.
BioBizz Grow is an all organic growth promoter made from 100% Dutch sugar beet extract. This potent growth formula is a complete fertiliser solution containing everything your plants need. Enriched with 70 trace elements, natural sugars, humic acids, kelp, and vitamins B1, B2, C and E; Bio Grow is one of the best organic growth promoters out there.
BioBizz Bio Grow has an NPK ratio of 4-3-6 and is a well balanced fertiliser. Designed for use with mostly all types of soil, Bio Grow primarily works by activating bacteria in the soil which in turn helps boost the vegetative growth of your plants.
With a high concentration of nitrogen, Bio Grow is most suitable for use during the vegetative stage of development and is perfect for continued use on herbs and leafy greens. However, it can be administered throughout the entire growth period on all plants, and is used by many growers as a plant tonic during the flowering and fruiting stages.
Key features of Bio Grow include:
High nitrogen concentration for vigorous vegetative growth
An abundance of trace elements, sugars, vitamins and humic acids for healthy plants
All-organic complete fertiliser solution made entirely from sugar beet extract
Ideal for organic gardeners and those growing in soil or cocopeat.
Our Opinion
BioBizz are a Dutch based company and they have been making great organic fertilisers for well over a decade. As one of the most trusted manufacturers of organic fertilisers, BioBizz products (including Bio-Grow) are ideal for those who like to grow the natural way in soil – recommended.
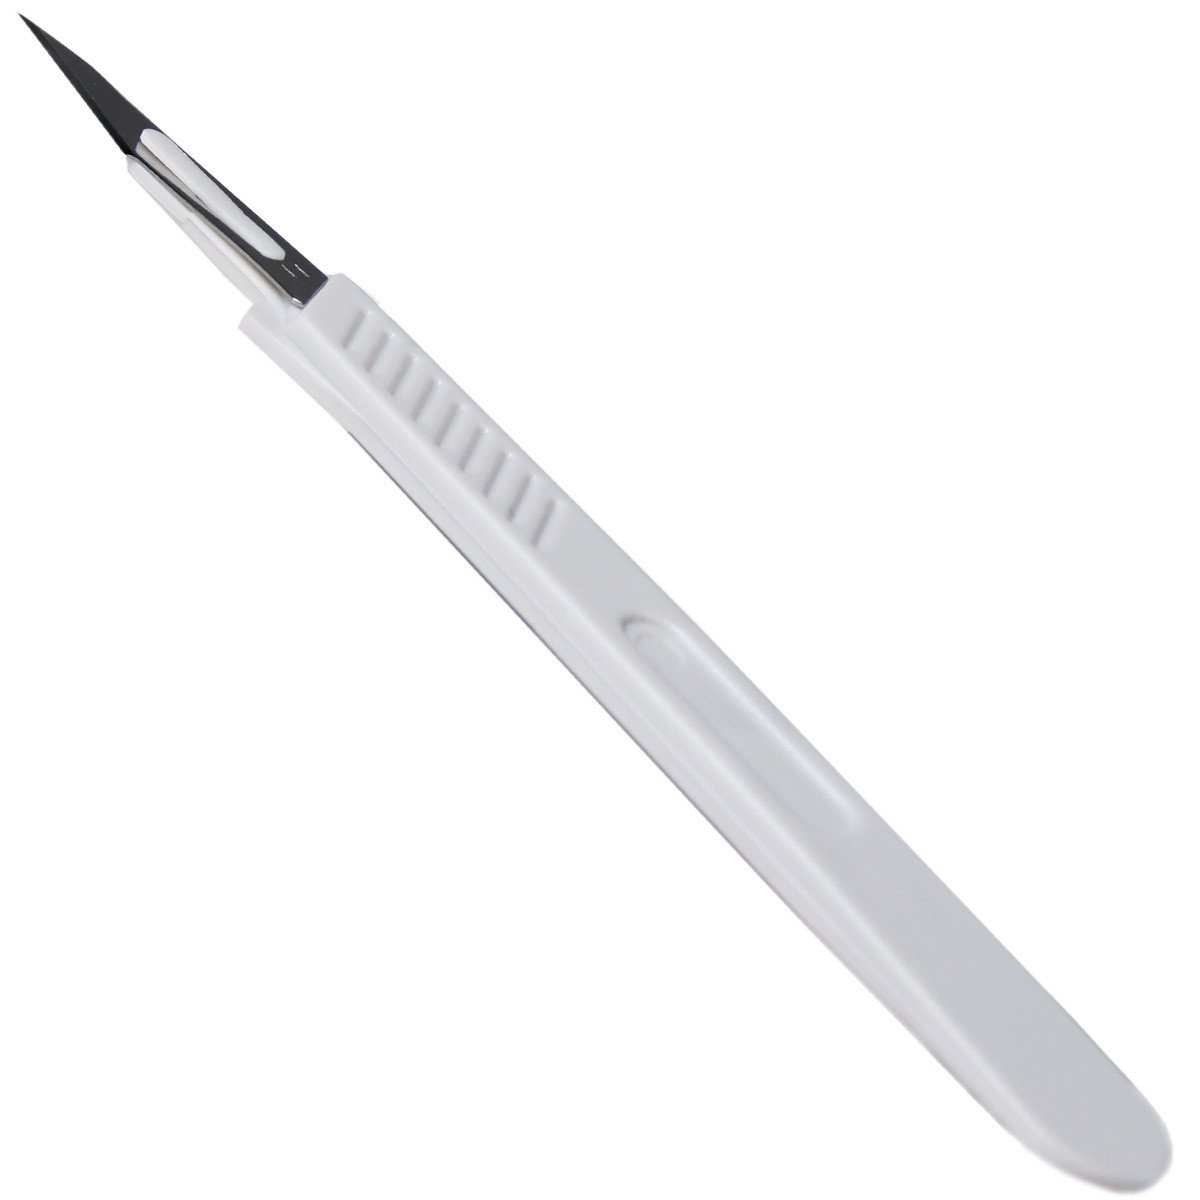
Sterile surgical scalpels are used to take cuttings from plants- fresh Surgical Scalpels need to be used every time that you decide to take new cuttings.
Taking cuttings is one of the most popular ways to propagate a plant. Also referred to as cloning, it offers the ability to get multiple plants that are genetically identical to the mother plant. Many people feel intimidated by the process, and are a bit leery to attempt it. If you are one of those people, relax, it’s a relatively easy process.
What follows are step by step instructions for a simple procedure that works for both hardwood and softwood plants. (NOTE: Not all plants can be cloned in this manner. Some plants are virtually impossible to get cuttings from, even for experts.)
Why Take Cuttings?
There are several reasons that you may want to clone your plant, one being, that it does not require seeds. Cloning may be your only option for obtaining a certain variety of plant when no seeds are available. Another reason is to maintain consistent quality control of your crop. Every seed, like every human being, is slightly different. Aside from identical twins, genetically, no two people are exactly the same. DNA works in plants the same way it does in humans. So if you have a plant that is just what you want it to be, you can take cuttings and have as many perfect clones of your special plant as you want.
Another big factor which makes cloning so popular is that in most cases, it’s much faster than starting from seed. The majority of plant species will produce a rooted, growing plant from a clone before the seeds of the same species can even sprout, saving a lot of time.
What You’ll Need
A SINGLE EDGE RAZOR BLADE – Must be sharp!!
BACK-UP BLOCK – A piece of Styrofoam, wood or plastic approximately 2″x2″.
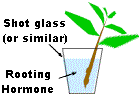
SHOT GLASS – Or similar small glass or plastic container.
GROWING MEDIUM – Jiffys, Rockwool or Oasis cubes, Pro-mix, coconut fiber or one of several other suitable growing media.
SEED TRAY WITH CLEAR HUMIDITY DOME
ROOTING HORMONE – You will need a good quality gel, liquid or powdered rooting hormone. Although you can use a powdered rooting hormone, in our opinion they are much harder to work with resulting in a reduced success rate.
SPRAY BOTTLE WITH WATER
RUBBING ALCOHOL
Before You Start
This might sound obvious, but you should only take cuttings from healthy plants. The healthier the mother plant, the better success you will have with your clones. You should take a few more cuttings than you need and then select the best ones to use and dispose of the rest.
You will need to leach the nitrogen out of the mother plant(s) by watering them heavily with pH adjusted water only (no fertilizer) for two or three days before you take the cuttings. This is an important step because the nitrogen stored in the plant will retard rooting.
Decide what you are going to use for growing medium. Most people use Jiffys, Rockwool or Oasis cubes. You can also use many different mediums successfully. Use plastic cups with holes cut in the bottom to hold coconut fiber, a Perlite & Vermiculite mix or other loose type growing medium. .You will need to pre-soak your growing medium before you start, using pH balanced water. Distilled water is the best thing to use, but any good, chlorine free water source will work. (NOTE: Most growing medium need to be soaked in pH 5.5 to pH 6.5 water. Rockwool needs to be soaked for 24 hours with water adjusted to a pH of 4.5 to 5.5).
Make a hole in the top of the growing medium which is about the same size or a little smaller than the stem of the cutting. You do not want to force the cutting into the growing medium.
It is critical that you sterilize everything before you start, because cuttings are very susceptible to fungus, viruses and diseases until they root. Use rubbing alcohol on your hands, the razor blade and the cutting block. Rinse the shot glass (or whatever you are using) with alcohol, dry it and then fill it 3/4 full with rooting hormone, and set it aside for now.
Work quickly but carefully. When you make the cut that separates the clone from the mother, you must get it into the rooting hormone as quickly as possible to prevent air from getting pulled into the stem. Please be careful not to cut yourself with the razor blade. (The lawyers made us say that).
Take the Cuttings
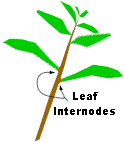
Take a growing tip from your plant 3″ to 6″ long with at least one leaf internode, two is better but not always possible. (A leaf internode is where the leaf connects to the stem, See diagram 1).
With a Sharp single edge razor blade, carefully cut off one or two leaves (or small branches) flush with the stem. (See diagram 2).
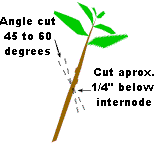
Make a cut approximately 1/4″ below the internode(s) where you just trimmed the leaves. Cut at a 45 to 60 deg. angle. (See diagram 3). Hold the back-up block tightly behind the stem where you are going to cut. This supports the stem and protects your fingers. Make this cut as quick and clean as you can as you do not want to tear or crush the stem.
Quickly insert the cutting into the rooting hormone (See diagram 4). If you are using a liquid hormone you can let the cutting soak for 30-60 seconds. With a gel type hormone you just dip the cutting and then insert it into the growing medium. If you are using a powdered hormone you need to wet the stem with water and then carefully roll it in the powder.
Gently insert the cutting into the growing medium (see diagram 5). Do not push the cutting all the way thru the medium. You need to leave room for the roots to develop. Make sure that the cut(s) you made at the leaf internode(s) are below the surface of the growing medium.
Lightly pack the growing medium up against the cutting. Make sure there is good contact between the cutting and the growing medium.
Care and Feeding Instructions
You have successfully taken cuttings. Now the challenge is to keep them alive long enough to root. The cuttings are obviously very vulnerable at this point and must be handled with care. If you follow the steps below you should have few problems.
Once you have your cuttings in the growing medium, mist them with the spray bottle filled with water and place them in the tray. Mist the inside of the clear humidity dome and place the dome over the tray. (NOTE: The cuttings need some ventilation and a couple of small holes in the dome will usually do the trick).
Remove the dome and mist the cuttings 2 or 3 times a day. This keeps the cuttings from drying out and also changes the air under the dome. This step is critical as the cuttings have no way to replenish lost moisture until they develop roots. Mist the inside of the dome and replace on tray. The humidity under the dome needs to be about 90% until roots appear on the cuttings. (NOTE: Be careful that the air under the dome doesn’t get too warm. If it does, you may have to increase the amount of venting, as well as the number of mistings per day). Cuttings need to be kept between 72° and 80° Fahrenheit. Too hot or too cold will inhibit root growth. If you live in a cold climate you may need a heated propagation mat.
The cuttings will require lighting at this time. Dappled sunlight is fine if you are leaving your cuttings outside. Indoors, we recommend fluorescents. They are cooler and more energy efficient then metal halides and provide equal to superior results. Keep in mind that fluorescent lights don’t penetrate so you must keep the lights 1-2 inches above the plants.If you are using a Metal Halide or High Pressure Sodium fixture you must keep the cuttings much further away (2 – 3 feet away for 175 – 400 watt bulbs and 4 – 6 feet for a 1000 watt bulb).The lights should be turned on for 18 to 24 hours a day.
To water the cuttings we suggest using either plain distilled water or RO (reverse osmosis) water. It is recommended but not absolutely necessary to add a very mild fertilizer such as Olivia’s Cloning Solution or Wilder’s Clone Root Concentrate at this time. You can also use your hydroponic fertilizer at 1/4 strength. Don’t forget to adjust the pH of the water/nutrient solution at 5-5.5 for Rockwool and 5.5-6.5 for most everything else.
Water the cuttings approximately every 2 days unless you live in a very dry climate in which case you will probably need to water every day. Never let the growing medium dry out. Do not let it set in water either, or the stem will rot. A great method for watering the cuttings is to use two trays, one with holes and the other without. Fill the tray without holes about half way with water and then slowly lower the tray with the holes and the cuttings, into it. Let sit for a few moments and then slowly raise the tray back out and let it drain. Small Hydroponic systems are available to automate the watering cycles of the cuttings, greatly reducing the amount of manual labor.
After about a week you can test to see if your plants have started to root. Remove the humidity dome and leave it off for an hour or two. If the plants have not wilted at all then they probably have enough root development to support themselves. If no wilt is noticed leave the dome off. If they are wilted, spray the cuttings and dome and replace the dome on the tray. Once you have determined that the plants can support themselves, stop misting the cuttings and leave the humidity dome off. (NOTE: Once the plants have roots, constant misting can actually be harmful to the plants).
If the lower leaves start to turn yellow and die, don’t worry. This is perfectly normal. It is the plant feeding off of itself to sustain life, moving valuable nutrient and water from the older growth. Do not remove any dead growth until the plant is well rooted. If you remove the dying growth the plant can starve and die completely.
When the cuttings are completely rooted you can move them into your hydroponic system or the soil.
Final Notes
Cloning is easy once you get the hang of it. Just remember that every step must be done properly. Skipping a small, seemingly insignificant step can have very significant consequences. We suggest that the first time you take cuttings, take twice as many as you need. With a little practice this method of propagation should produce a 95 to 100 percent success ratio.
The use of distilled or RO water can drastically increase your success ratio, especially if you don’t have good quality water where you live. Do not continue using distilled water once the plants have gone into the hydroponic system or soil as it can lead to mineral deficiencies. RO or other chlorine/chloramine free water should be used at this time.
This is one tried and true method of propagation that works well on most types of plants. There are several other ways to clone your plants, including, air layering, dividing, and tissue culture. There are even hydroponic systems that do a good job of rooting cuttings using no growing medium at all. Once the cuttings form roots you simply transplant them to whatever growing medium you will be using.
BudBox PRO White XL-HL 1.2m x 1.2m x 2.2m: The Budbox HL range features tents that are 20cm higher than the standard Budboxranges, with all of the features that make Budbox tents the most trusted name in the indoor grow tent market.
BudBox Pro – superbly designed and constructed, premier grow tents
Pro White material offers class leading PAR results
Strong, powder-coated 25mm steel framework
Metal, click-lock connectors for enhanced structural strength and long-term stability
Creates a sealed area that locks in light, smells and sounds
Tough, thick, durable yet lightweight outer shell that’s easy to fit in minutes
Features a green tinted viewing window, to keep a close eye on your growing environment without unzipping the door
Intake and extraction ports with tightening drawstrings attached, large enough for acoustic ducting
Military-grade, high-quality zips
Large ventilation panel/s for increased passive air flow
BudBox™ is still the ONLY grow tent that takes the time and care to powder coat their poles and connectors, delivering the best possible anti-corrosion protection and a very clean and reflective look.
Let’s talk about light. You plants need PAR light to grow and flower. PAR is an acronym for Photosynthetic Active Radiation; plants love the blue and red light from 400 to 750nm. Blue light tends to help the plants grow strong leaves and stems and the red part helps with flowering. BudBox™ Pro–White models reflects more PAR than Mylar material and at the same time reduce troublesome hot spots (concentrated heat energy) and, as such, will always the professional’s choice when it comes to horticulture. Not only is the flat white material reflecting more PAR light directly to your plants it reflects less of the overall unused spectrum. With light energy comes heat energy and the Pro-white lining will always run cooler than a standard Mylar tent. The Mylar material will reflect more heat energy, therefore, will run hotter (around 6-8degC) as such, the these units require greater ventilation, or the use of less powerful lighting, so the environment does not overheat and damage your plants.
Its formula provides optimum development throughout the growth-stage to obtain greener, stronger and more resistant plants.
Grow faster, greener and more vigorous than ever.
Ideal for the production of cuttings.
The easy assimilation of nutrients and the high Nitrogen content provides plants with a more robust and branched structure.
The great thickness of the leaves accumulates more reserves, stimulating rapid rooting of cuttings.
Green House Powder Feeding can be used on every medium.
Ideal for:
Lettuce
Ficus Benjamina
Azaleas
Erica Carnea
All kinds of young and herbaceous plants
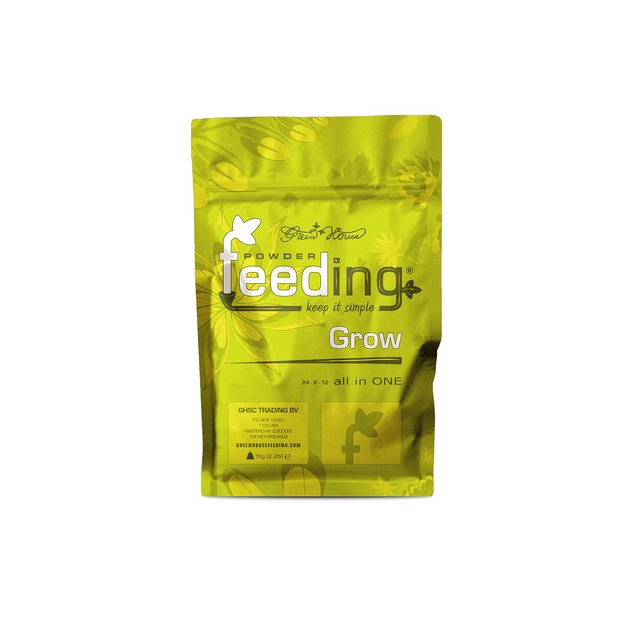
Packet Sizes: 1Kg and 500g
The feeding schedule is slightly different and if using anything than soil we recommend using a PH- and EC-meter in order to achieve the desired values and have full control over your feeding solution.
Easy Grower
If you grow on pre-fertilized soil we recommend starting using Powder Feeding 2-4 weeks after planting the seeds and to start with a mild solution (0.25g per Liter).
During the vegetative stage you can increase the feeding up to 0.5g per Liter.
With the beginning of the flowering stage you should slowly increase the amount of Powder Feeding until you reach 1g per Liter.
Following this schedule, there should usually be no problem and growers will achieve a good yield.
Experienced Grower
Experienced growers usually measure their feeding solution to provide the plants with the exact amount of nutrients and the correct pH value of the solution.
Whether you grow in coco, hydroponics or aeroponics – with all of these systems you should measure your pH and EC values.
When using a pH and EC meter you can optimize your growing and achieve much better results.
Steps of mixing nutrient solution:
1. a) Check pH and EC value of the water and make sure the temperature is about 18-22 degrees Celsius. You should also check if your water contains enough Calcium.
1. b) If your EC is 0,0 (using RO or rain water) you need to add Calcium to your water before adding Powder Feeding. Make sure your EC rises up to 0.3-0.4 EC
2. Add Powder Feeding and mix well for 2-3 minutes, and then measure the EC value. If necessary repeat until you reach the desired value.
3. When you reached the desired EC value, wait for 15-30 min.
4. Then measure the PH and if necessary adjust it using PH up or PH down – mix good for 2-3 minutes and wait again 15-30 minutes before measuring.
5. When you reached the desired values, feed your plants.