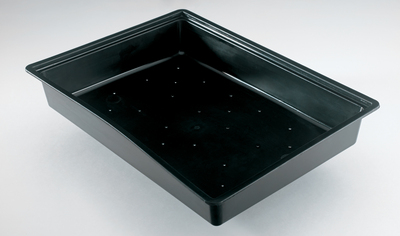
Sowing Tray With Holes
R65.00
In stock
Description
Sowing Tray With Holes. These multi-purpose Sowing Trays are perfect for cultivating micro greens and sprouting seeds in a range of grow media.
Holes are 4mm
35cm x 48cm x 7cm
Ideal for Micro Herbs
-
Growing Microgreens
Microgreens are simply greens, lettuces, and herbs that are harvested when they are quite young — generally when they are approximately 5 – 10cms tall.
What Can You Grow as a Microgreen?
Basically, you can grow any lettuce, salad green, or herb as a microgreen. It’s easy to start with a pre-packaged seed mix. We have an Eden Seeds mix which contains Cabbage, Broccoli, Cress, Kale, Mizuna, Mustards Red and Green, Radish, Tatsoi.How To Grow Microgreens
Microgreens are very easy to grow. You can grow them outside, in a garden bed or in containers, or inside on a sunny windowsill.If you are planting microgreens in a garden bed, loosen the soil and rake it smooth. Scatter your seed mix so that the seeds are about 5mm apart — remember, we’re harvesting them very young, so they don’t need a lot of room. Once the seed is scattered over the area, cover it with about 5mm of soil and water gently but thoroughly.
If you’re planting in a container, the first step is to choose a container that is at least five centimeters deep and as large in diameter as you want. Fill it with a good quality organic potting mix, and smooth the soil. Scatter the seeds so that they are about 5mm apart, and cover with about 5mm of soil. Water gently but thoroughly, and place your container in a spot where it will get at least four hours of sunlight.
In either case, do not let the soil dry out, and be sure to remove any weeds so that the tiny greens don’t have to compete with them for water and nutrients. Because you’ll be harvesting the greens so young, you don’t really need to fertilize them while they’re growing. If you’ve got plenty of organic matter in your garden bed, that will be perfect. Microgreens grow for such a short period of time that they are rarely bothered by pests and diseases. However, if you are growing brassicas in your mix (mustard, kale, etc.) and cabbage worms are a problem, you may want to cover your microgreens with a net (a piece of old curtain mesh is ideal) cover to protect them.
Harvesting Microgreens
The best time to harvest microgreens is when they’ve developed their first set of true leaves (the first ones are seed leaves, and don’t look anything like the actual leaves of the plant), which is generally about ten days to two weeks after planting. To harvest, simply snip the microgreens just above soil level.Unlike mesclun or baby greens, you won’t be able to get additional harvests from one planting of microgreens. Because the plants haven’t had much time to develop, and you’re snipping off everything except the very bottom of the stem, the plant has no way to generate new growth. You can plant another crop after harvest by simply scattering fresh seed and covering it with soil. You don’t need to remove the old roots; they are good sources of organic matter.
As you can see, microgreens are simple to grow, and provide you with a quick harvest for not much work. You can add them to salads, sandwiches, or stir-fries, and it’s much cheaper to grow your own than it is to purchase them. Experiment with different mixes, adding the varieties you like best. They’re definitely deserving of a spot in your garden.
Get your Sowing Tray With Holes today!